
1. Introduction
2. Understand Items, Kits, iSKU And Parent iSKU
3. Perform Bulk Inventory Linking
4. Create Kit (If Only You Have Combo Product)
5. Link Kit (If Only You Have Combo Product)
6. Perform Stock Adjustment (Optional)
7. Bulk Tally All Channels Inventory
1. Introduction
Congratulations on completing SiteGiant Pre-Onboarding! This Onboarding 1: Inventory tutorial will cover some basic information and steps of SiteGiant Inventory Management. You will learn about Inventory Items, Kits, Inventory Linking, and Stock Adjustment.
2. Understand Items, Kits, iSKU And Parent iSKU
Items
• Items are any goods or products that are stored in a warehouse.
• It records your item info such as Item Name, Price, Cost, Weight, Dimension, Warehouse Info, and most importantly Stock Quantity.
• If your items are selling in multiple sales channels, you must ensure they are linked with the same inventory item to centralize the stock quantity.
• For example, you are selling a T-shirt of 2 colors in 1 product listing: Green and Orange. In Inventory, the Green T-shirt is an item, and the Orange T-shirt is another.
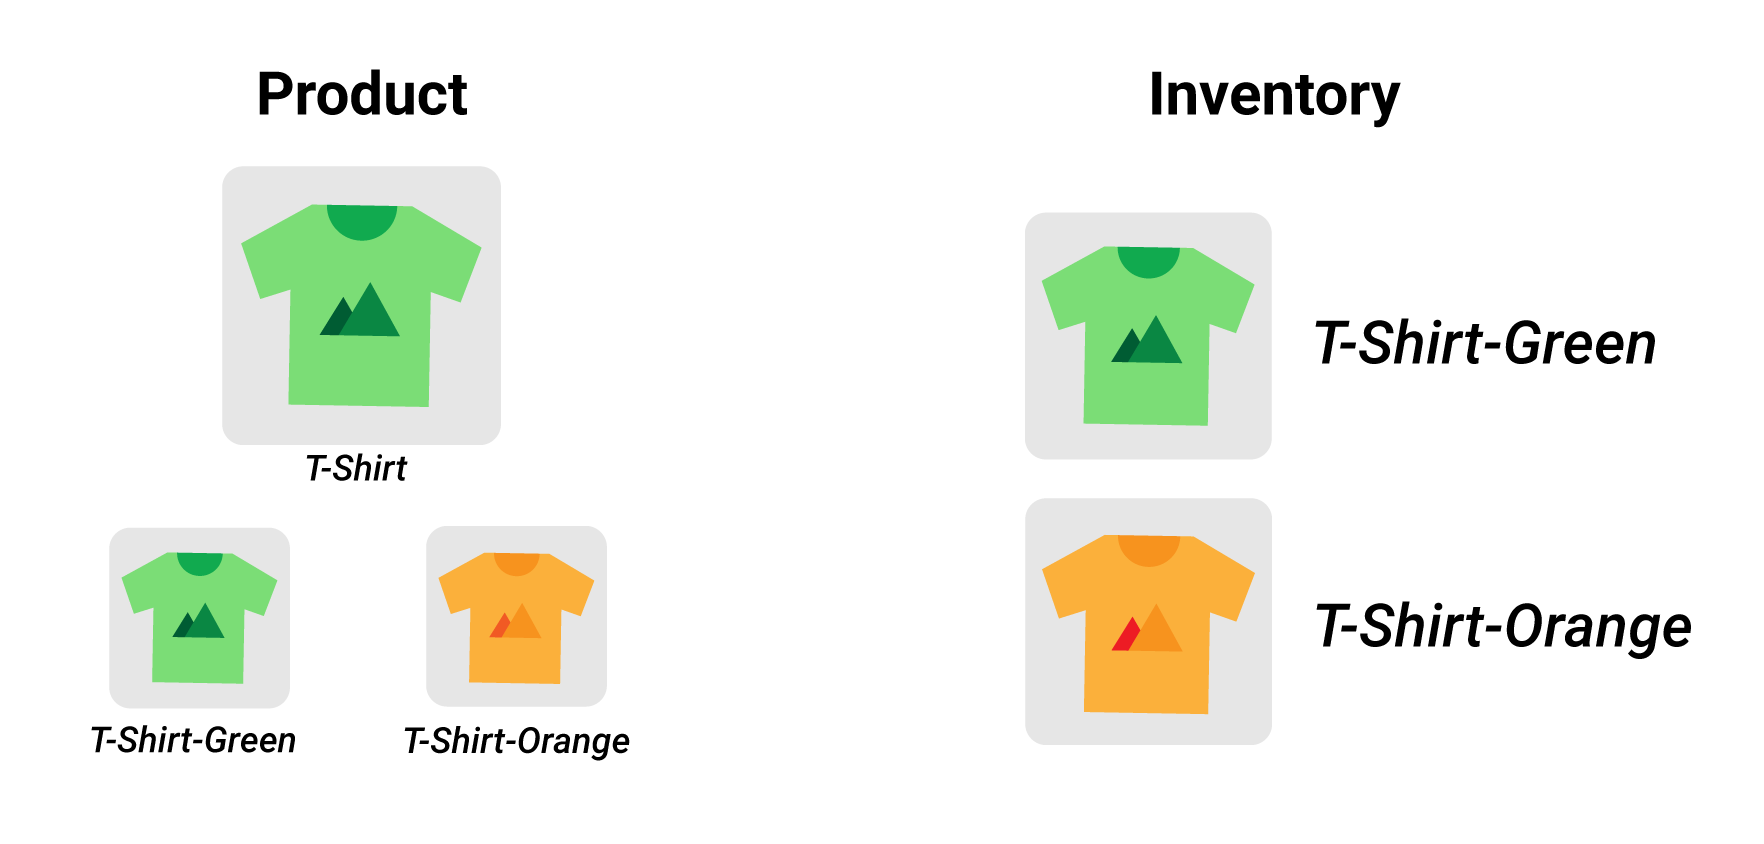
Kits
• Combine several Items, or multiple quantities of an Item, to sell as one bundle product on marketplaces.
• Remember that on the last Pre-Onboarding guide, you must list your combo product with the SKU in an Excel sheet? You will be using it to create Kits on the steps later.
iSKU
• iSKU means Inventory SKU that is only used in SiteGiant ERP.
• Unique code assigned to specific items or kits to manage the inventory.
• When you perform Bulk Inventory Linking, the system will generate an iSKU based on your product SKU.
Parent iSKU
• Parent iSKU is used to group multiple iSKU.
• With Parent iSKU, you can tally inventory levels and update product pricing to all the associated channels.
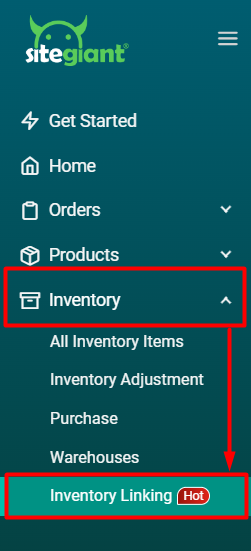
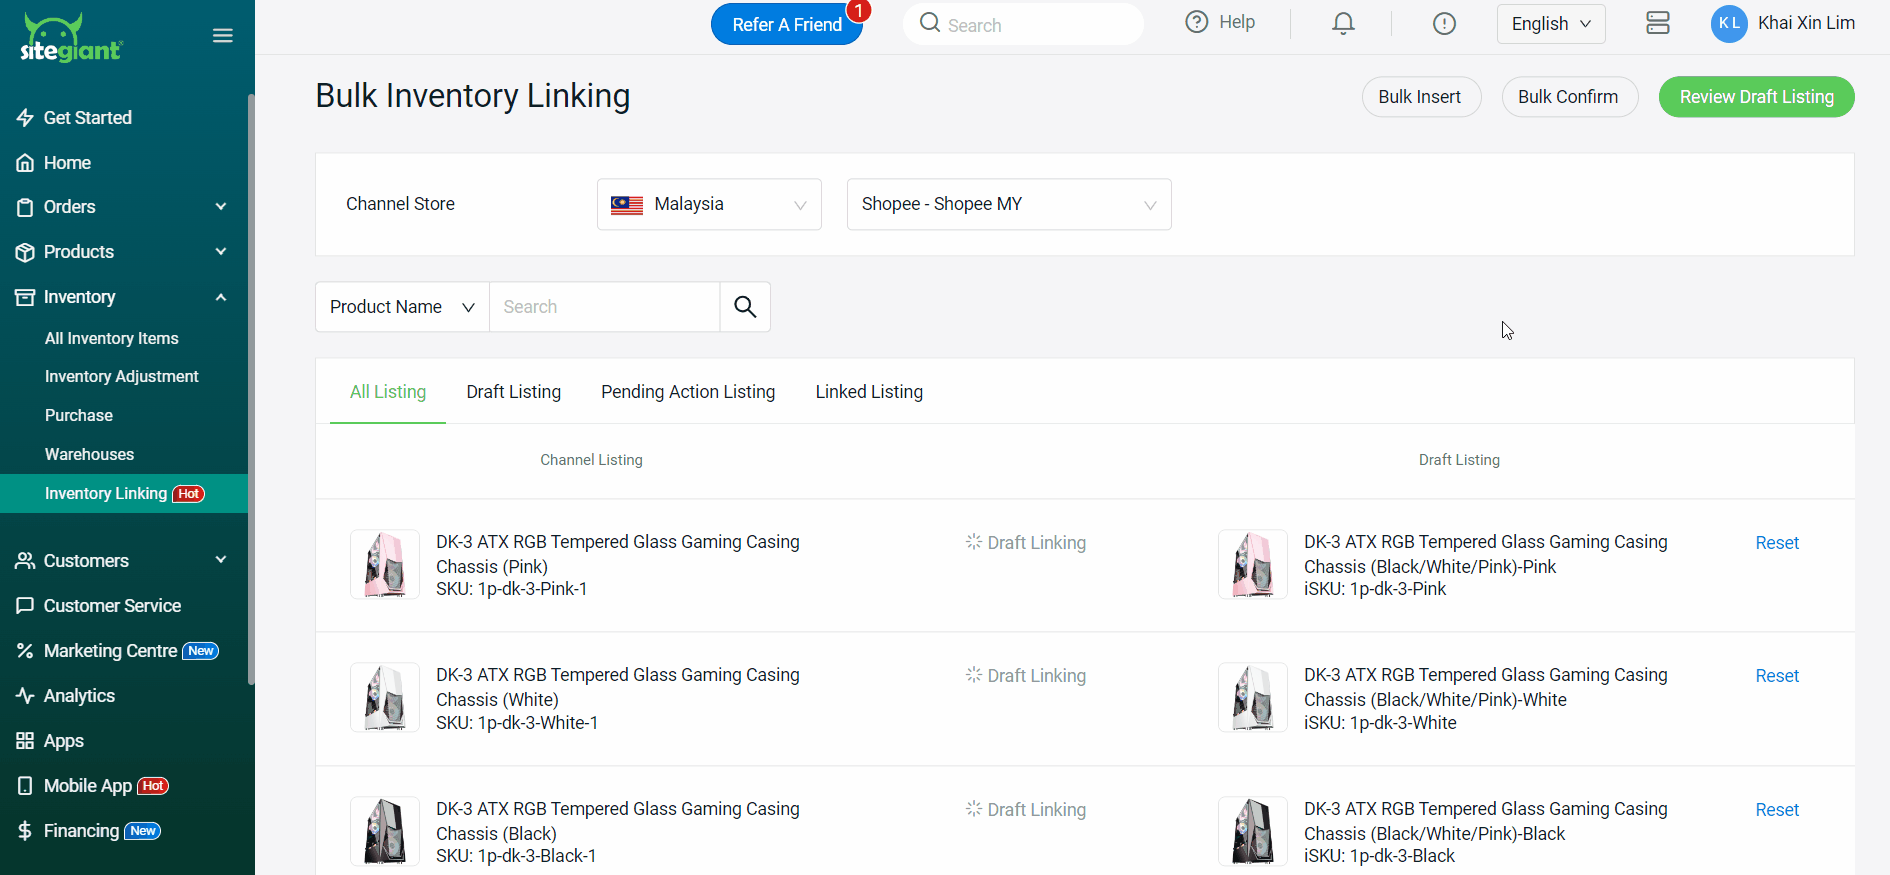
3. Perform Bulk Inventory Linking
Step 1: Navigate to Inventory on the sidebar menu > Inventory Linking.
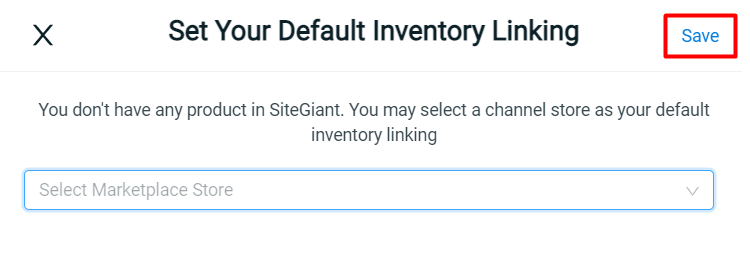
Step 2: If you don’t have any inventory products in SiteGiant, a pop-up will appear for you to select a default marketplace store > select the store with the most completed product listing > Save.
Step 3: Back to Inventory Linking > select the default store you selected in Step 2 > all the products will be in Draft Linking status.
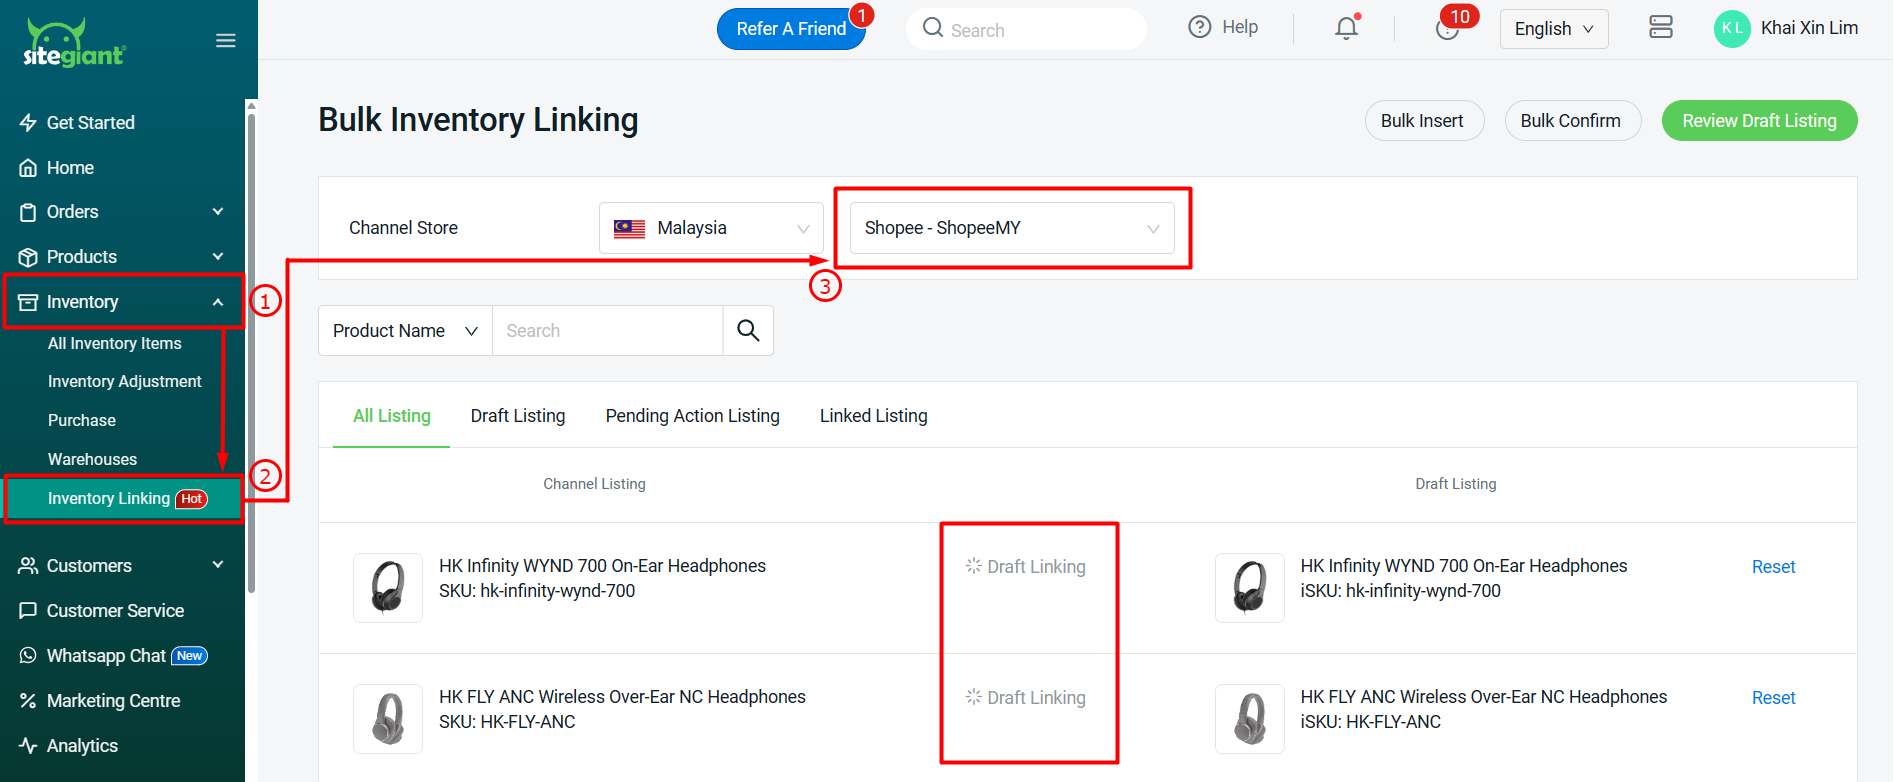
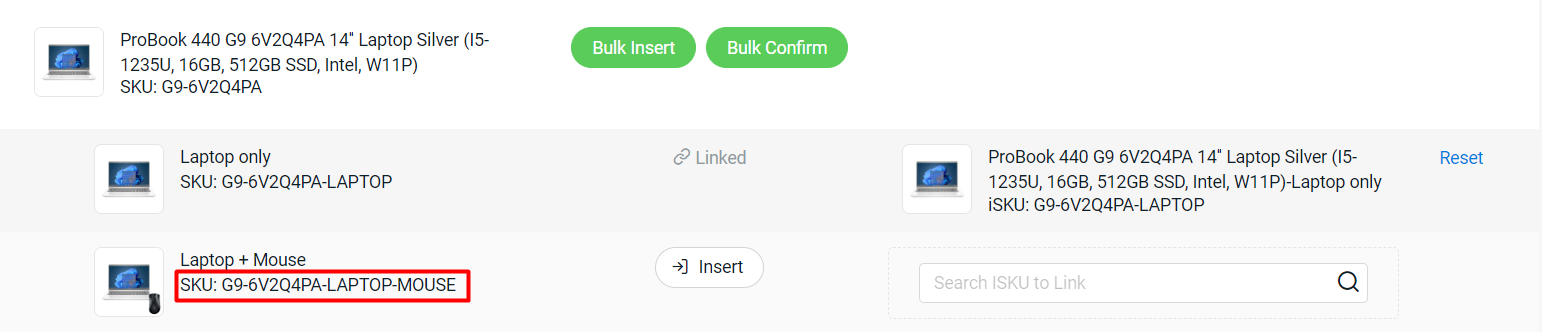
Step 4: Refer to the Excel sheet you listed down the Multi-Listing products, search the products > click Reset and link it with the primary product SKU. (If only you have Multi-Listing product)
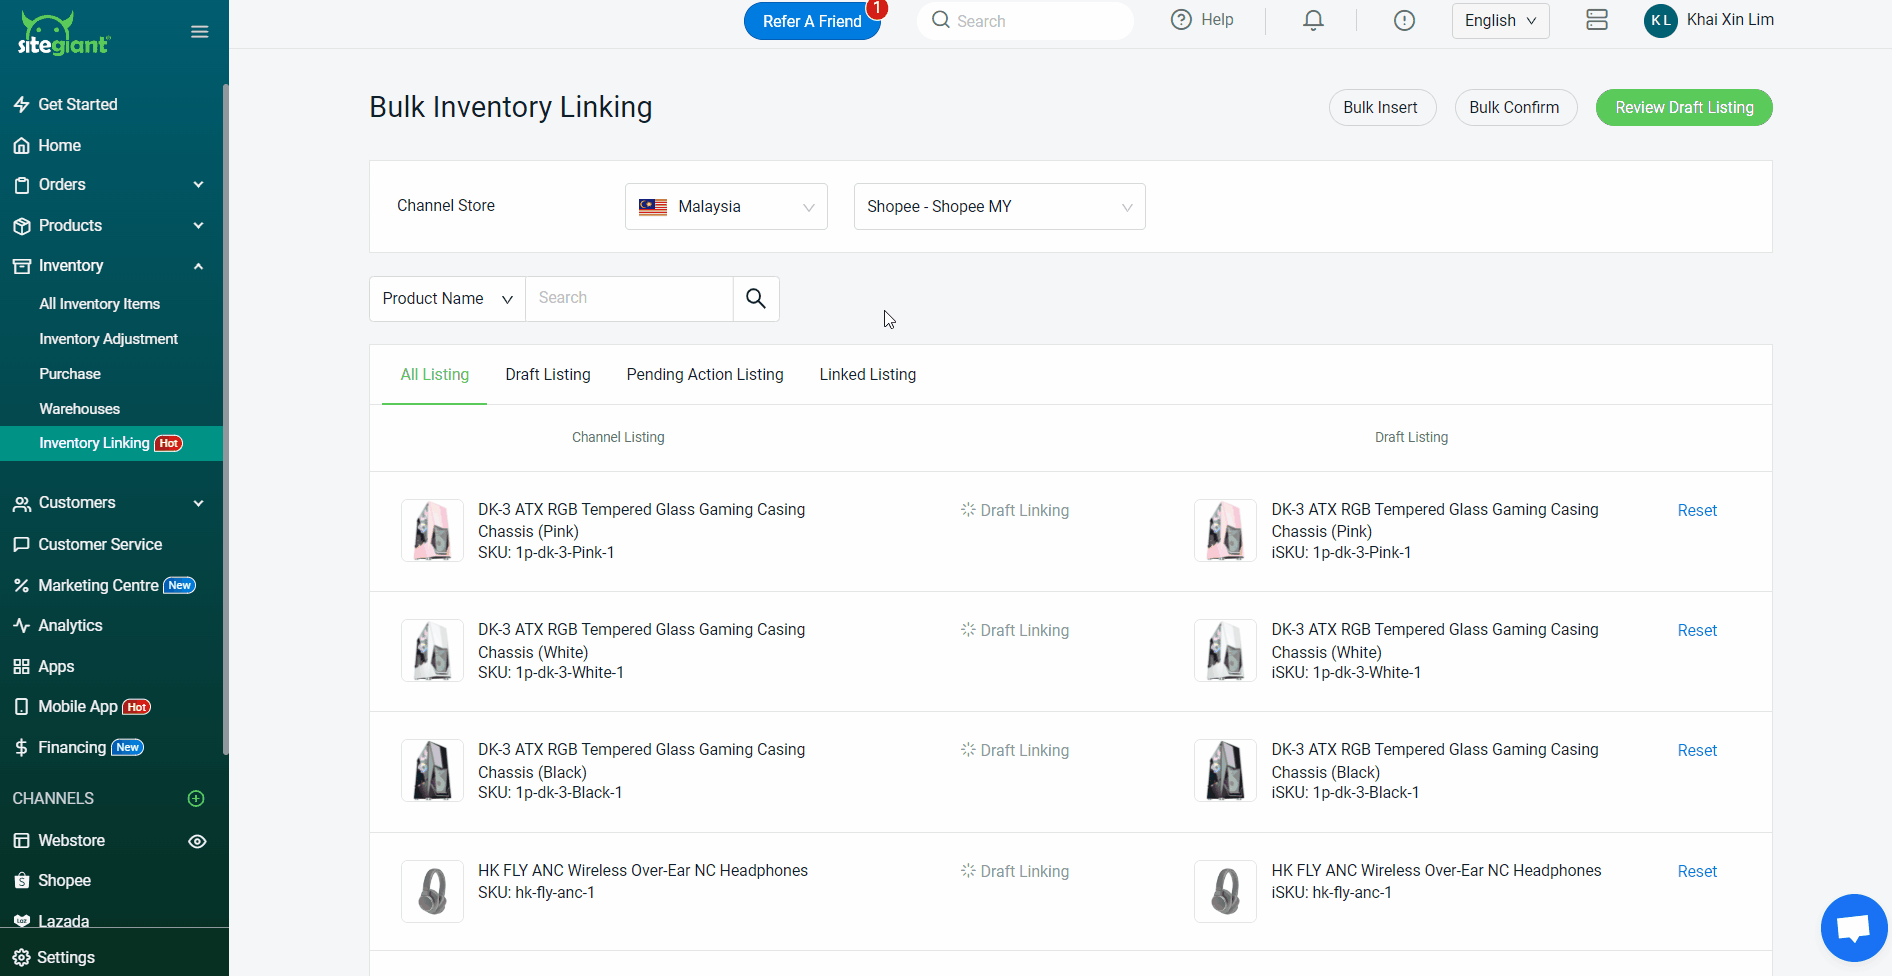
Step 5: Refer to the Combo products listed in the Excel sheet, search the products > click Reset to remove the linking because combo products must be handled separately using Kits. (If only you have Combo product)
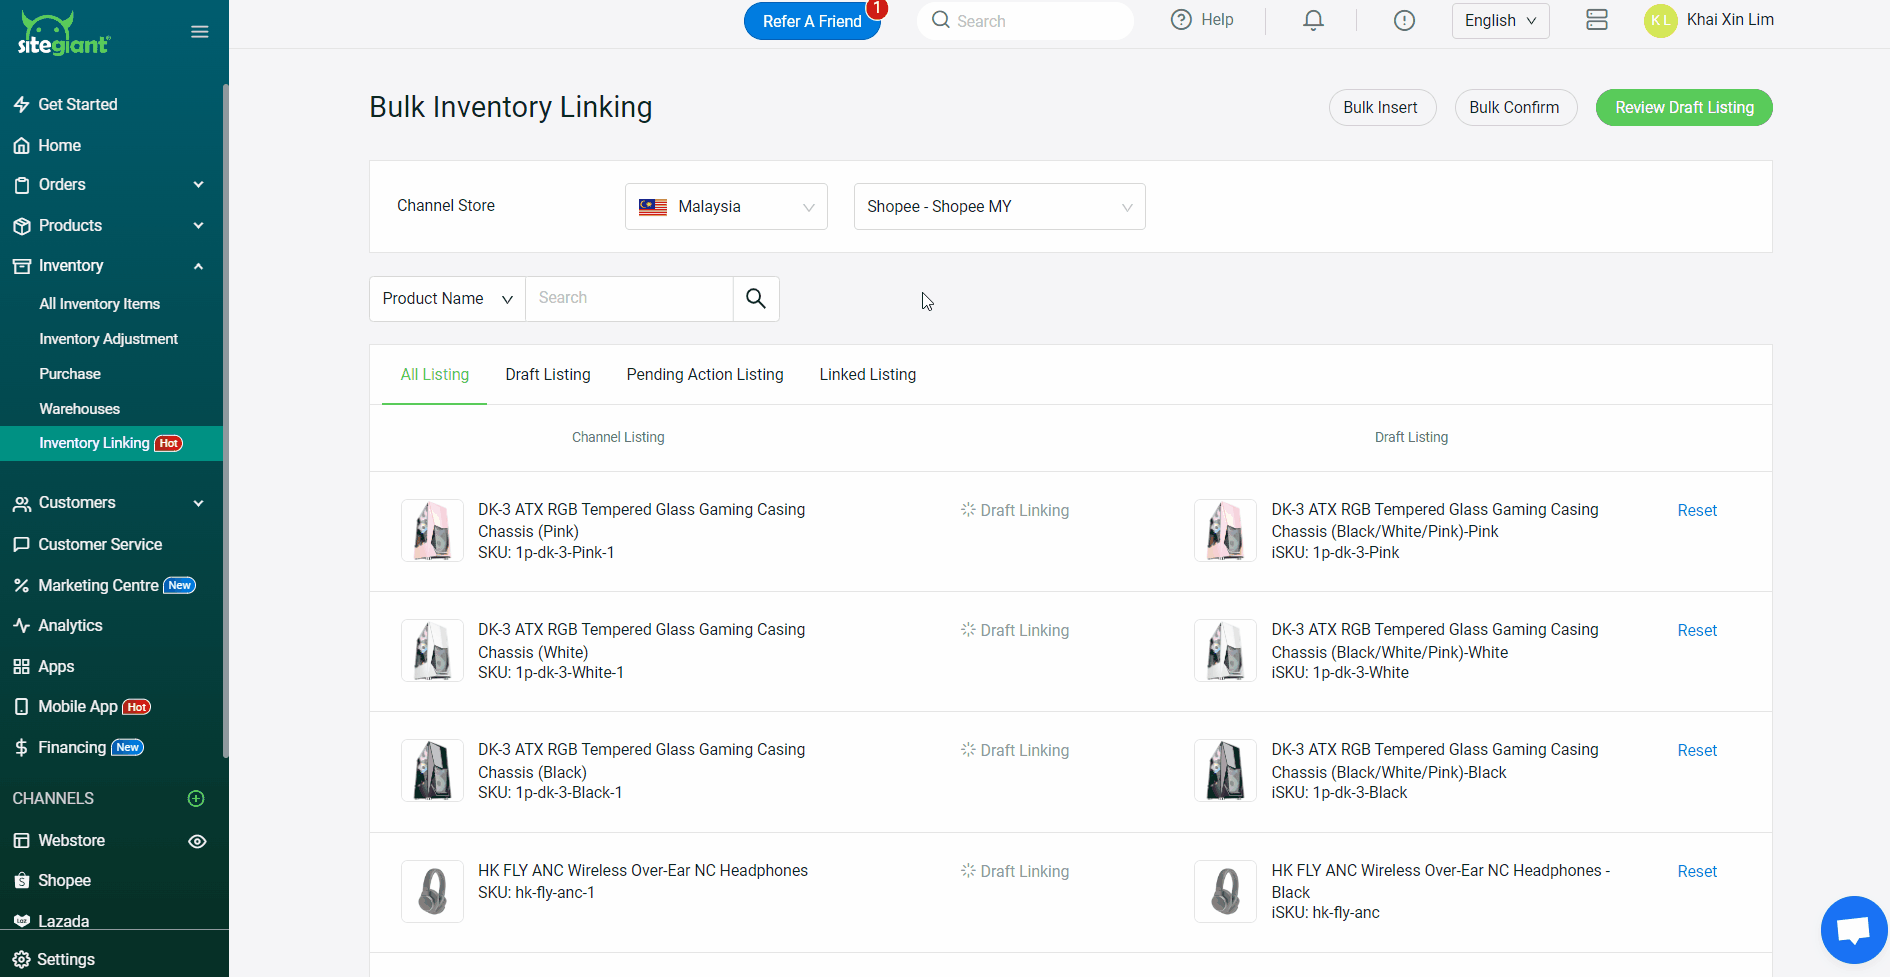
Step 6: Click Review Draft Listing > review and check the linking > click Confirm And Save Listing.
4. Create Kit (If Only You Have Combo Product)
Step 1: Navigate to Inventory > All Inventory Items > click + Add New Item > Add Kit.
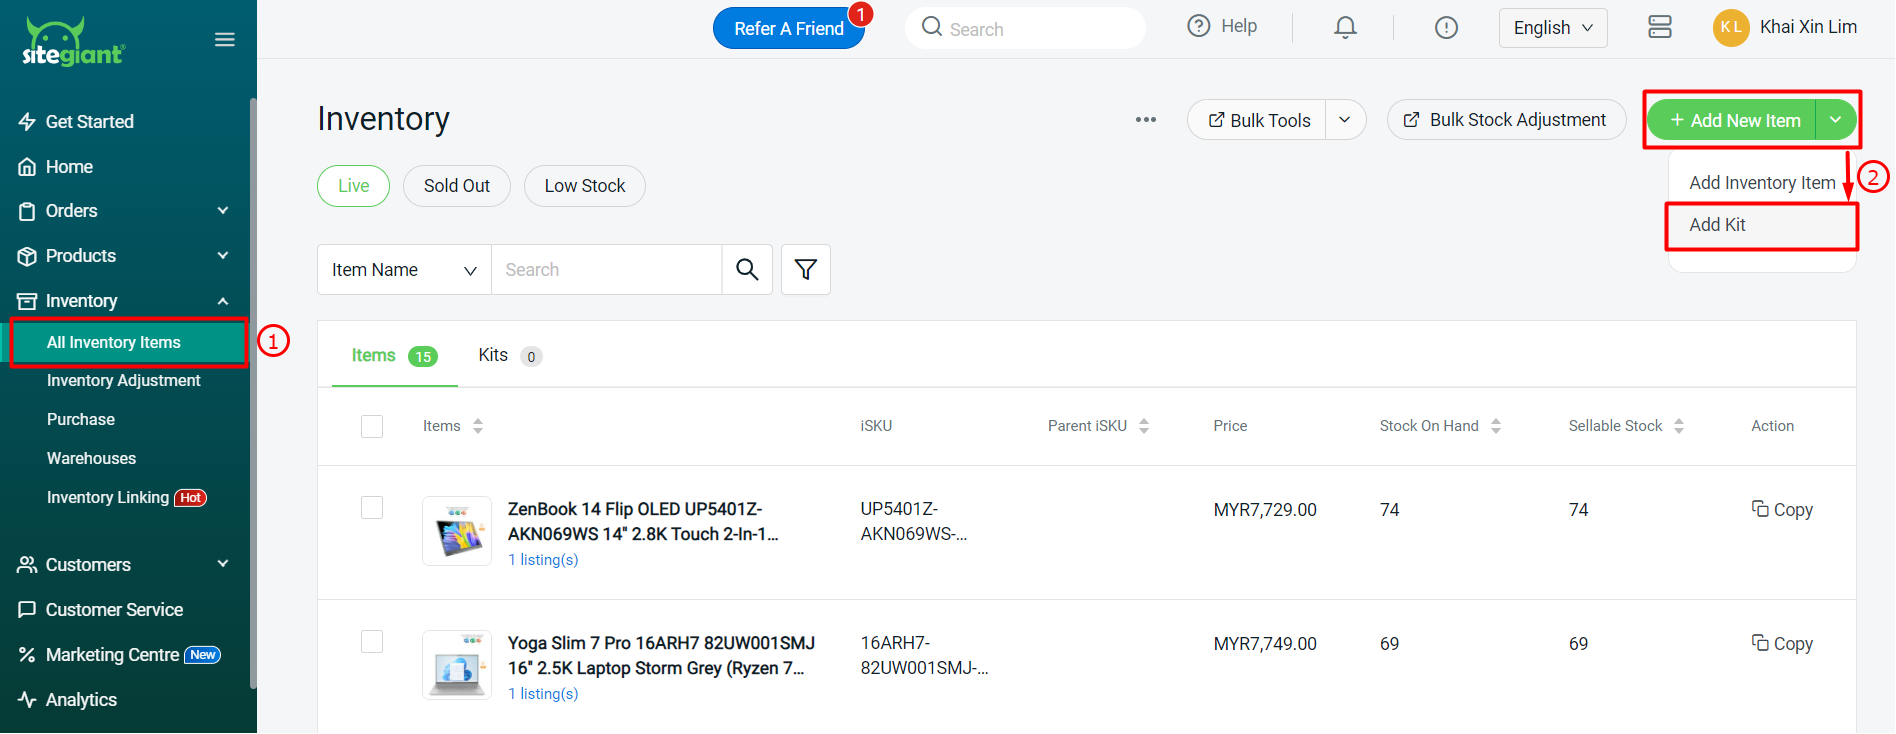
Step 2: Fill in the Kit Info accordingly.
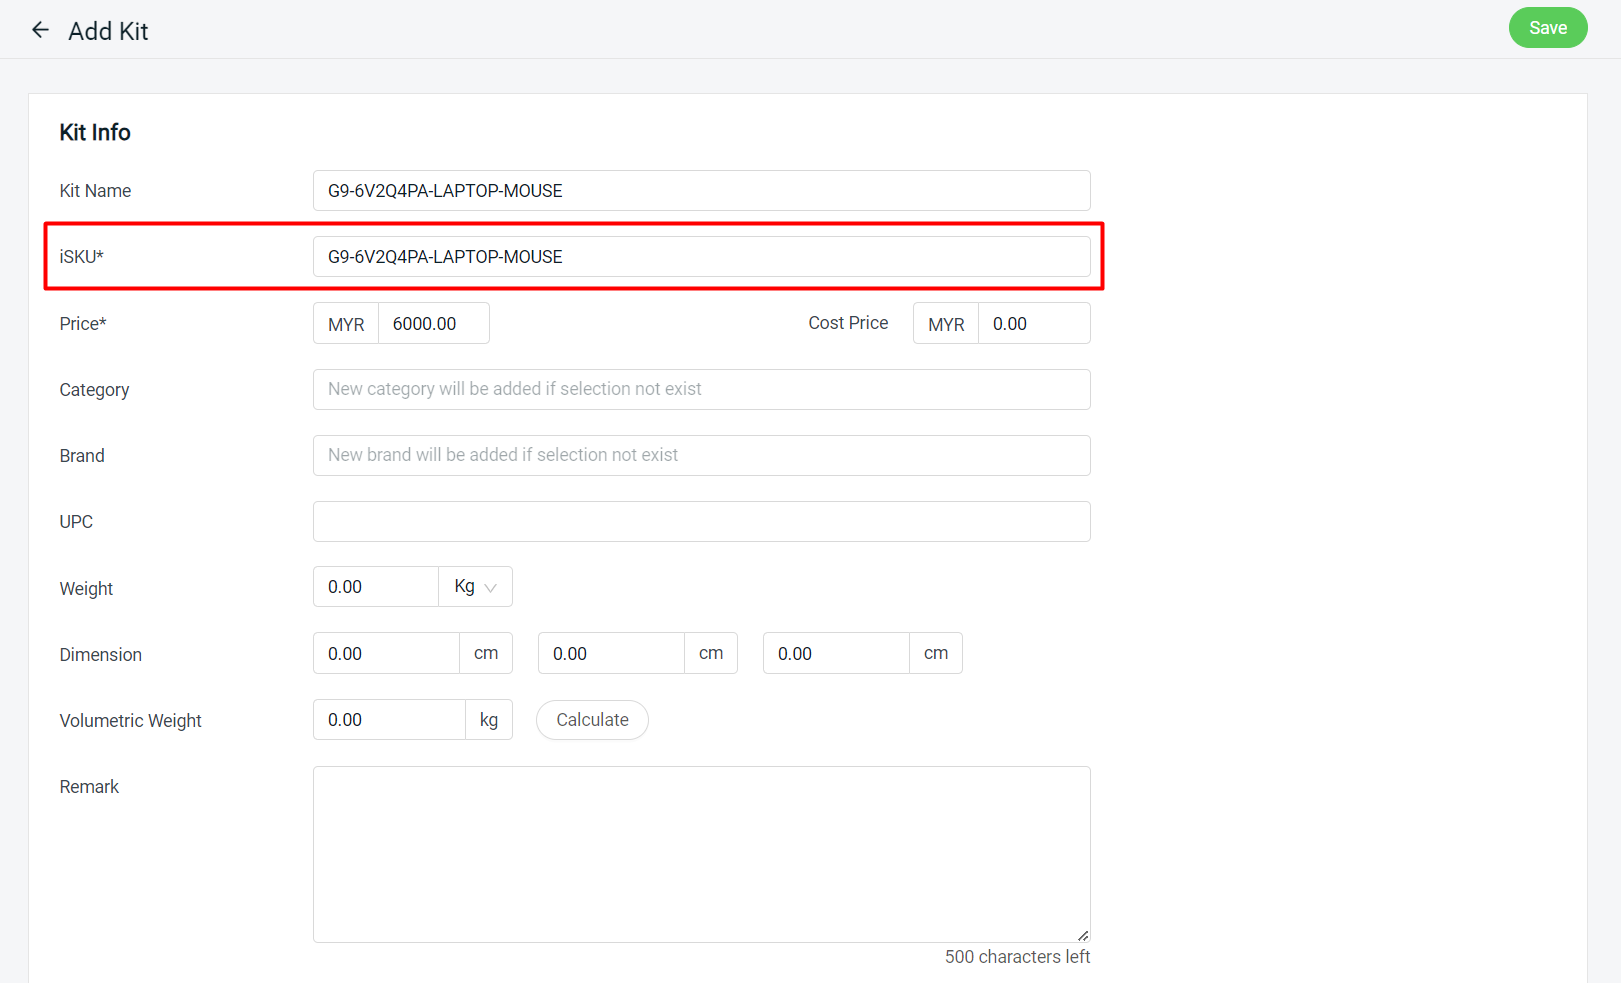
📌Note: Kit info with * is required to fill in. Kindly fill in the iSKU as your Combo Product SKU.
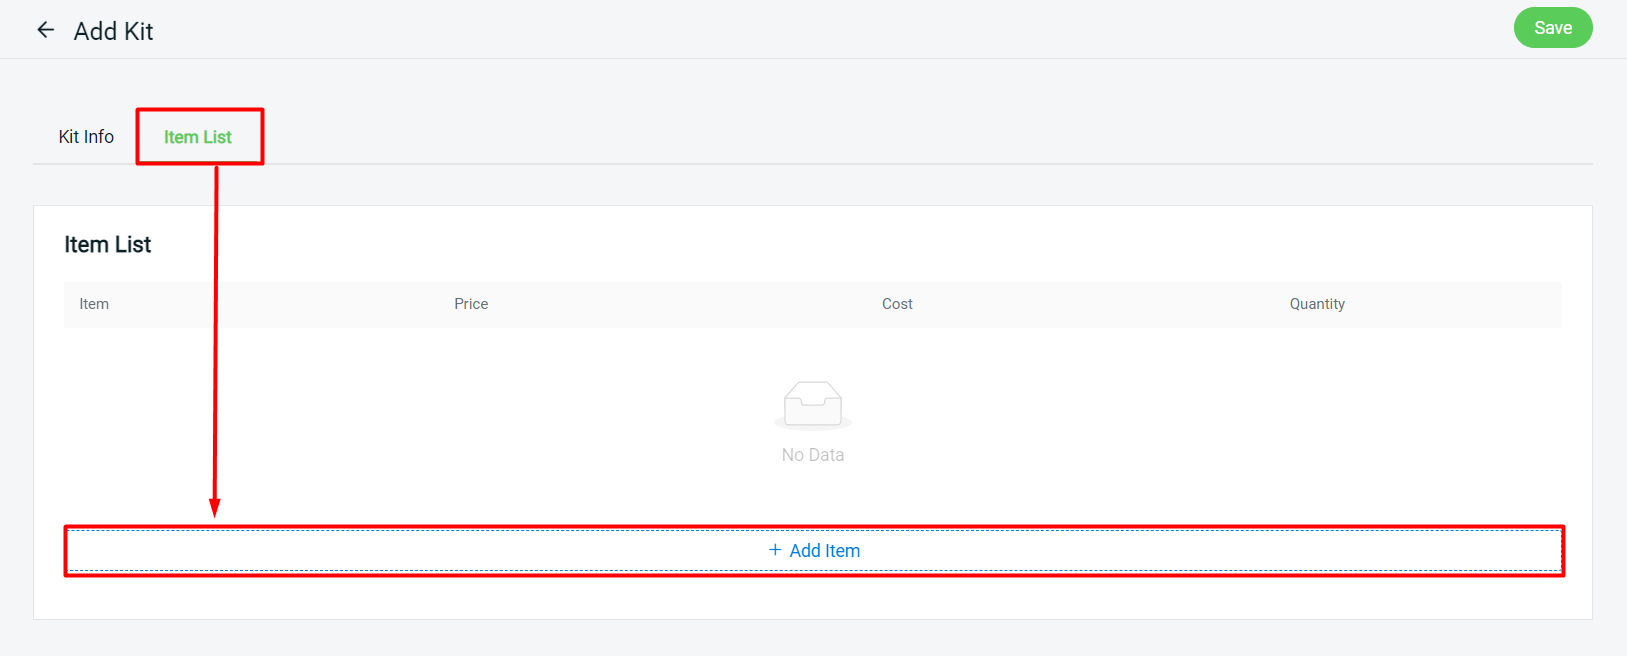
Step 3: Under the Item List tab, click + Add Item to add the items in the combo.
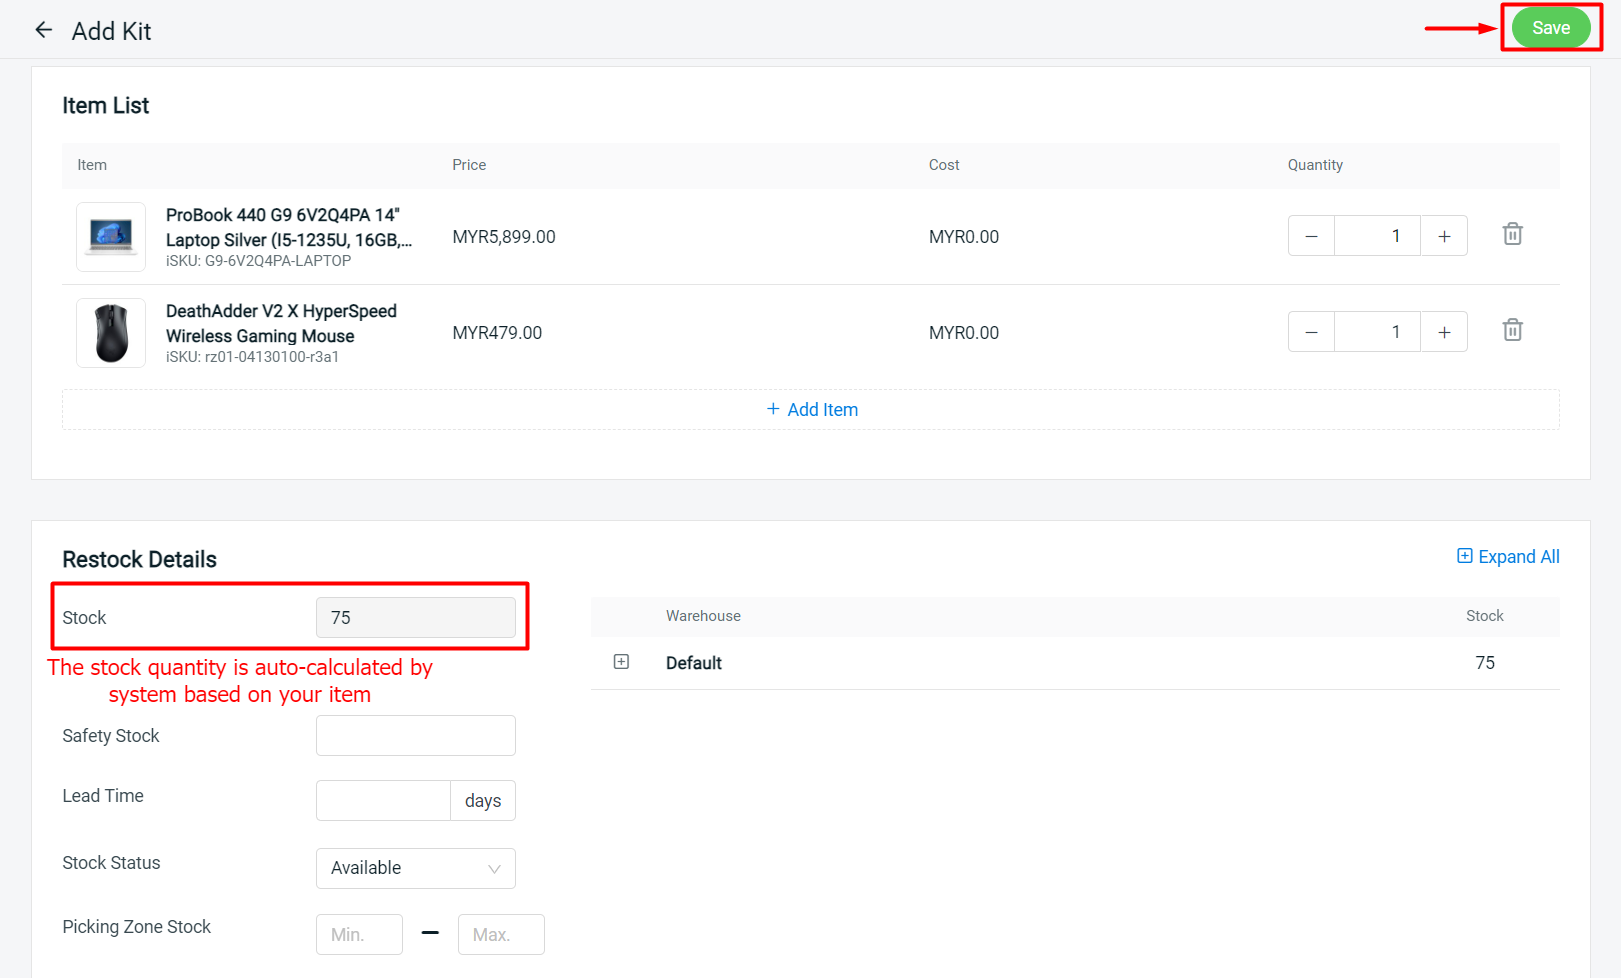
Step 4: Once you add the items and adjust the quantity, click Save on the top right.
5. Link Kit (If Only You Have Combo Product)
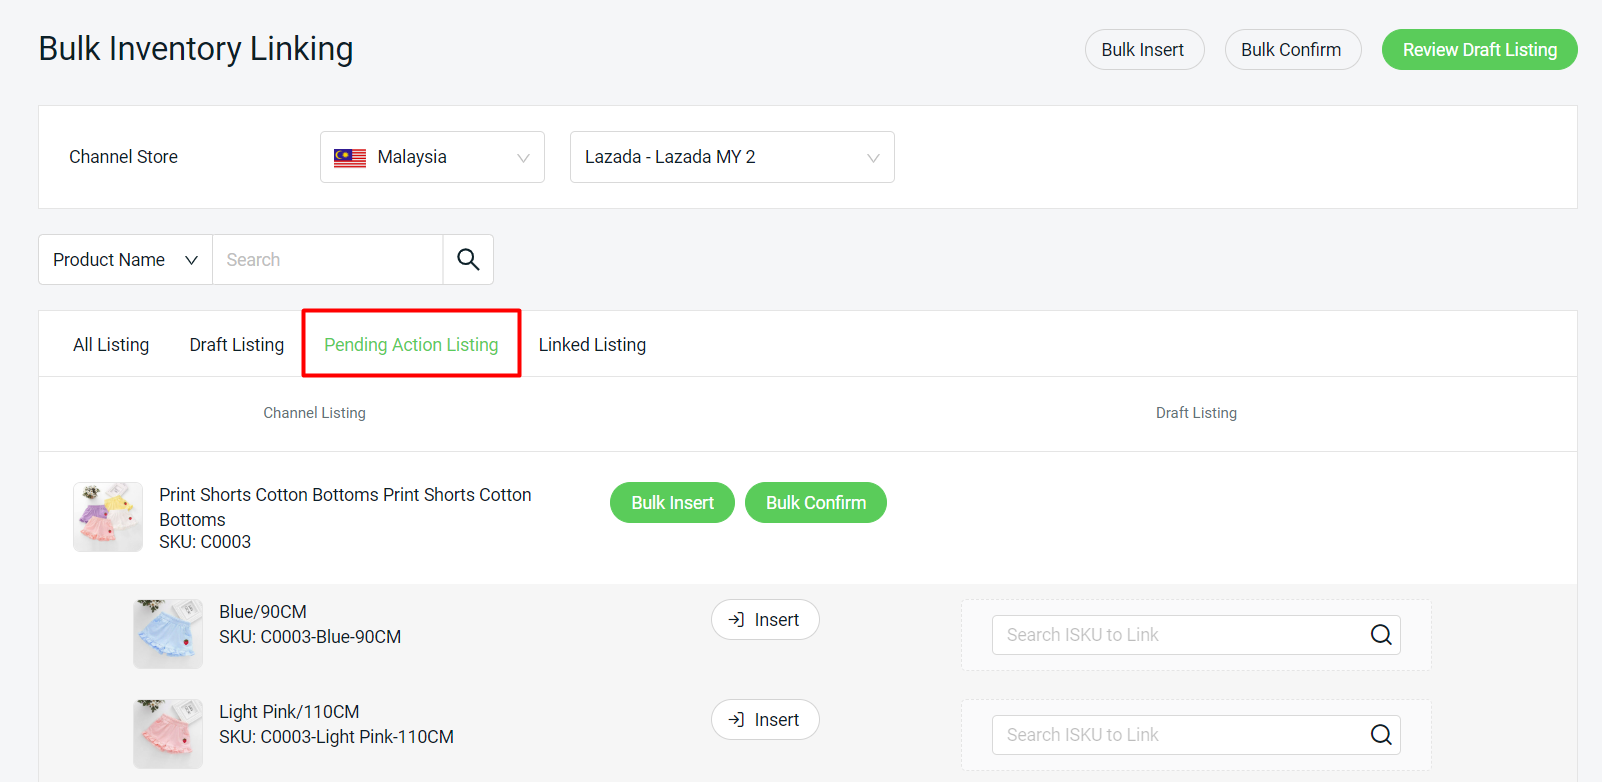
Step 1: Once done create the Kits for all the Combo products, go back to Inventory Linking > select the default store you selected in the steps above > go to the Pending Action Listing tab.
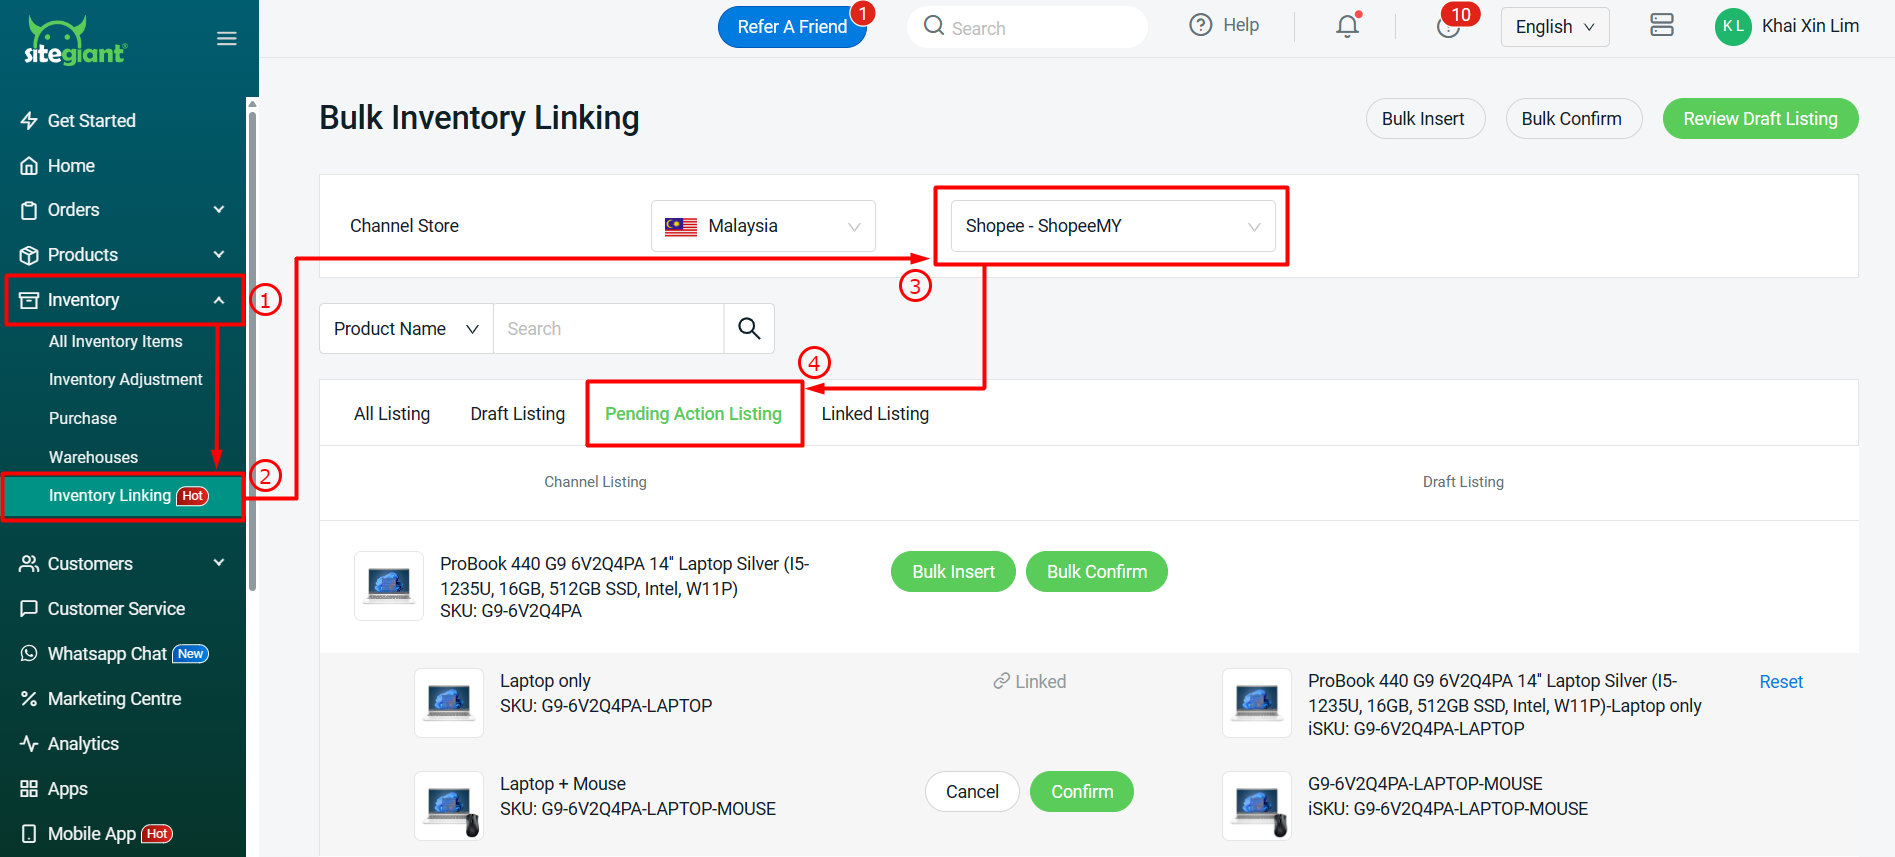
Step 2: The product and inventory item will match automatically when the SKU and iSKU are the same, click Bulk Confirm on the top to confirm the linking for all the products.
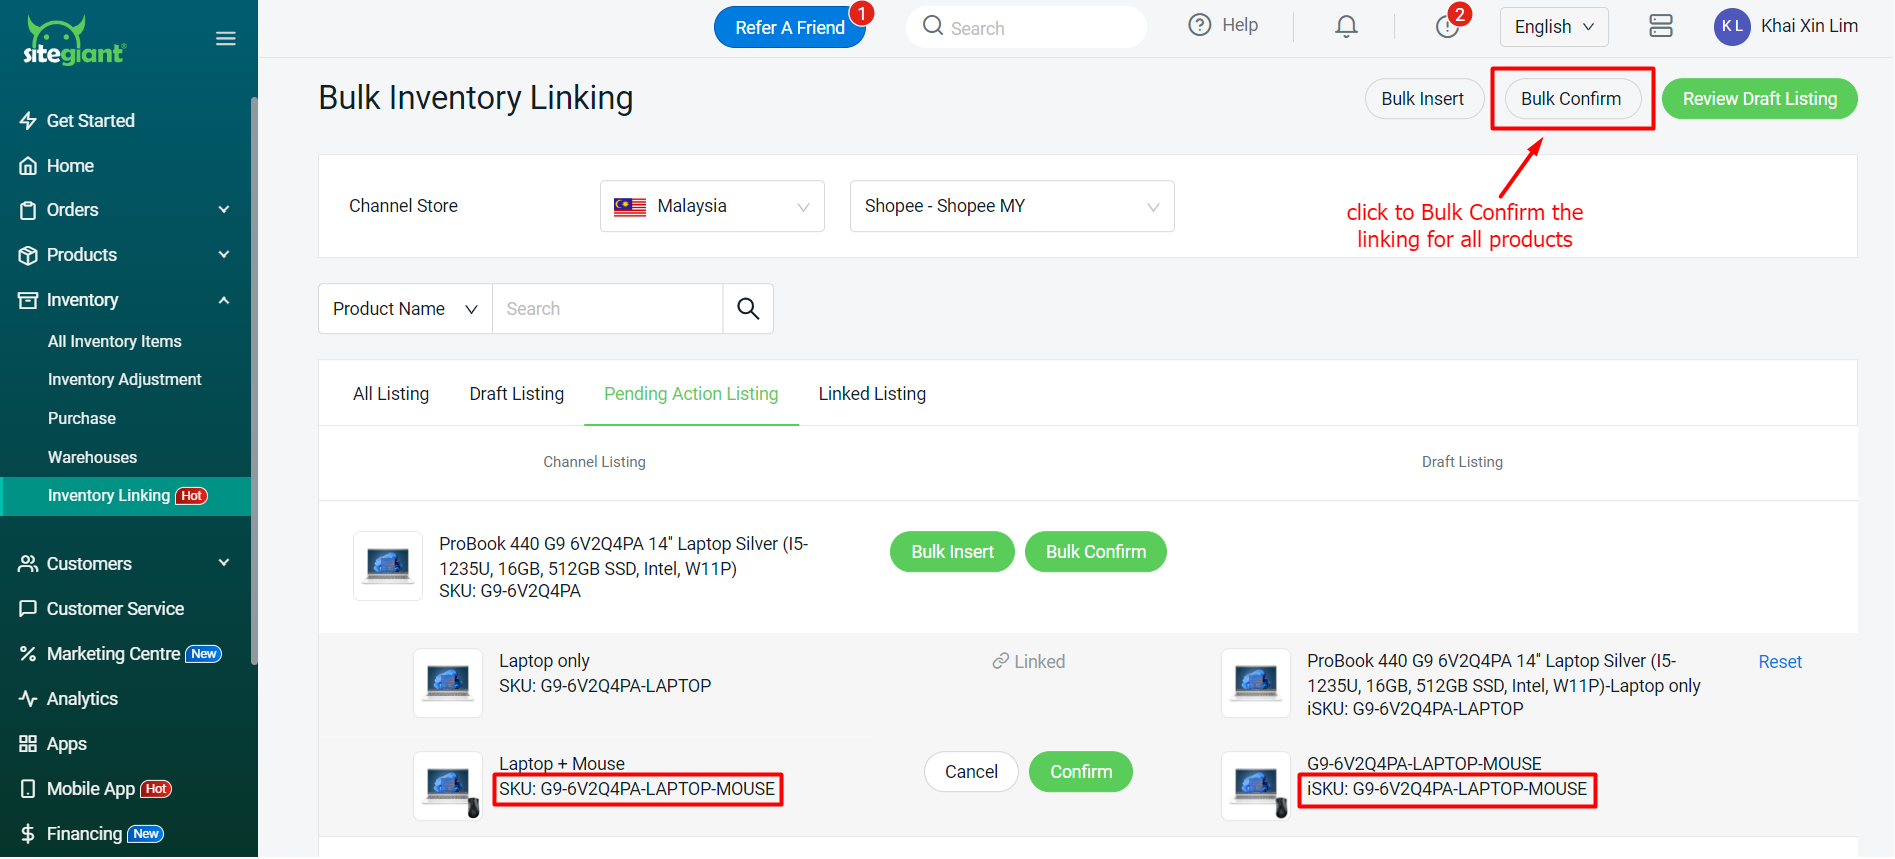
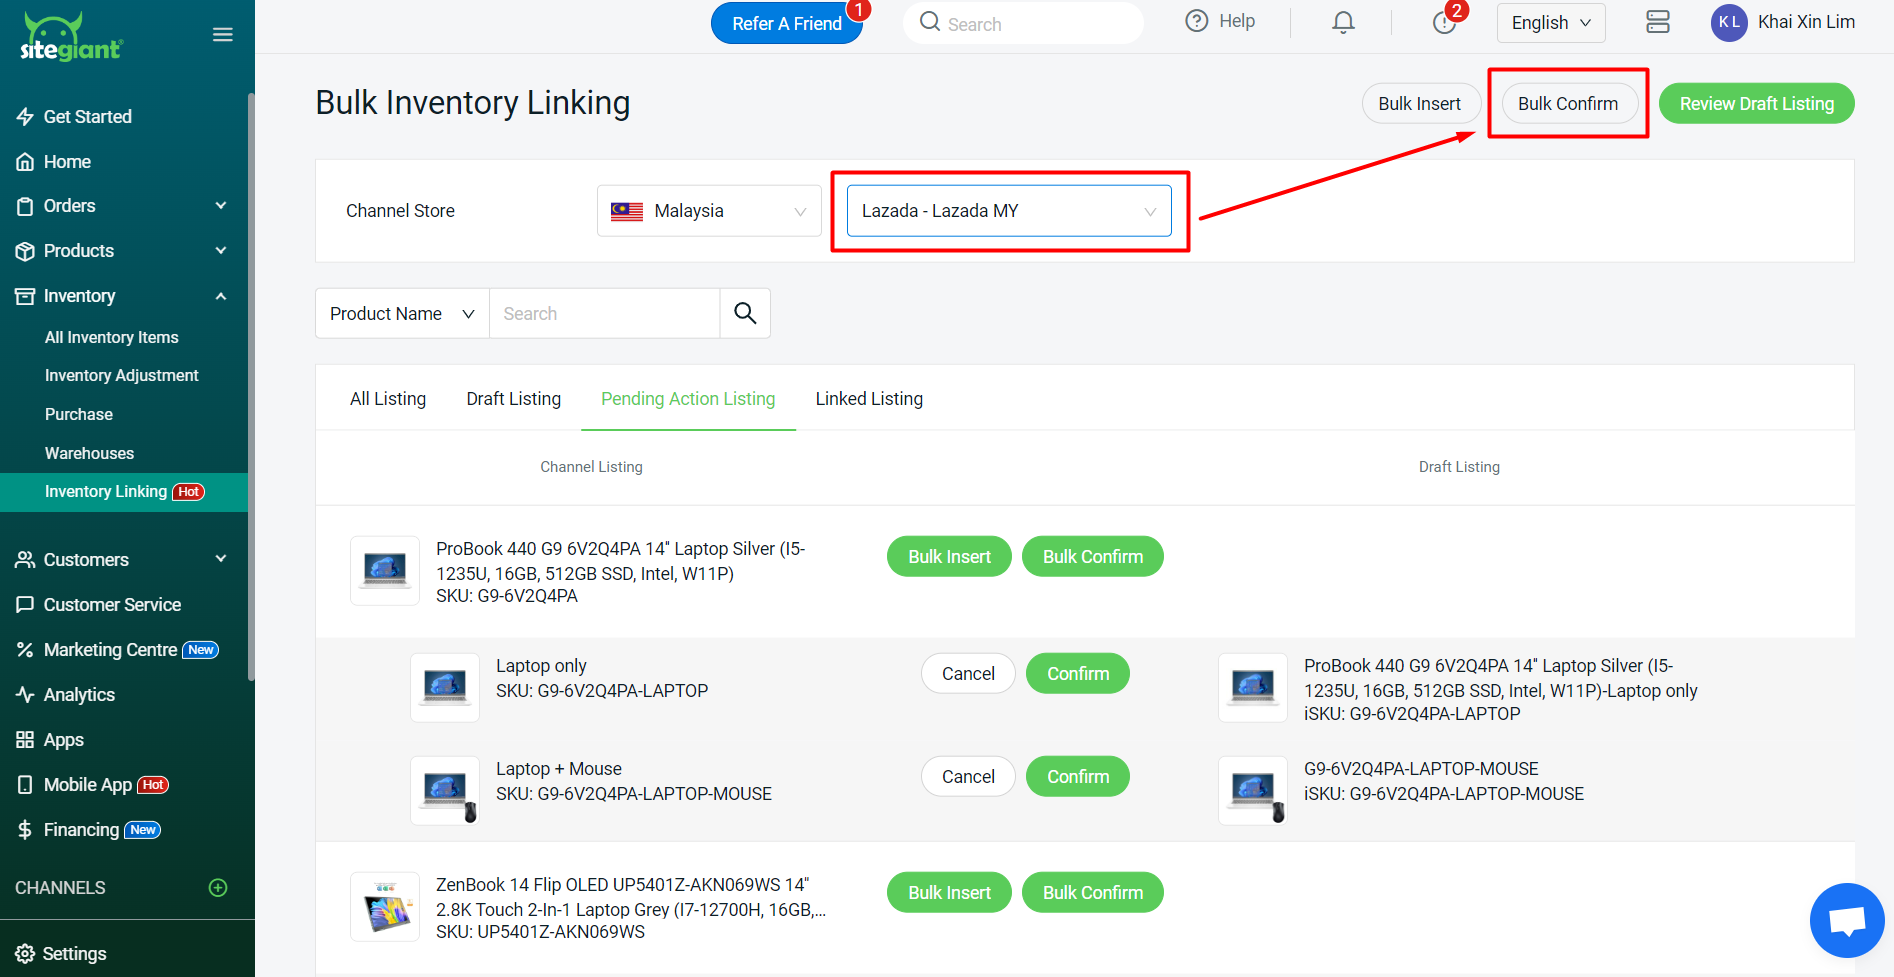
Step 3: Now that all inventory linking for the default store is completed, switch the Channel Store to perform the inventory linking > click Bulk Confirm to link the product with the existing iSKU.
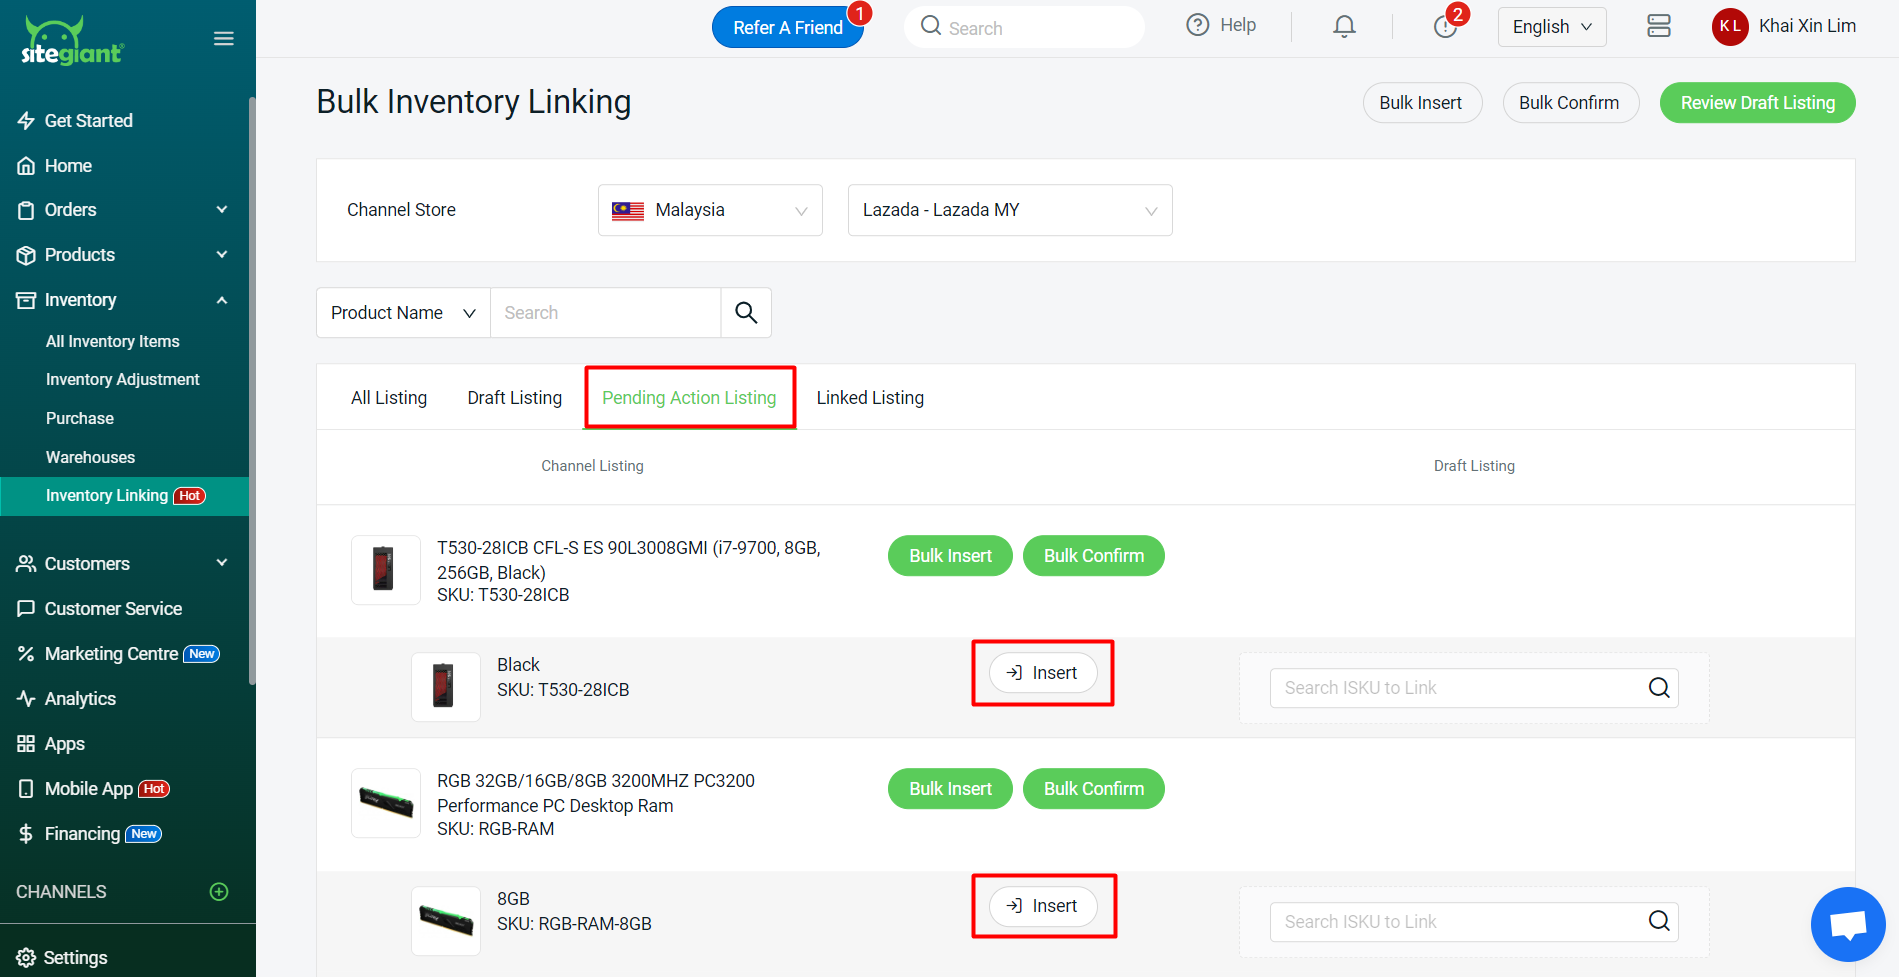
Step 4: If the products sold in this Channel Store are not in the default store, click Insert to create a new iSKU.
Step 5: Repeat the steps for the rest of the Channel Stores, kindly ensure all your products are linked with inventory item or kit > click Review Draft Listing > review and check the linking > click Confirm And Save Listing.
💡Tips: Products not linked with inventory will show under the Pending Action Listing tab.
6. Perform Stock Adjustment (Optional)
⚠️Important: Once the products are linked with inventory items, all the stock adjustments must be performed through SiteGiant. Please make sure the Update Stock button is toggled on for the related sales channel. It can be configured by navigating to + Channel on the sidebar menu > Authorized Channel > click Gear Icon > enable Update Stock > Save.
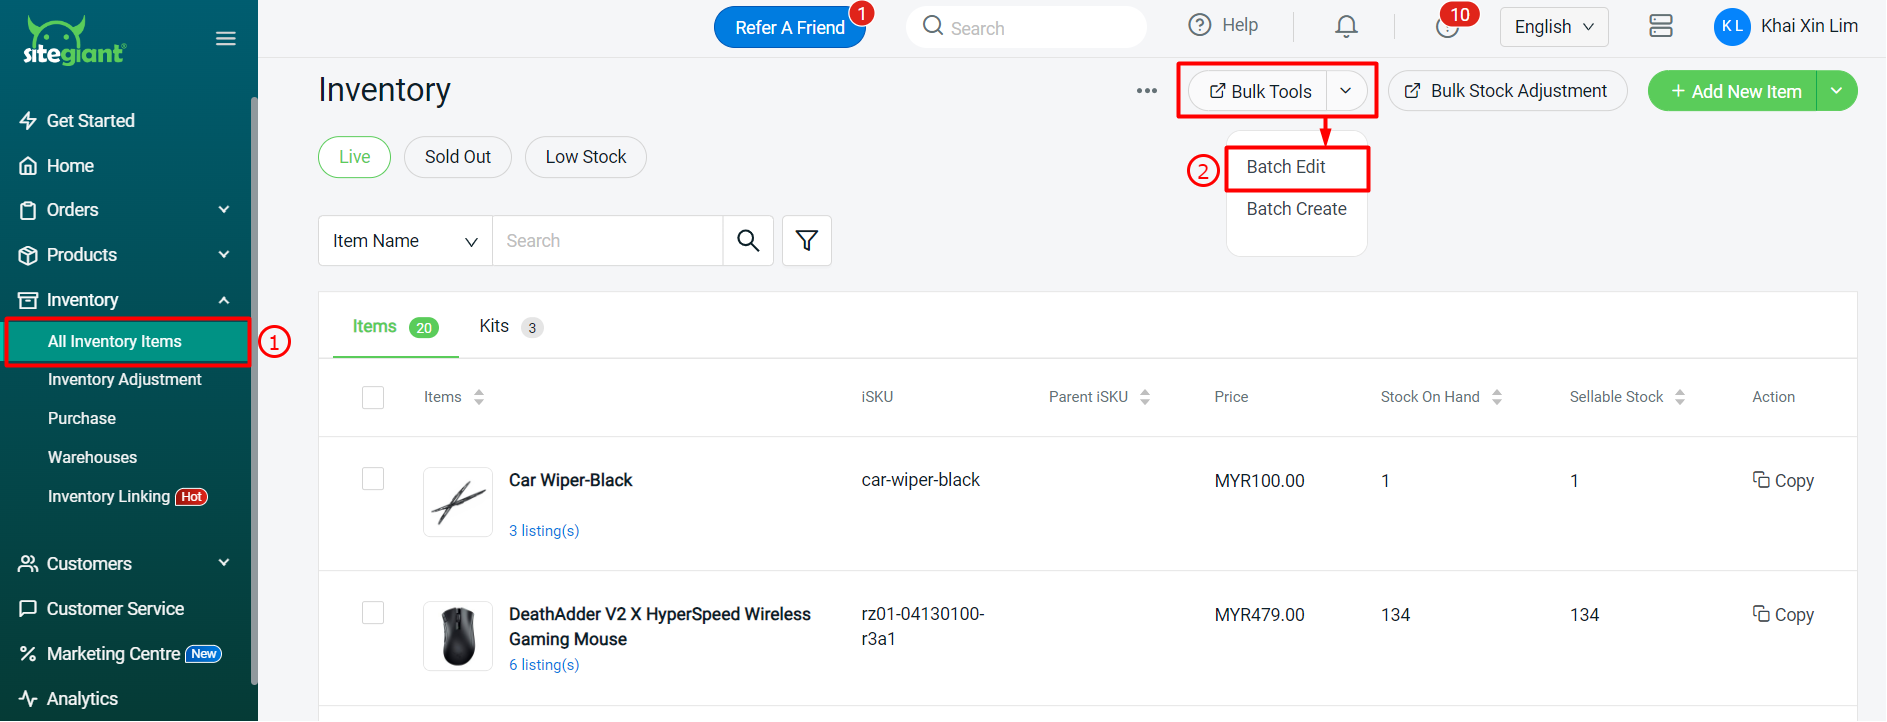
Step 1: Navigate to Inventory > All Inventory Items > Bulk Tools > Batch Edit.
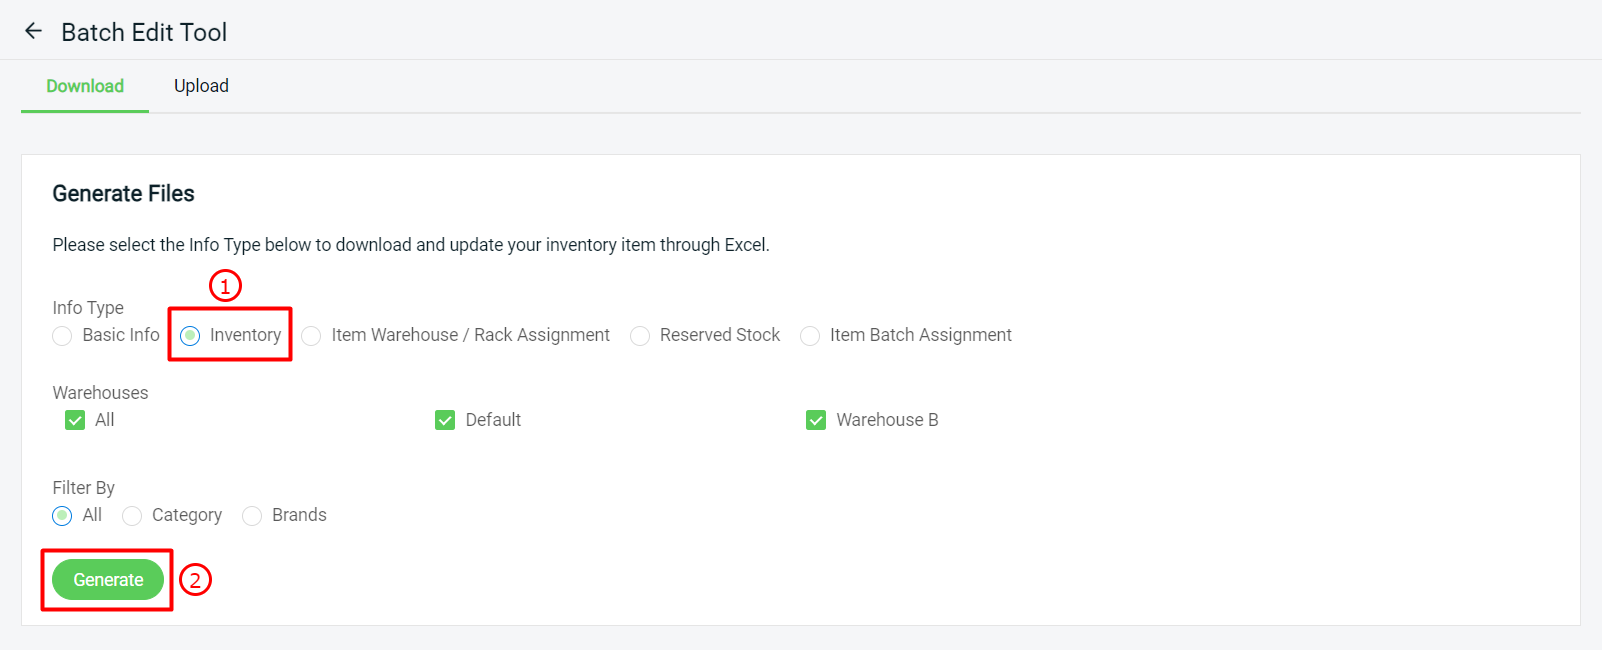
Step 2: Under download, select Inventory Info Type > Generate.
Step 3: Download the generated Excel file (zipped).

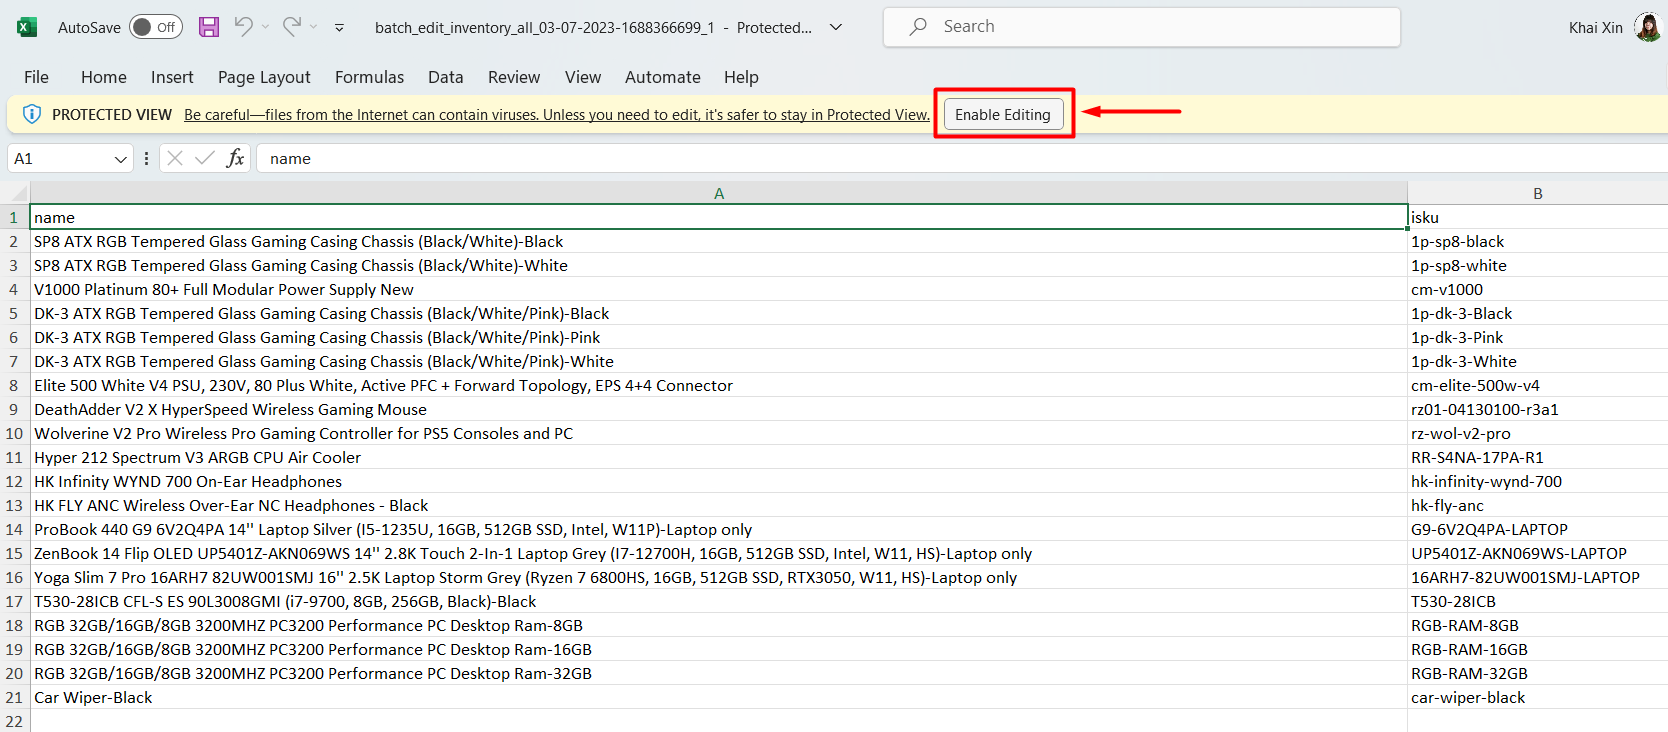
Step 4: The Excel file will be in Protected View, click Enable Editing to edit it.
Step 5: Update the quantity_change OR new_stock_on_hand for the inventory stock adjustment. You may remove the items from the Excel file or leave both columns empty if the item doesn’t have an adjustment.
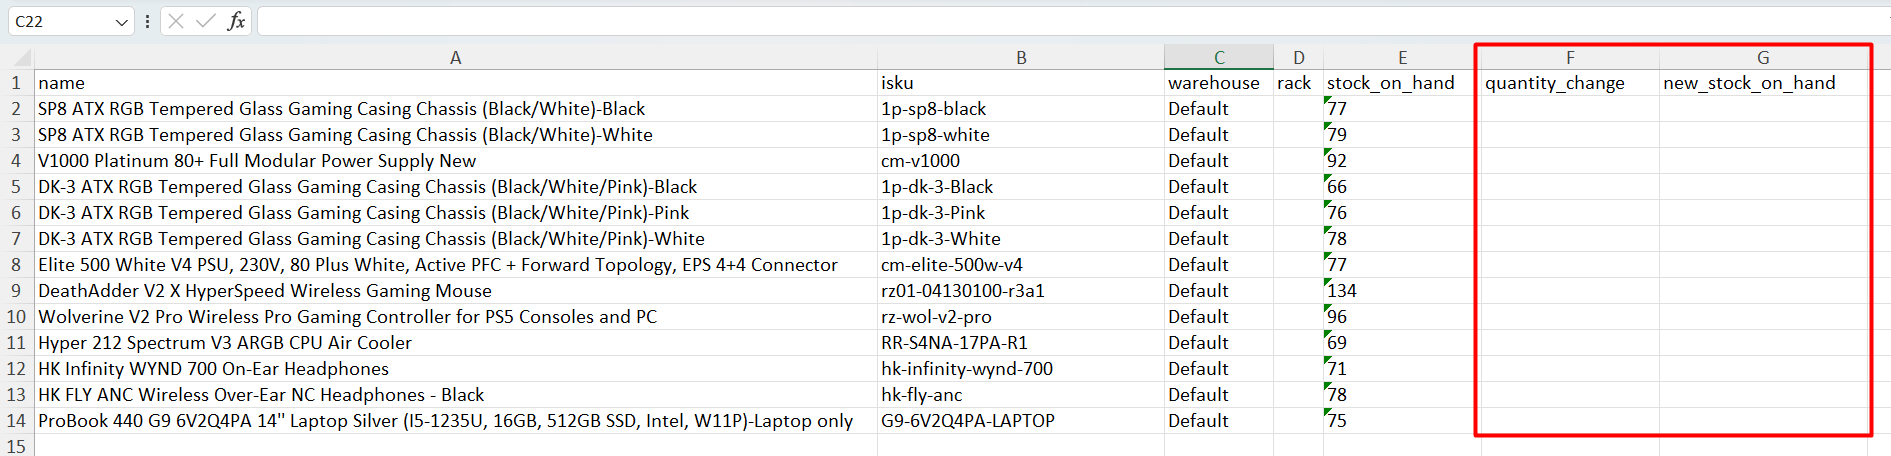
📌Note: If quantity_change and new_stock_on_hand columns are filled, the system will update based on the quantity_change.
The column with * is Not Editable.
| Column | Description |
| name* | Inventory item name |
| isku* | Inventory item iSKU |
| cost * | Inventory item cost |
| warehouse* | Inventory item allocated warehouse |
| rack* | Inventory item allocated rack |
| stock_on_hand* | The current stock you have in the warehouse |
| quantity_change | The stock level that you wish to adjust (+/-) |
| new_stock_on_hand | New total stock on hand you have in the warehouse |
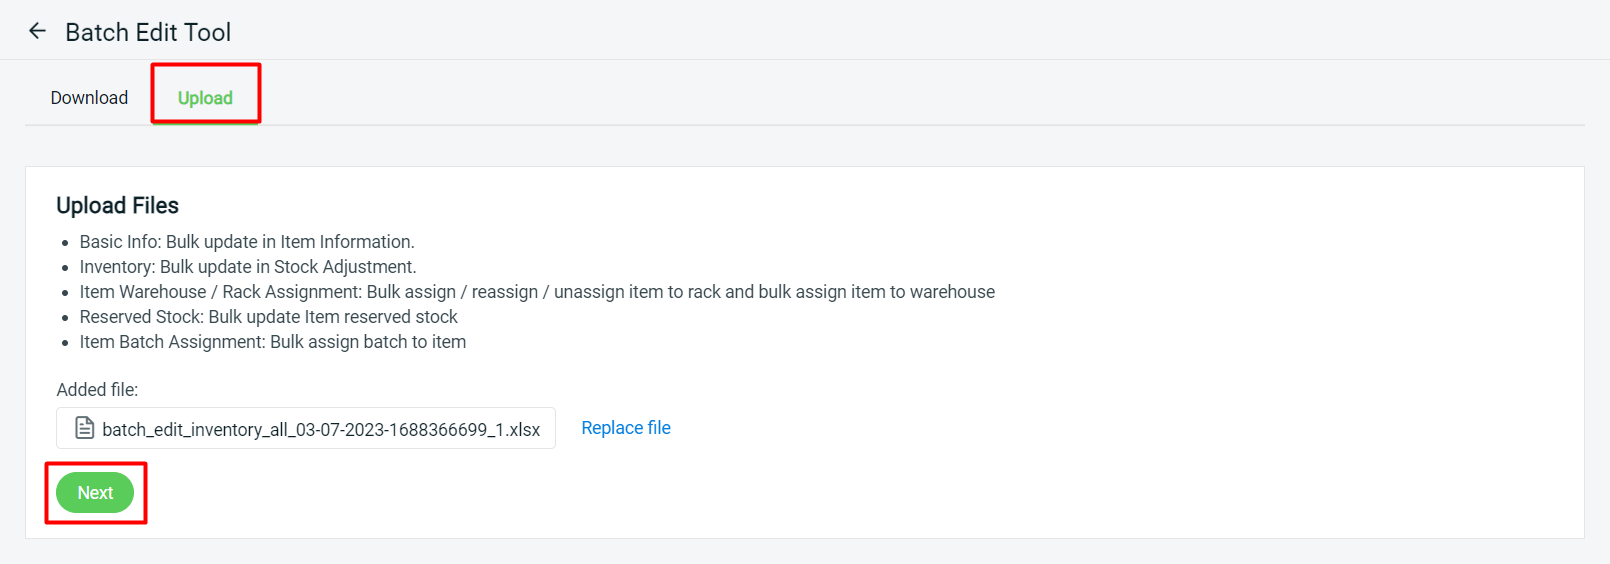
Step 6: Once done, save the Excel file > back to SiteGiant Batch Edit > Upload > upload the Excel file > Next.
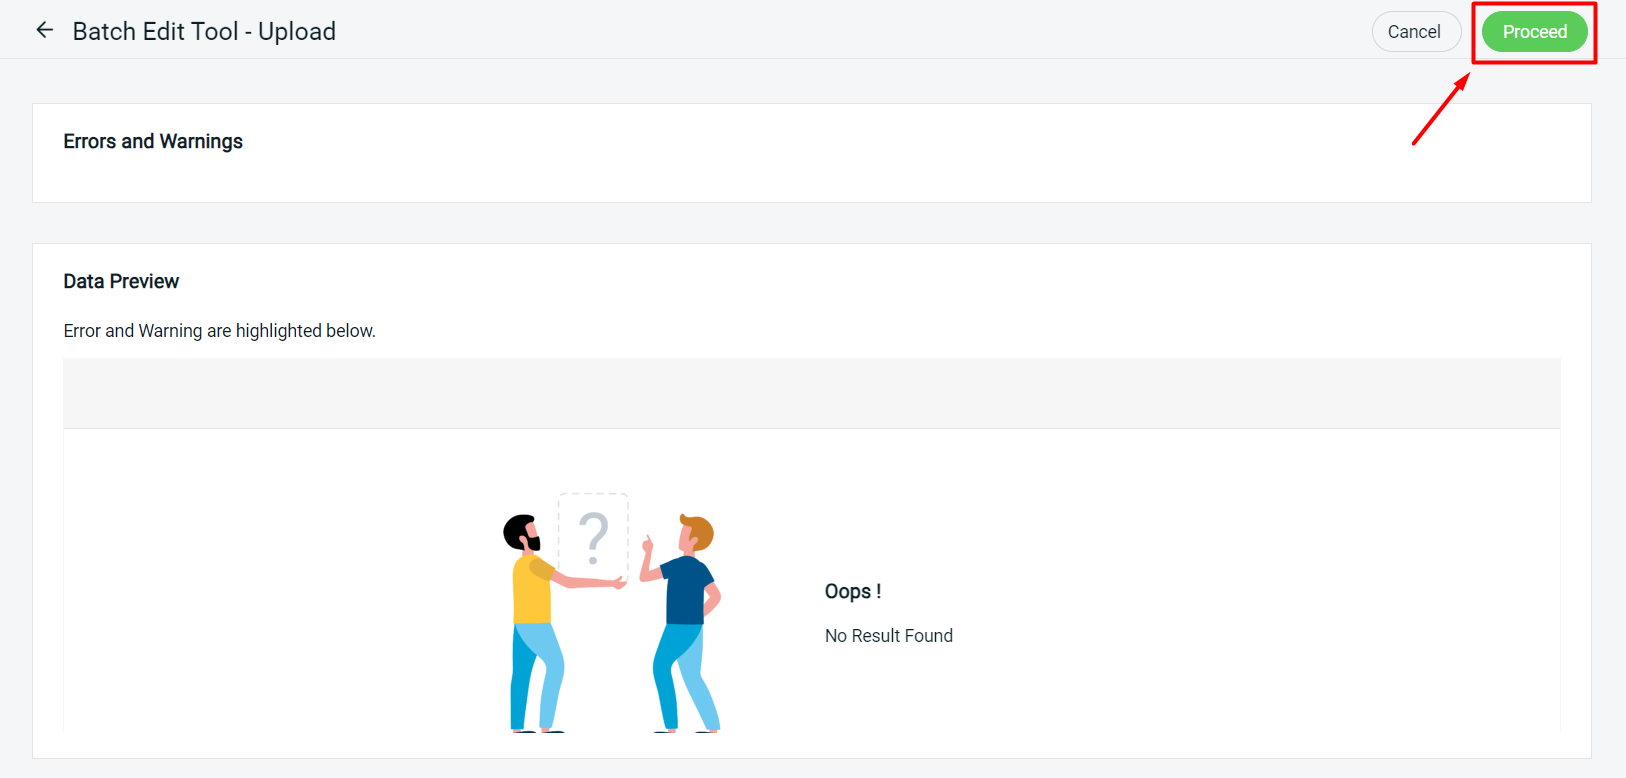
Step 7: If there are any errors in the Excel uploaded, you will see the error message in Errors and Warnings and it will show the error column in the Data Preview. Amend the error column and reupload the file. Click Proceed if the file uploaded does not have errors.
Step 8: Refresh the page and check the Imported List, if the Progress is in green, it is successfully updated.

7. Bulk Tally All Channels Inventory
After completing bulk inventory linking and stock adjustment, you might realize the stock quantity of your marketplaces is not tallying, or the new stock adjustment quantity didn’t update to the marketplaces. Thus, you must perform the Tally All Channels Inventory action to sync the latest SiteGiant inventory stock to its associated channels.
Tally All Channels Inventory action has to be performed when you link new channels with existing inventory items, or after a sales campaign whereby some marketplaces will suspend stock updates during the campaign period.
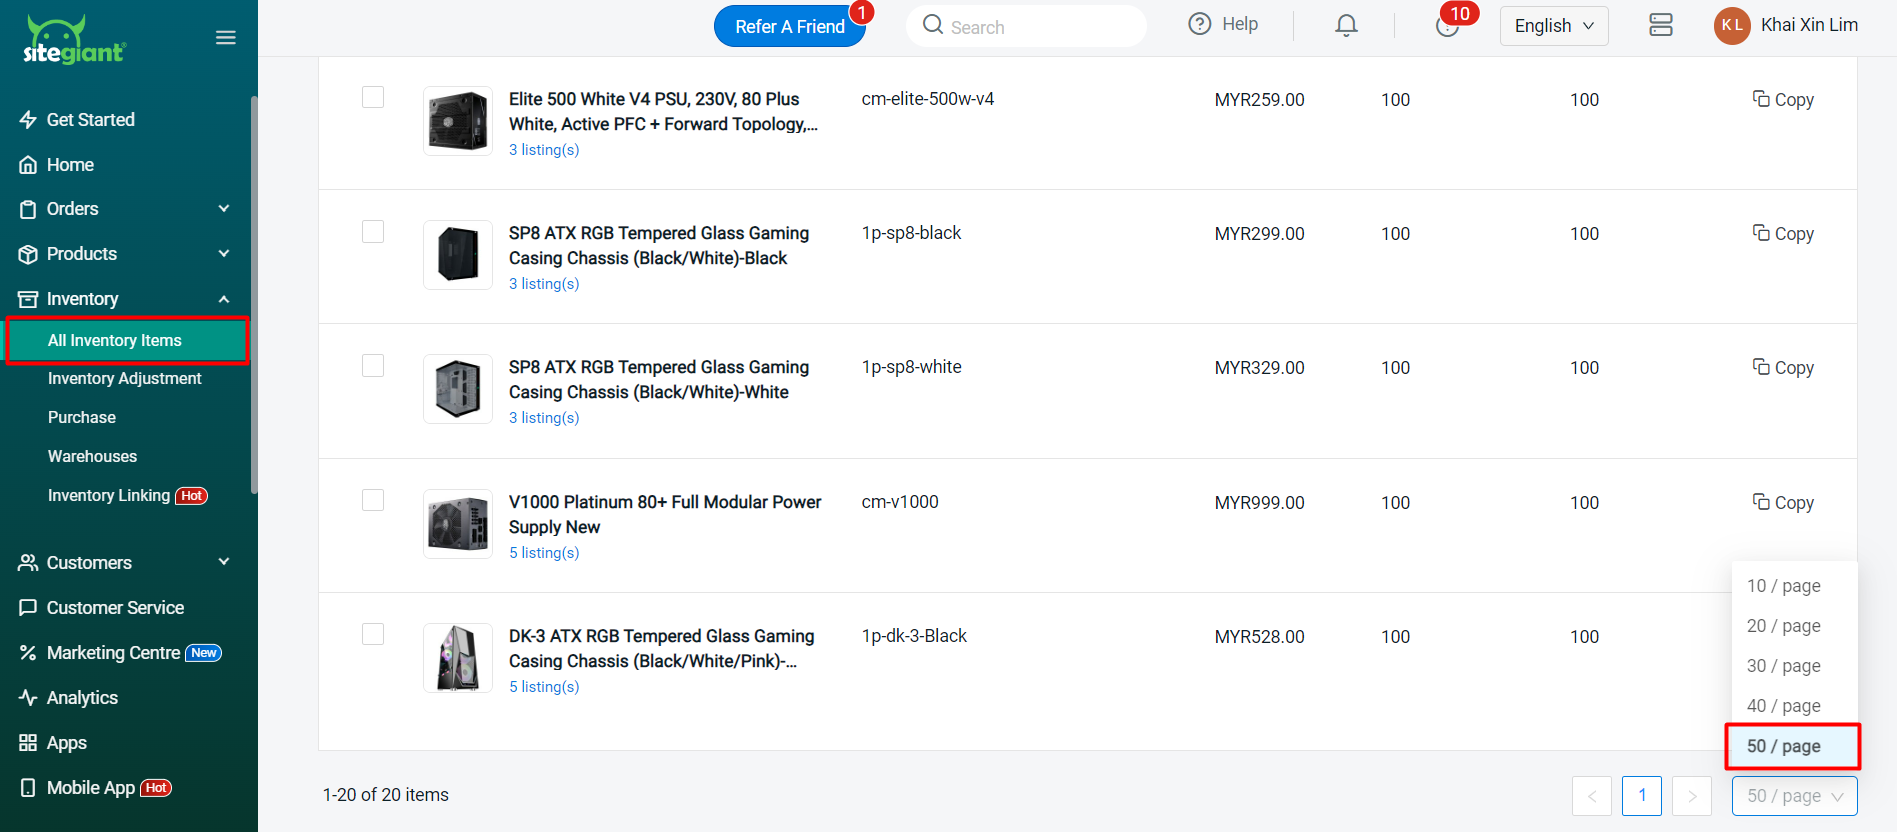
Step 1: Navigate to All Inventory Items > scroll to the bottom of the page and change the page to 50/page.
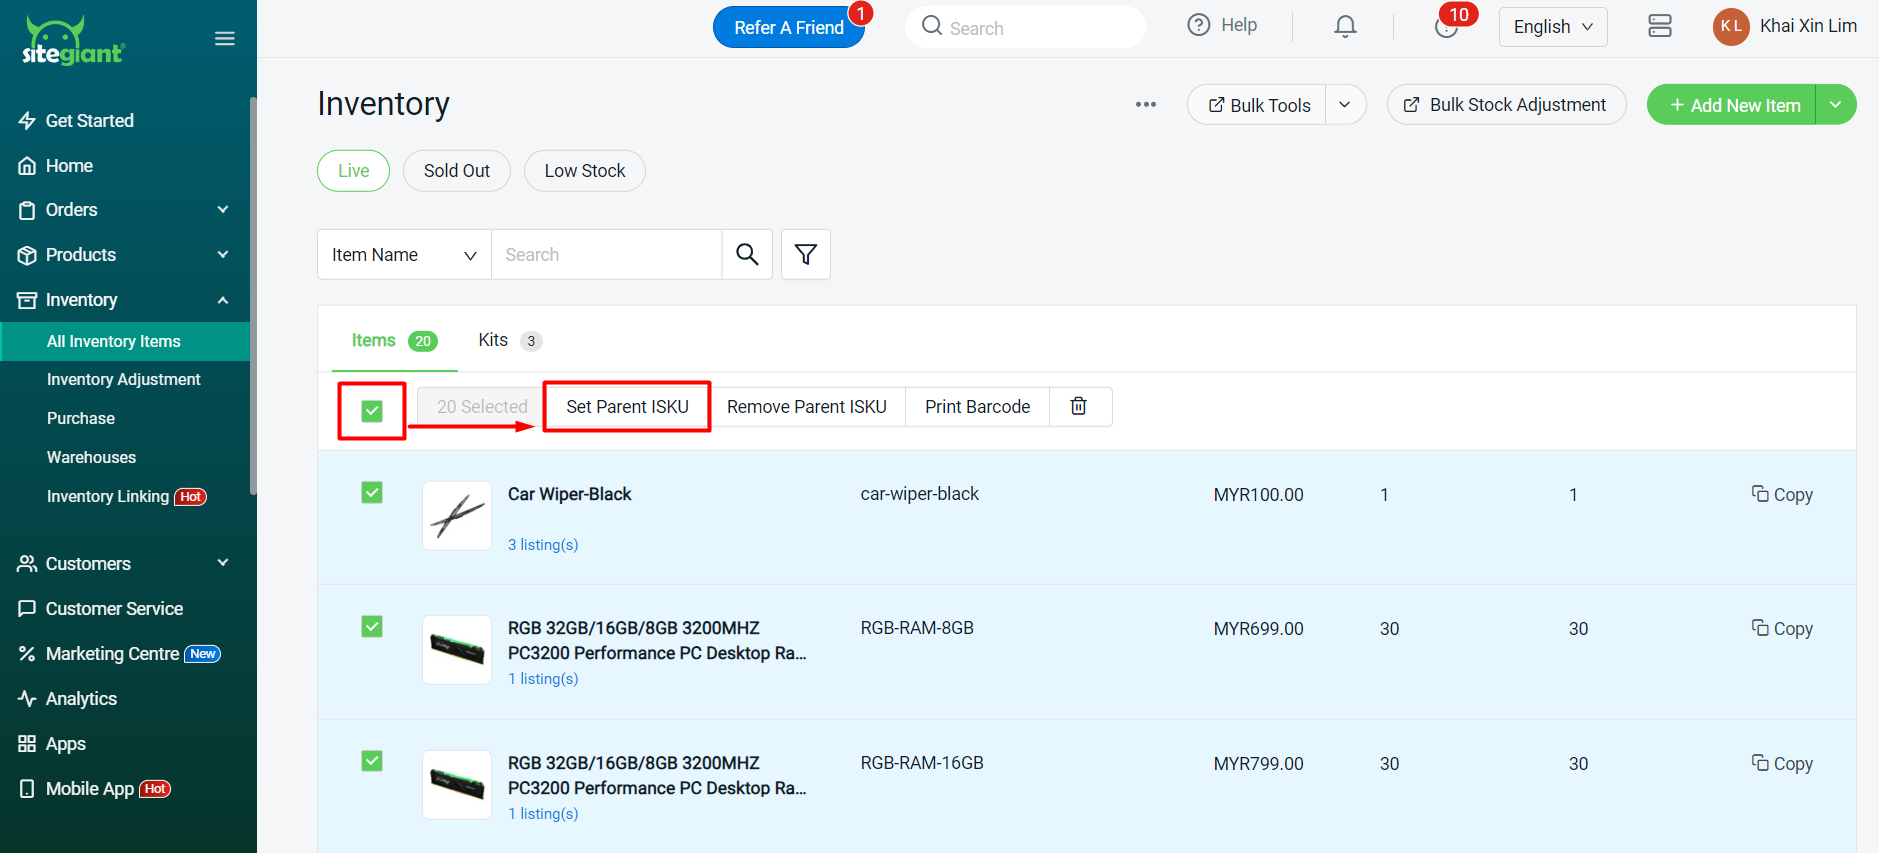
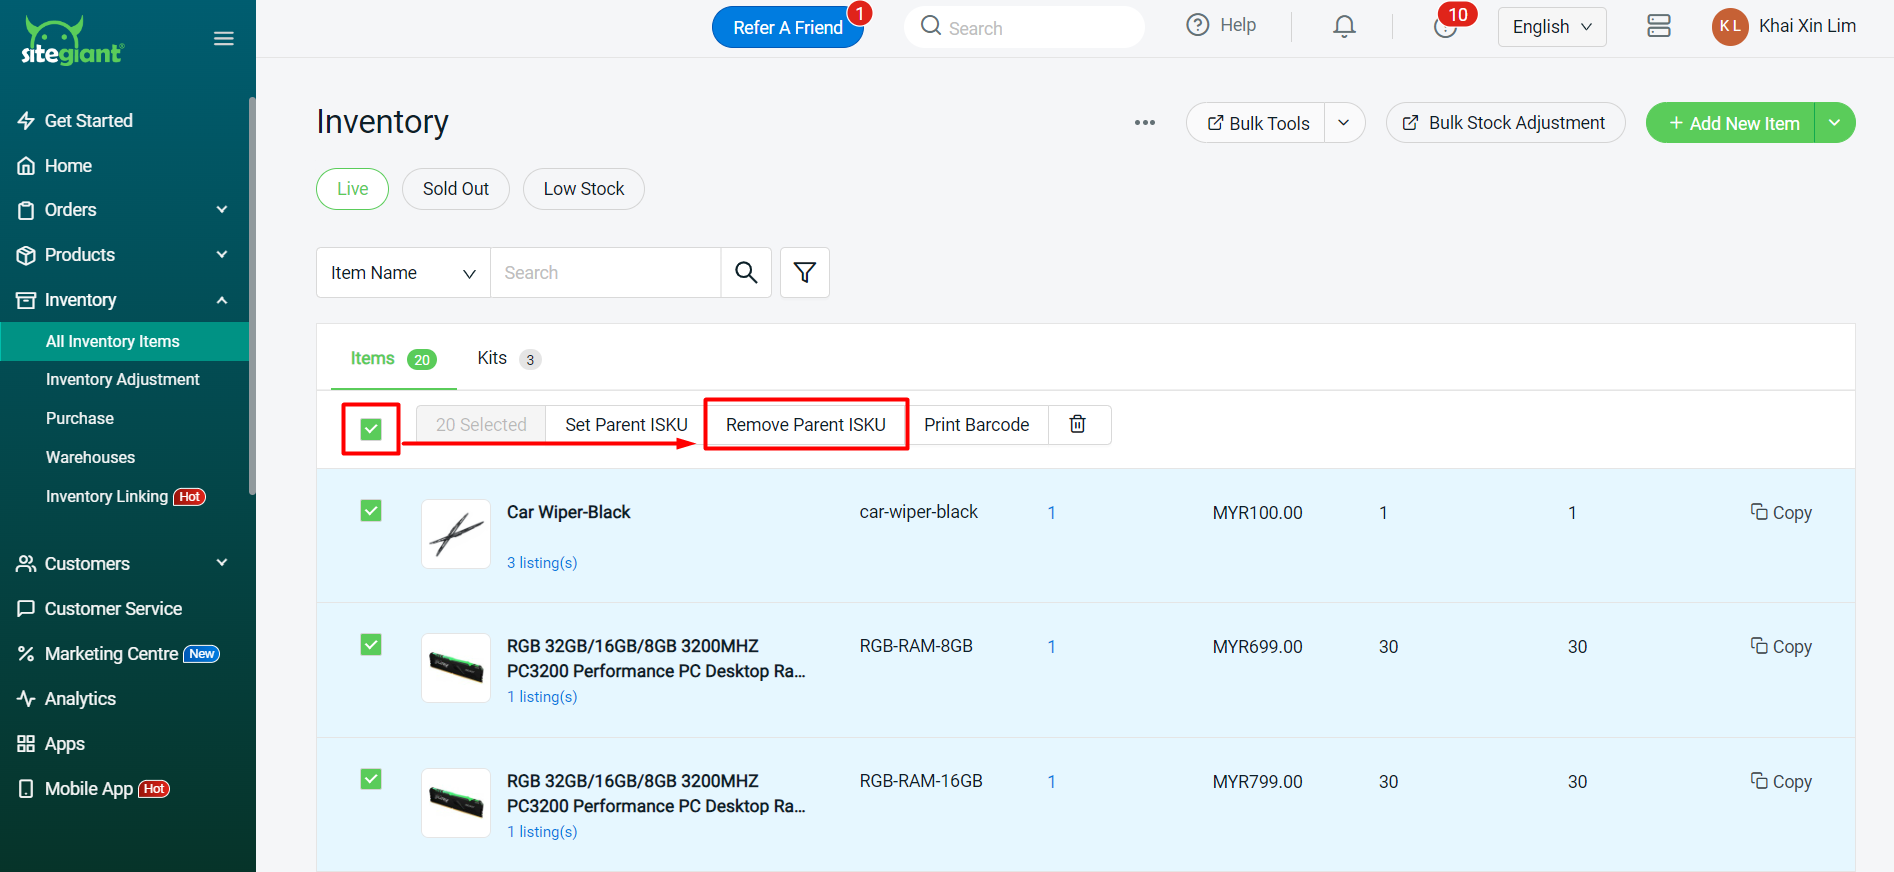
Step 2: Select all inventory items (max. 50) > click on Set Parent iSKU.
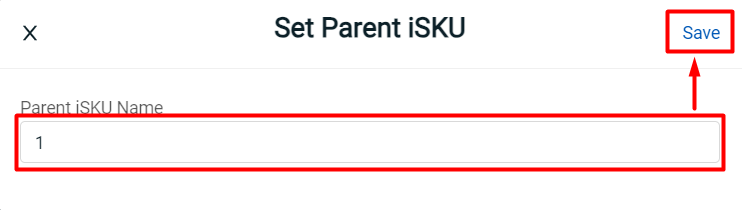
Step 3: Insert a Parent iSKU Name > Save.
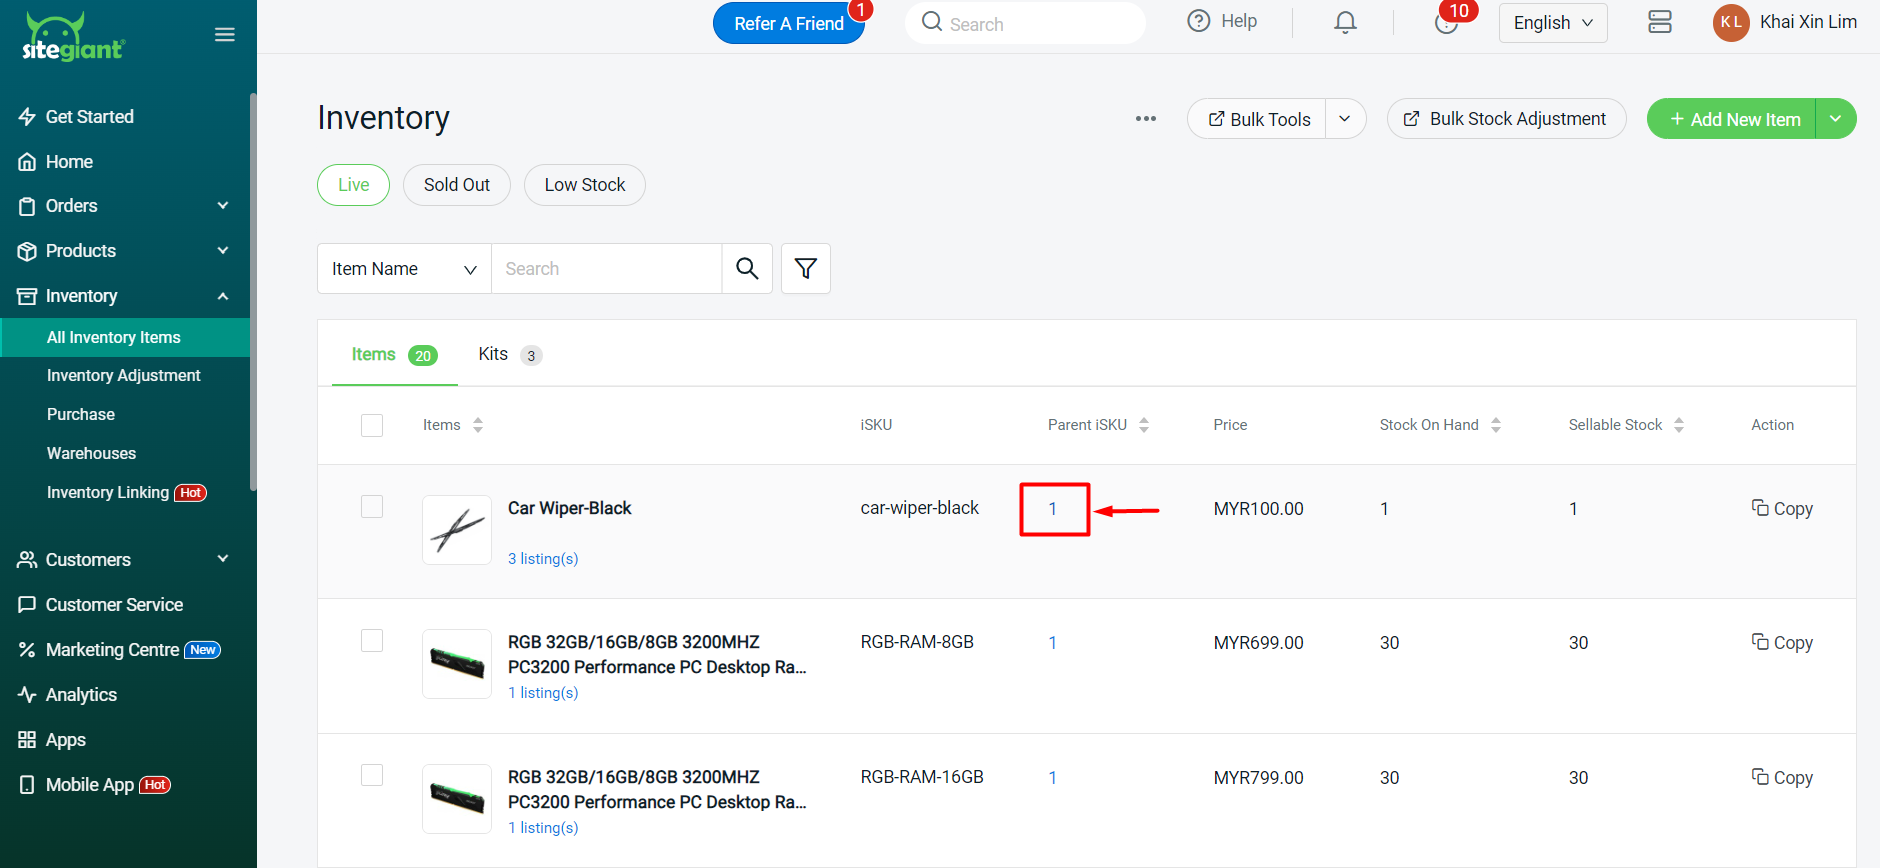
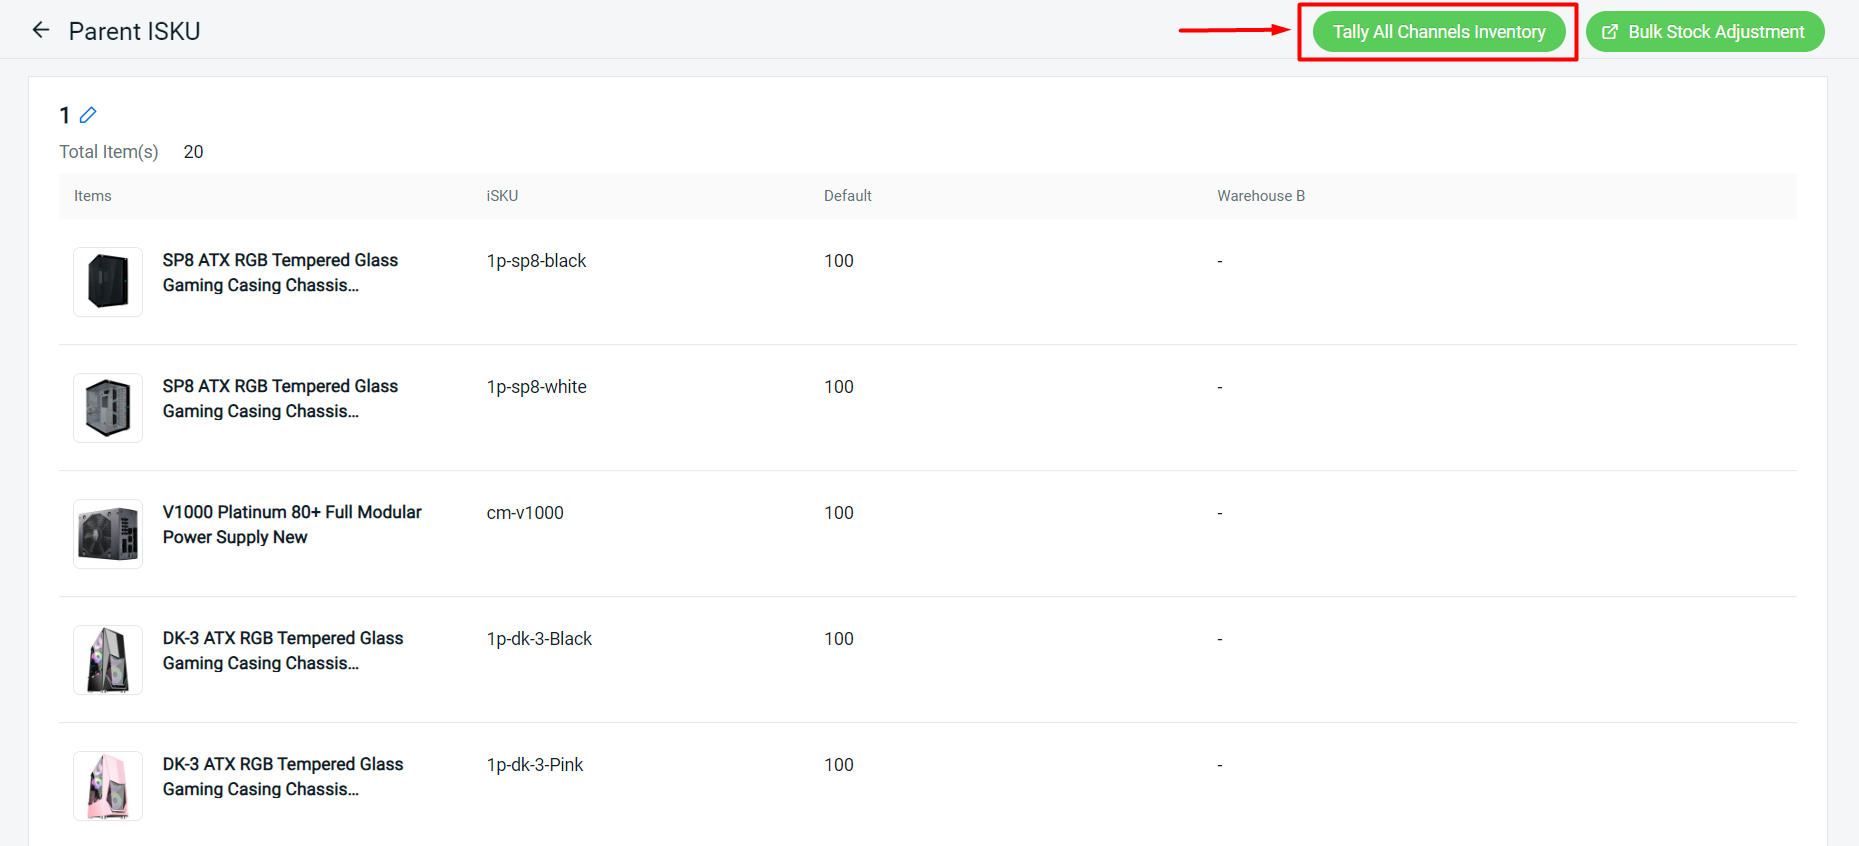
Step 4: Click on the Parent iSKU to view the details.
Step 5: Click Tally All Channels Inventory to bulk tally inventory for selected items. The system will sync the Sellable Stock of each iSKU to all associated products.
Step 6: You may keep or remove the Parent iSKU by selecting all the inventory items > Remove Parent iSKU.
Step 7: Repeat steps 1 to steps 6 for every page of your All Inventory Items.
💡Tips: If you wish to know more about what Parent iSKU can do other than tally inventory, refer to How To Manage Inventory With Parent ISKU (Item Group).