1. Introduction
2. Order Fulfillment Assistant
3. Carrier Manifest
4. Marketplace Order Return Management
1. Introduction
After the order is processed, there still might have some unexpected changes, such as customers suddenly cancelling their orders. By using Order Processing Tools, such as Order Fulfillment Assistant and Carrier Manifest, you are able to cross-check the status of the orders before packing and shipping them out. Other than that, these features help you to make sure the correct items are being picked and packed to reduce customer return orders.
On the other hand, we know that sometimes customer return orders are unavoidable. Marketplace Order Return Management helps you to record your return order and you may easily restock the item’s quantity to inventory.
2. Order Fulfillment Assistant
Order Fulfillment Assistant helps you to cross-check your marketplace order status before you start the packing process. An error message will be triggered after the order has been cancelled or the wrong items have been scanned.
Step 1: Navigate to Orders > Fulfillment > Order Fulfillment Assistant.
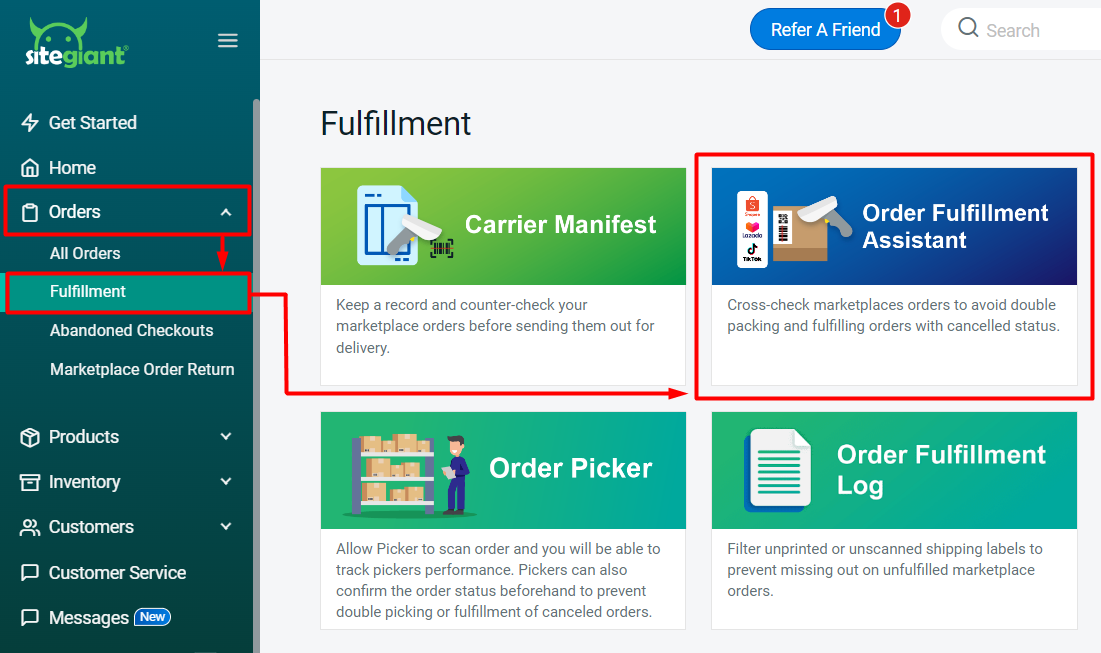
Step 2: For the first-time user, click on the Settings icon at the top right to configure the Order Fulfillment Assistant Settings.
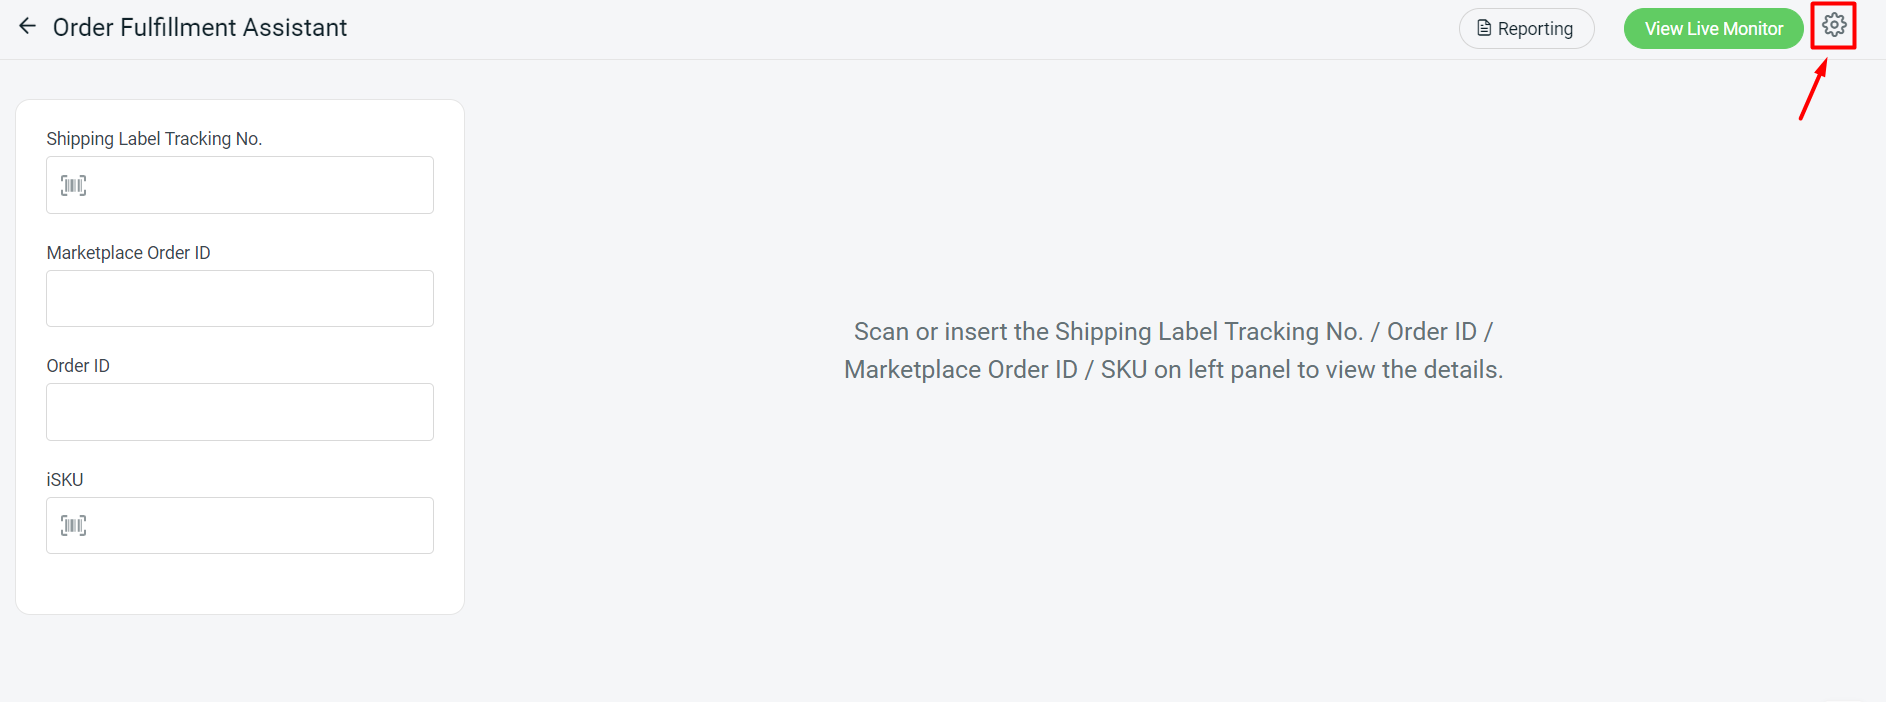
Step 3: Configure the Order Fulfillment Assistant Settings.
I. Order and Item Processing

1. Scan Order: Set the default cursor focused for orders scanning (By Tracking Number, Marketplace Order ID or Order ID).

2. Scan Item: Enable to allow the scanning of item to double-check the correct items are picked (By SiteGiant iSKU, UPC or Marketplace SKU).

3. Show Bundle Kit Items: Enable to list down the individual items in a kit.

4. Insert Serial Number: Enable to key in serial number for the item upon scanning. You can set whether by Default (can skip any item), Optional (based on the inventory item setting) or Force All (all items must insert serial number).

5. Quick Item Fulfillment: Enable to allow bypass scanning items with multiple quantities. Choose whether it is required to scan at least 1 quantity of the item before bypassing the scanning.

6. CCTV ParcelGuard: If using CCTV ParcelGuard to record order fulfillment activities, may refer to the CCTV ParcelGuard tutorial for detailed steps.

7. Convert UOM to base quantity (Note:This feature only available for WMS package): When enabbling the button, there has a changes as below.

i) Show UOM - will be available with the UOM details of the item upon scanning the order.
ii) When the Scan Item by iSKU feature is enabled, it allows for the scanning of the UOM iSKU to directly fulfill the specified quantity.
iii) When Insert Serial Number feature is enabled, it allows to insert serial number based on base quantity.
II. Shipping Status
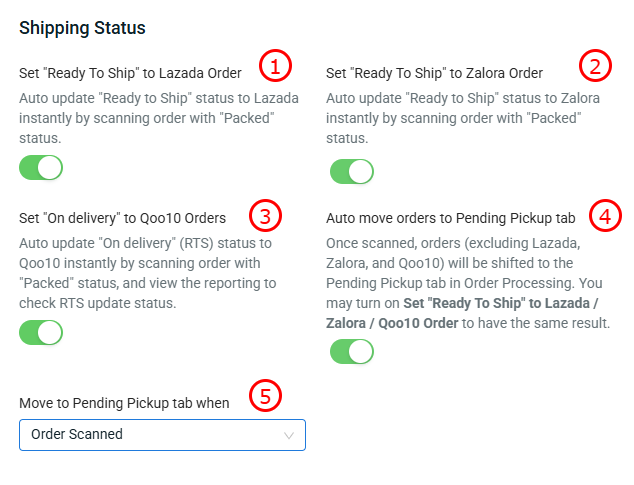
1. Set "Ready To Ship" to Lazada Order: Auto update Lazada order status from "Packed" to "Ready To Ship" status when scanning the order.

2. Set "Ready To Ship" to Zalora Order: Auto update Zalora order status from "Packed" to "Ready To Ship" status when scanning the order.

3. Set "On delivery" to Qoo10 Orders: Auto update Qoo10 order status from "Seller Confirm" to "On Delivery" status when scanning the order.

4. Auto move orders to Pending Pickup tab: Upon scanning the orders, they will automatically move to the “Pending Pickup” status. (Except for Lazada, Zalora and Qoo10.

5. Move to Pending Pickup tab when: Select when the order should be moved to Pending Pickup, either after the order is scanned or after all items are scanned. However, if the Scan Item button is disabled, you can only choose to move the order after it is scanned.
III. Order Information
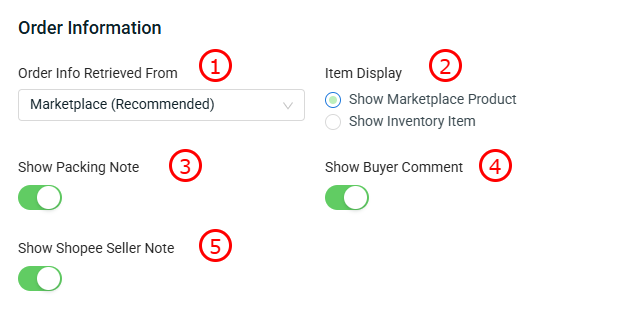
1. Order Info Retrieved From: It is recommended to choose Marketplace as it will get the latest order information directly from marketplaces when scanning the order. If choose SiteGiant, it will retrieve the order information from SiteGiant.

2. Item Display: Set it to display either marketplace products or inventory items.

3. Show Packing Note: Enable to show packing note.

4. Show Buyer Comment: Enable to show buyer comment of the order.

5. Show Shopee Seller Note: The Shopee Seller Note will be displayed upon scanning on the order fulfillment assistant website.
IV. Miscellaneous
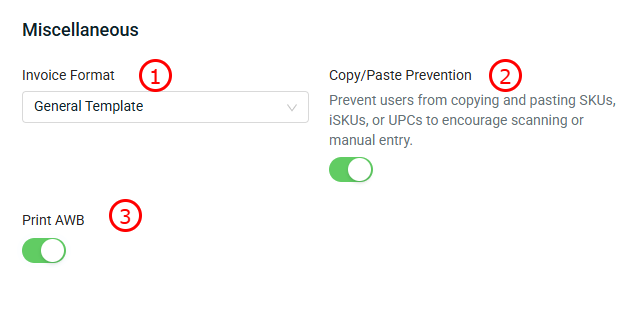
1. Invoice Format: Select either general template or order processing as the invoice format.

2. Copy/Paste Prevention: Enabling the button prevents the person from copying the iSKU/SKU/UPC from the order information. They will need to get parcel to scan the item or manual input during item entry.

3. Print AWB: The Print AWB button will appear at the top-right corner after scanning the parcel, but if the Scan Item button is enabled, it will only show once all items have been successfully scanned.
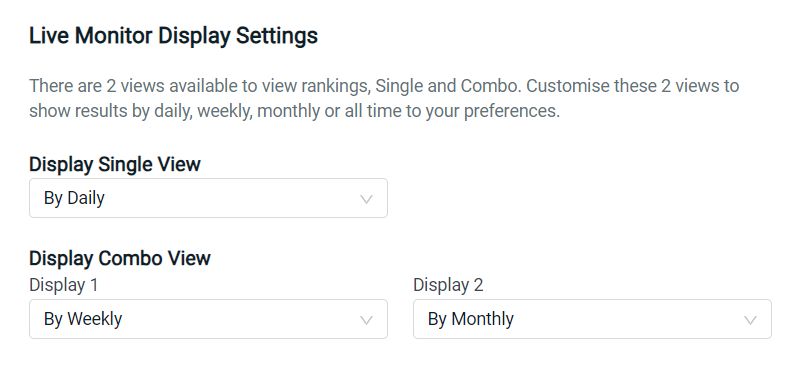
Step 4: You can set the Live Monitor Display Settings to monitor the performance of the packer. (optional) > Save.
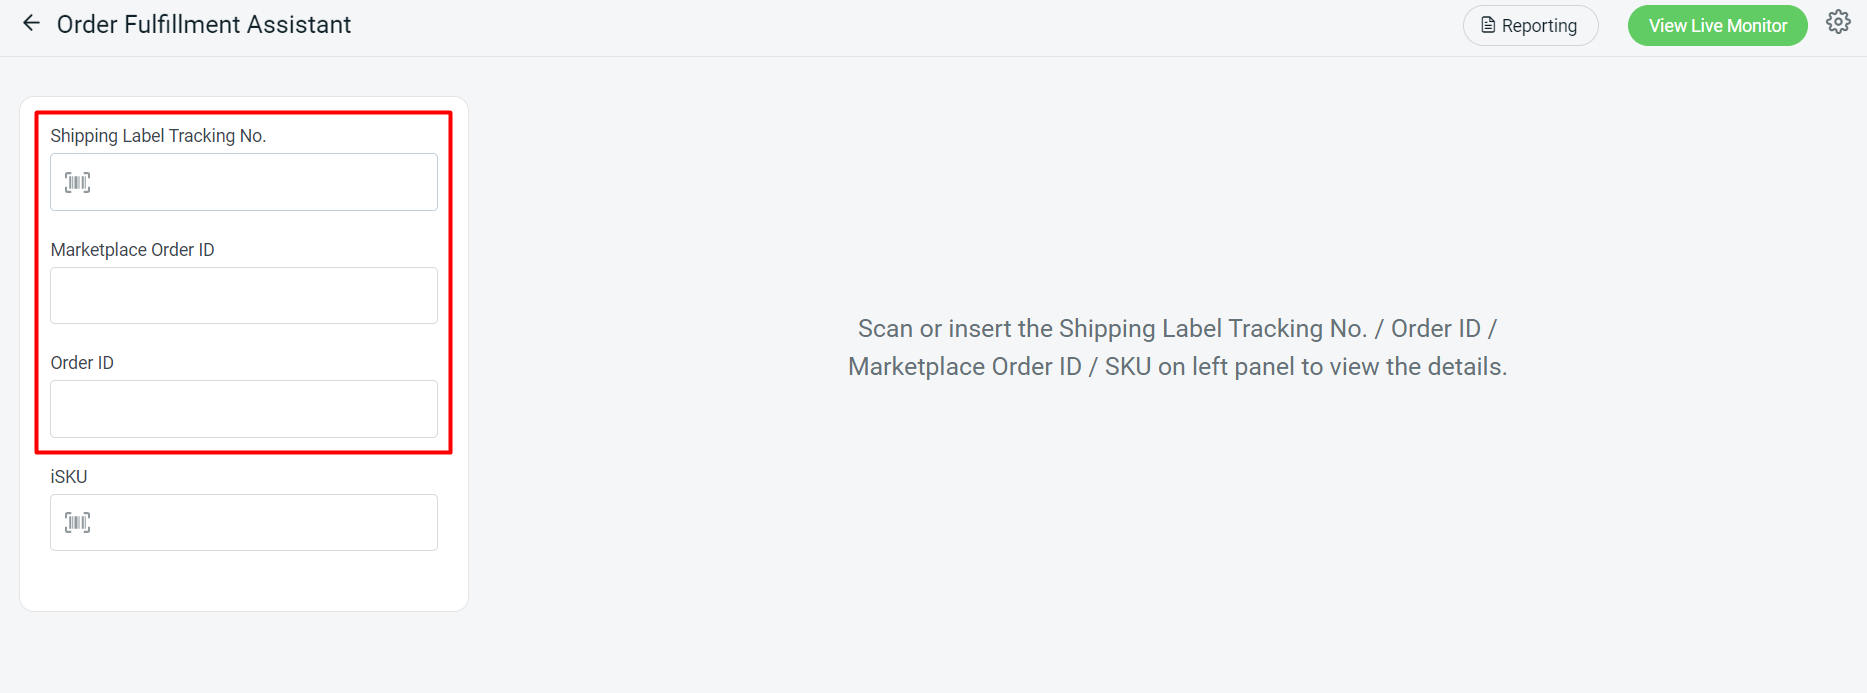
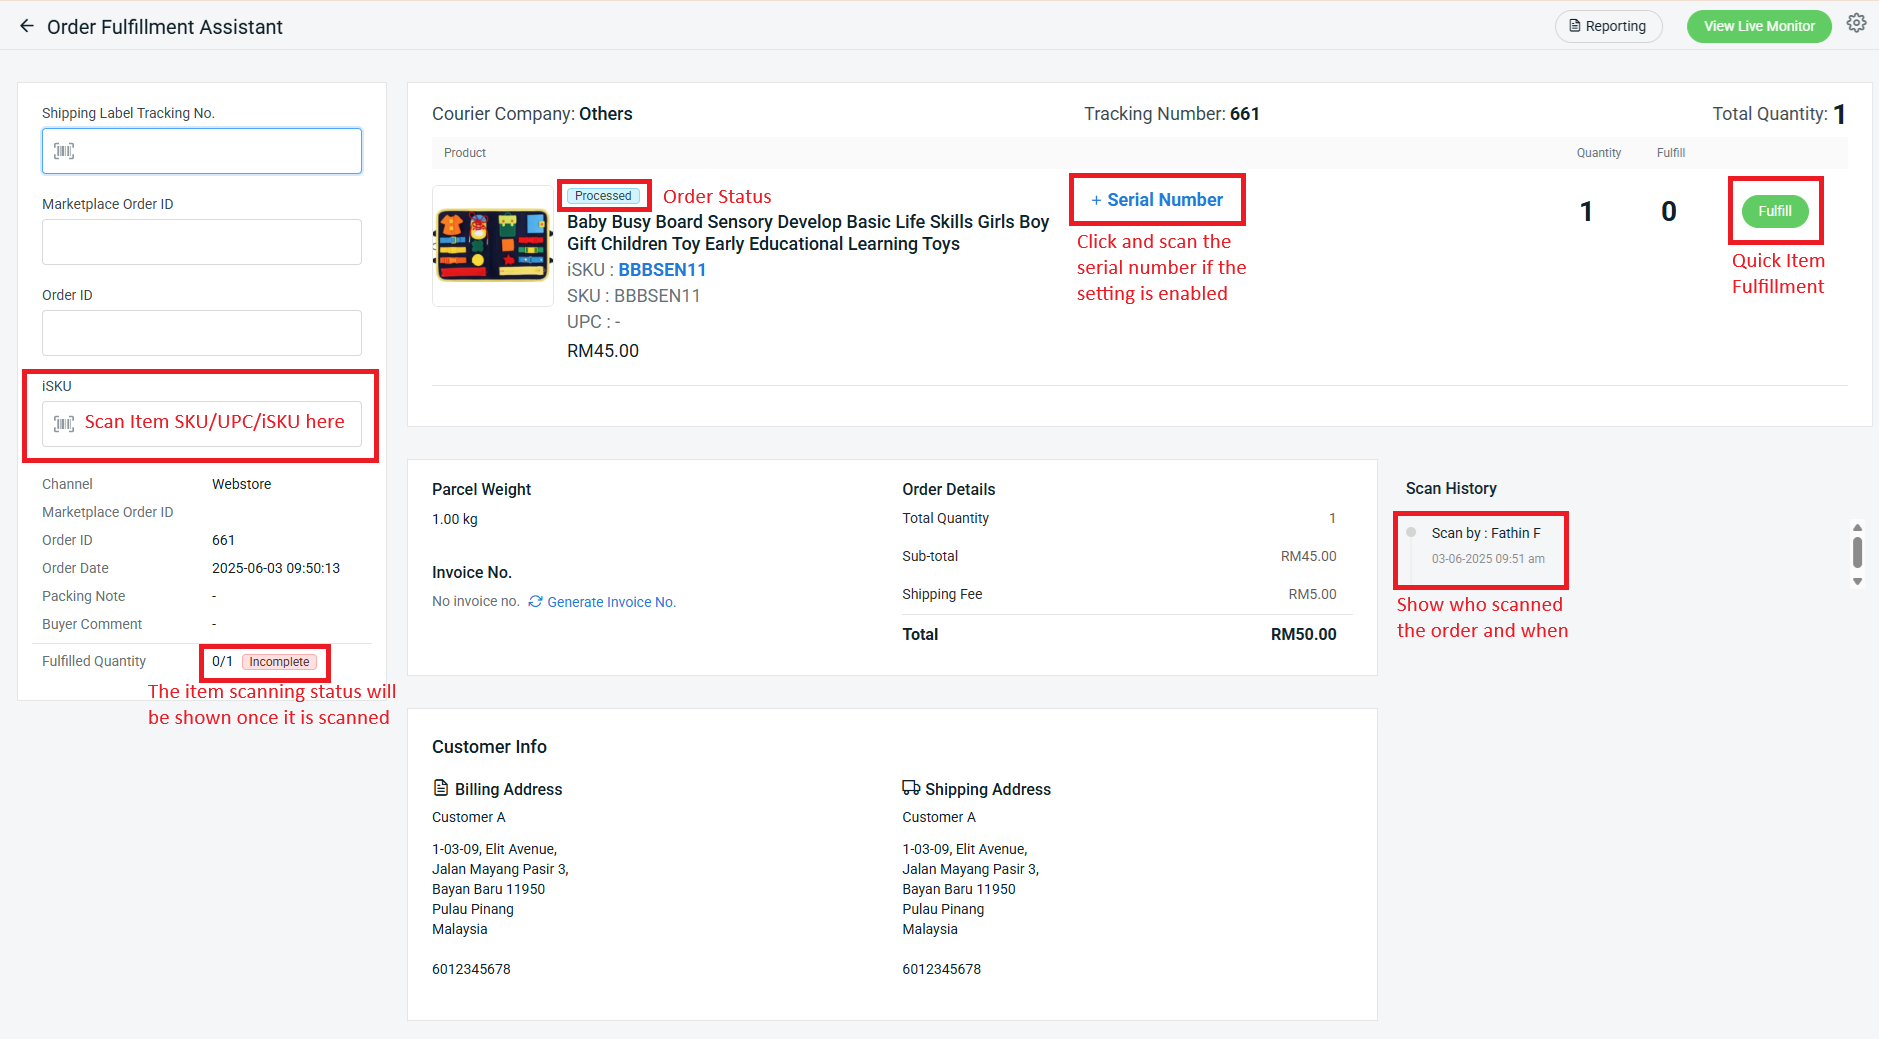
Step 5: Scan or insert the Tracking Number on Shipping Label/ Marketplace Order ID/ Order ID.
Step 6: The order details and products will be shown > if Scan Item is enabled, you may scan the item SKU/ UPC/ iSKU to double-check that the correct items are being picked > scan the serial number if it is enabled in the settings.
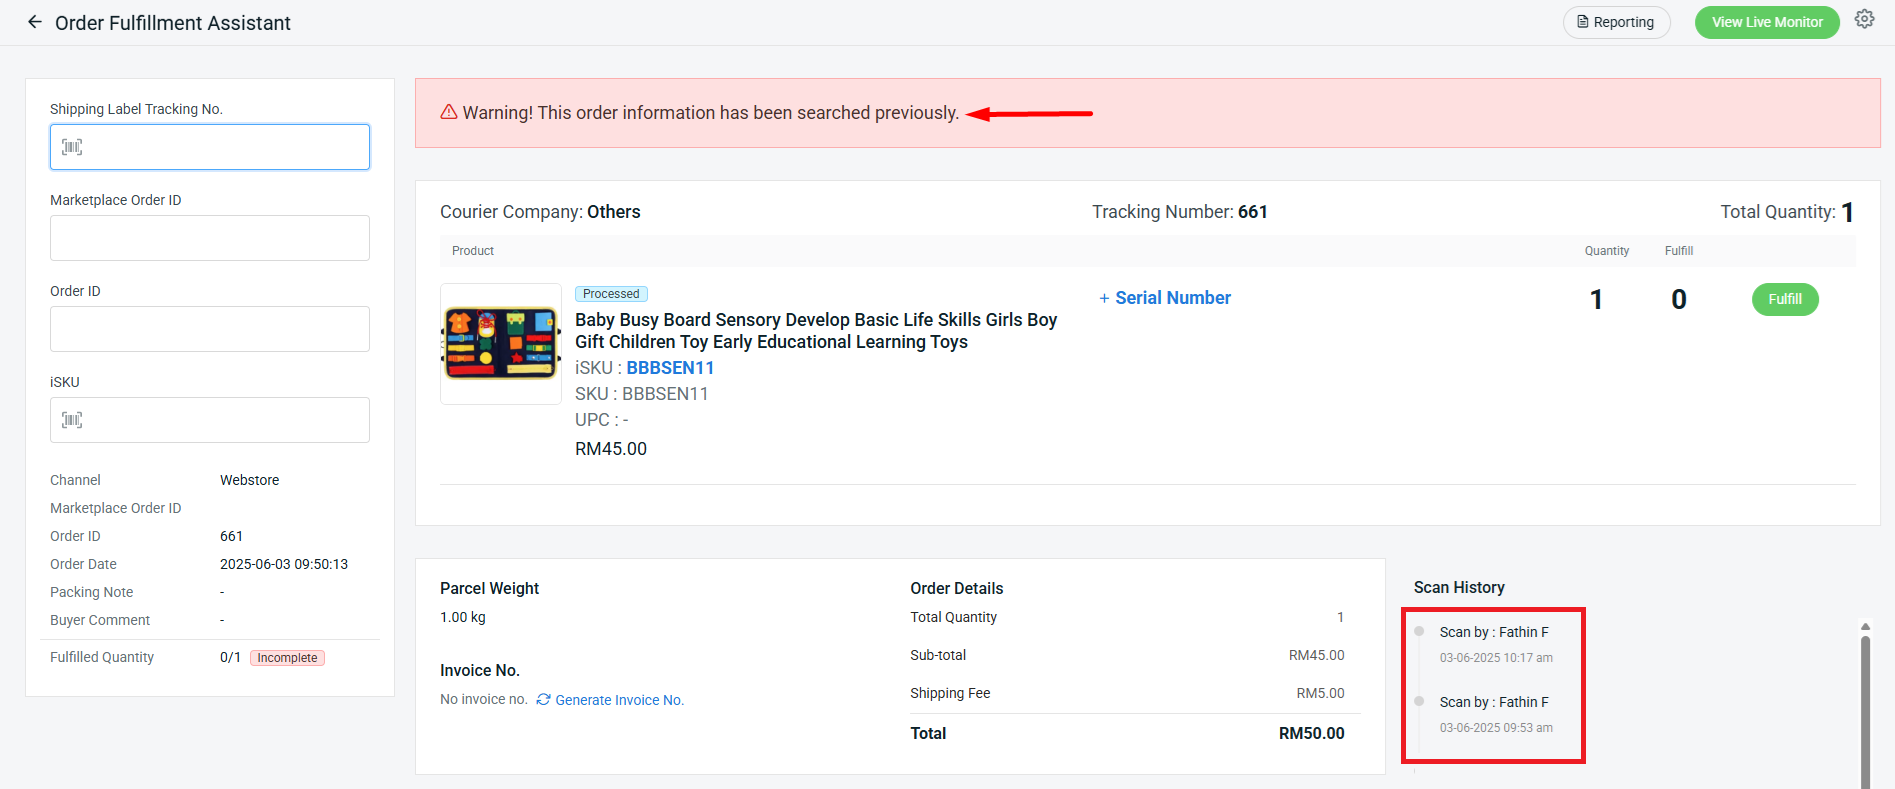
Step 7: A warning message will appear with a beep sound if the order is scanned before > you may check the Scan History for the scan record.
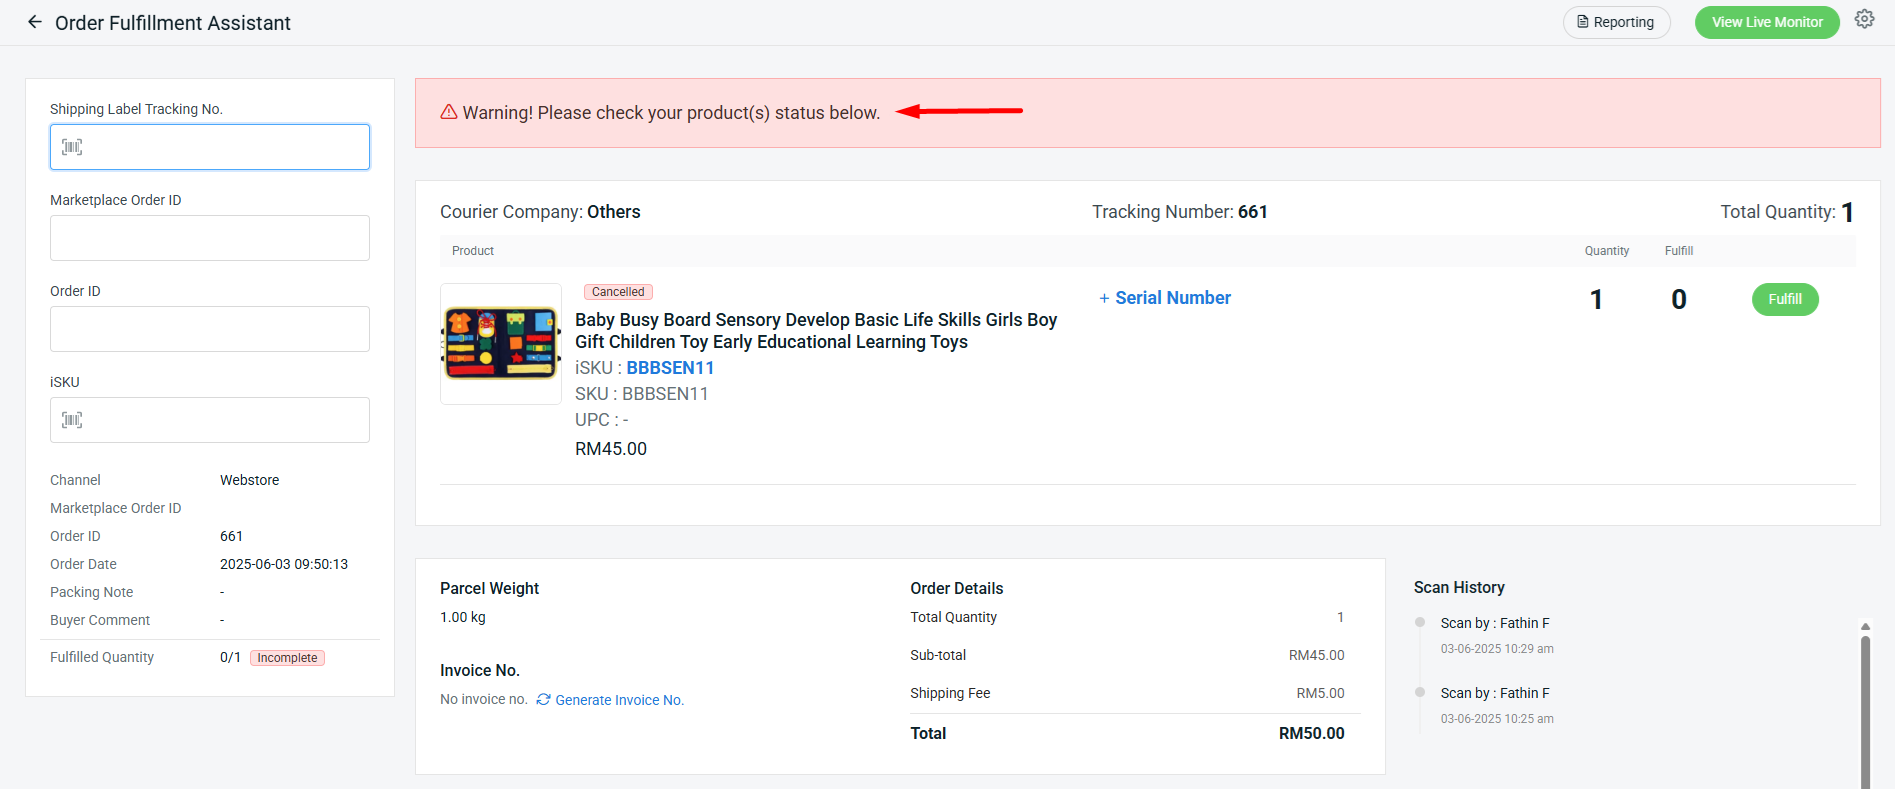
Step 8: The warning message will be shown if the order status is abnormal (e.g., cancelled).
Step 9: You may view the Order Fulfillment Assistant Report by clicking on the Reporting > click into the user report to view the details.
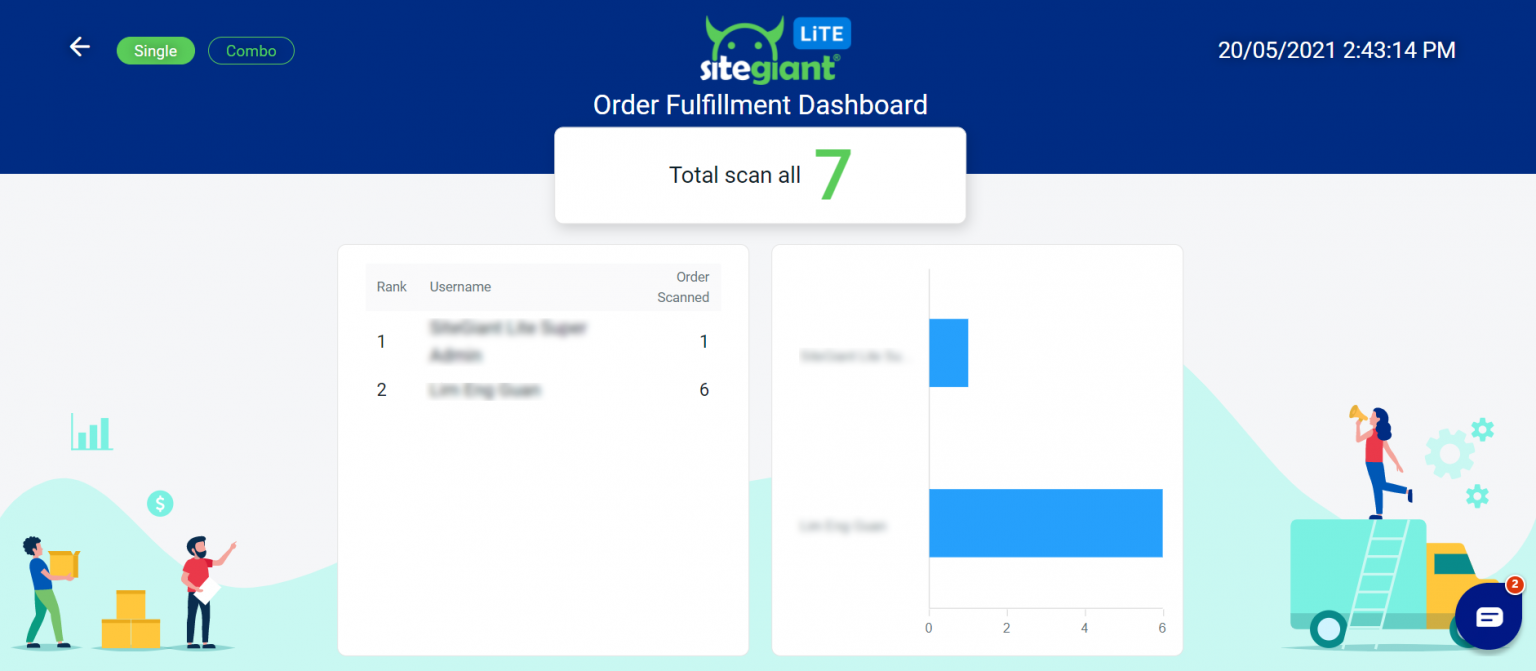
Step 10: You can also track the staff performance in real time using Live Monitor. Click on the View Live Report > choose whether by Single View or Combo View.
3. Carrier Manifest
This is the 2nd layer of cross-checking your marketplace order status before shipping. An error notification will pop up if there is any duplicated or cancelled order being scanned. In this way, you can be safe from delivering unnecessary orders and minimize your business loss. Furthermore, Carrier Manifest lets you keep a record of your shipped order based on shipping providers and dates, which you can easily retrieve for future reference if needed.
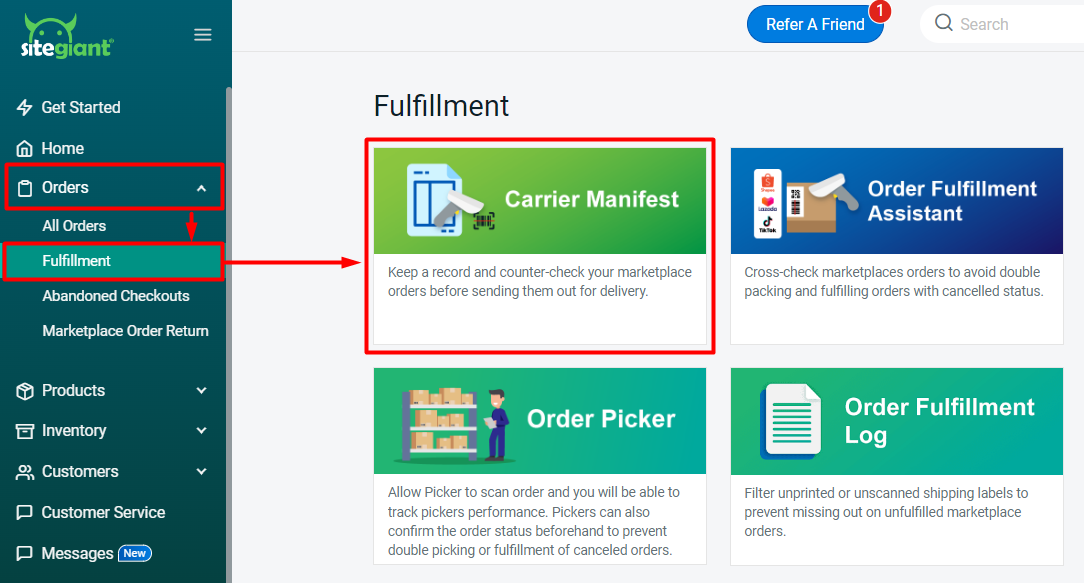
Step 1: Navigate to Orders > Fulfillment > Carrier Manifest.
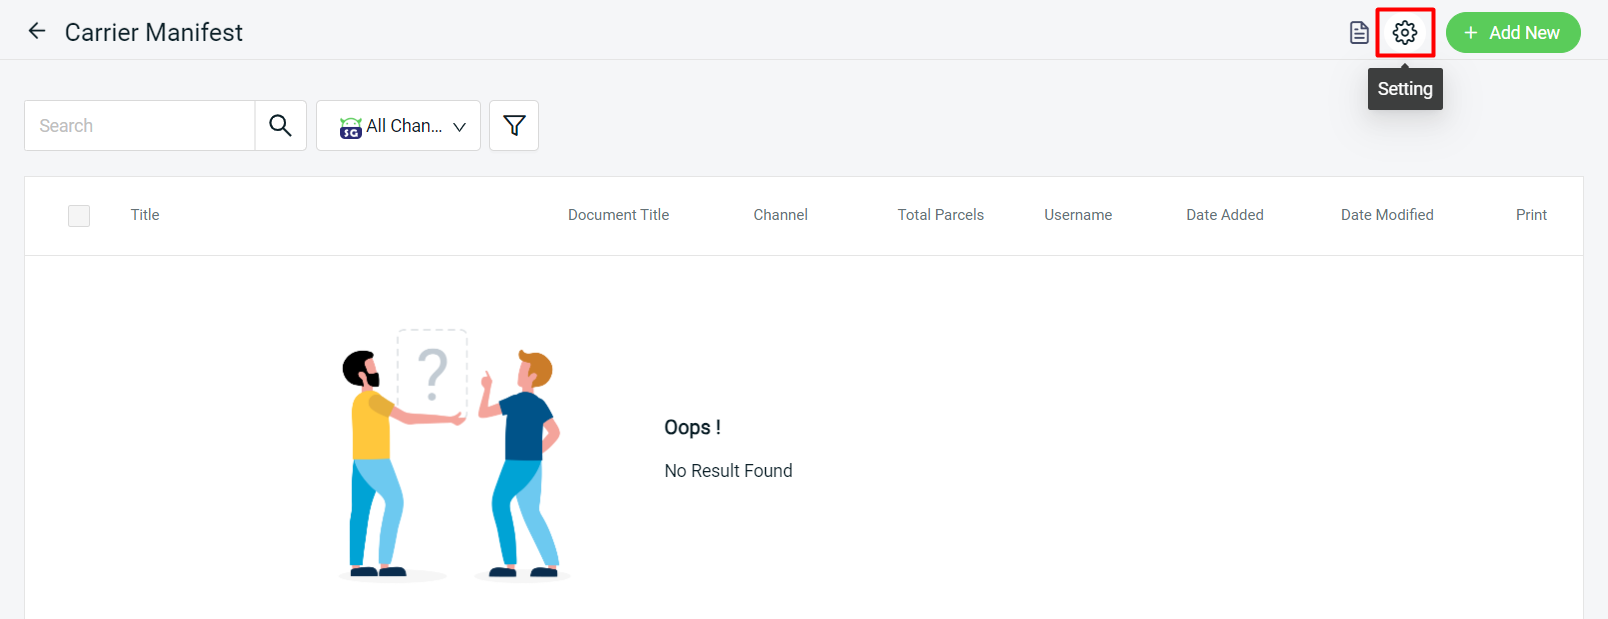
Step 2: Click on the Setting icon to configure the settings.
Step 3: Configure the settings based on your preferences > Save.
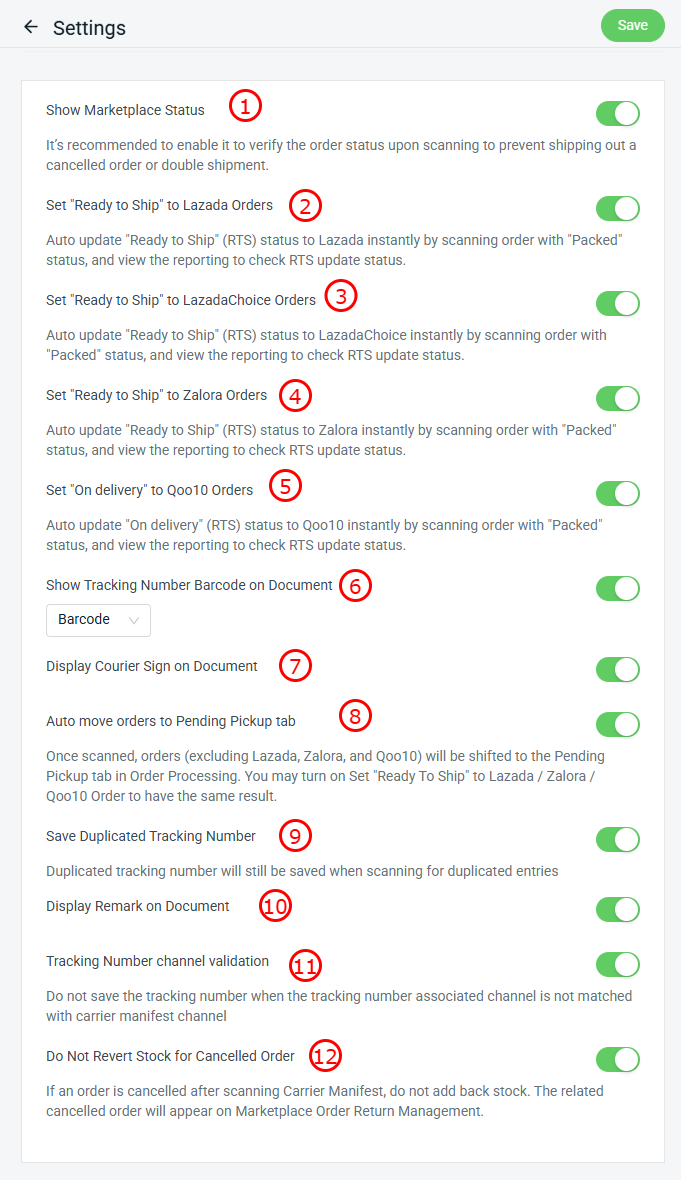
1. Show Marketplace Status: When enabled, the order status like Ready to Ship, Completed or Cancelled would be shown upon scanning.

2. Set "Ready to Ship" to Lazada Orders: Auto update Lazada order status from "Packed" to "Ready To Ship" status when scanning the order.

3. Set "Ready to Ship" to LazadaChoice Orders: Auto update LazadaChoice order status from "Packed" to "Ready To Ship" status when scanning the order.

4. Set "Ready to Ship" to Zalora Orders: Auto update Zalora order status from "Packed" to "Ready To Ship" status when scanning the order.

5. Set "On delivery" to Qoo10 Orders: Auto update Qoo10 order status from "Packed" to "Ready To Ship" status when scanning the order.

6. Show Tracking Number Barcode on Document: Choose whether to show Barcode or QR code beside the tracking number when printing out the Carrier Manifest.

7. Display Courier Sign on Document: Add a signature section under the Carrier Manifest for the courier person to sign upon handling the parcels.

8. Auto move to Pending Pickup tab: Auto move all orders (except for Lazada and Zalora)to pending pickup when scanning the order.

9. Save Duplicated Tracking Number: If you disable the button, it will not save duplicated tracking numbers scanned previously within the same list and will prompt an alert with a beep sound.

10. Display Remark on Document: The remark that you are entering when created carrier manifest will appear during printing.

11. Tracking Number channel validation: By enabling the button, it will not save the tracking number in carrier manifest if selection of  sales channel couriers is not same as inside your order details.

12. Do Not Revert Stock for Cancelled Order: By default, the system will deduct stock when an order is cancelled after scanning the carrier manifest. By enabling the button, stock will not be updated automatically, and the cancelled order will appear in Marketplace order return management.
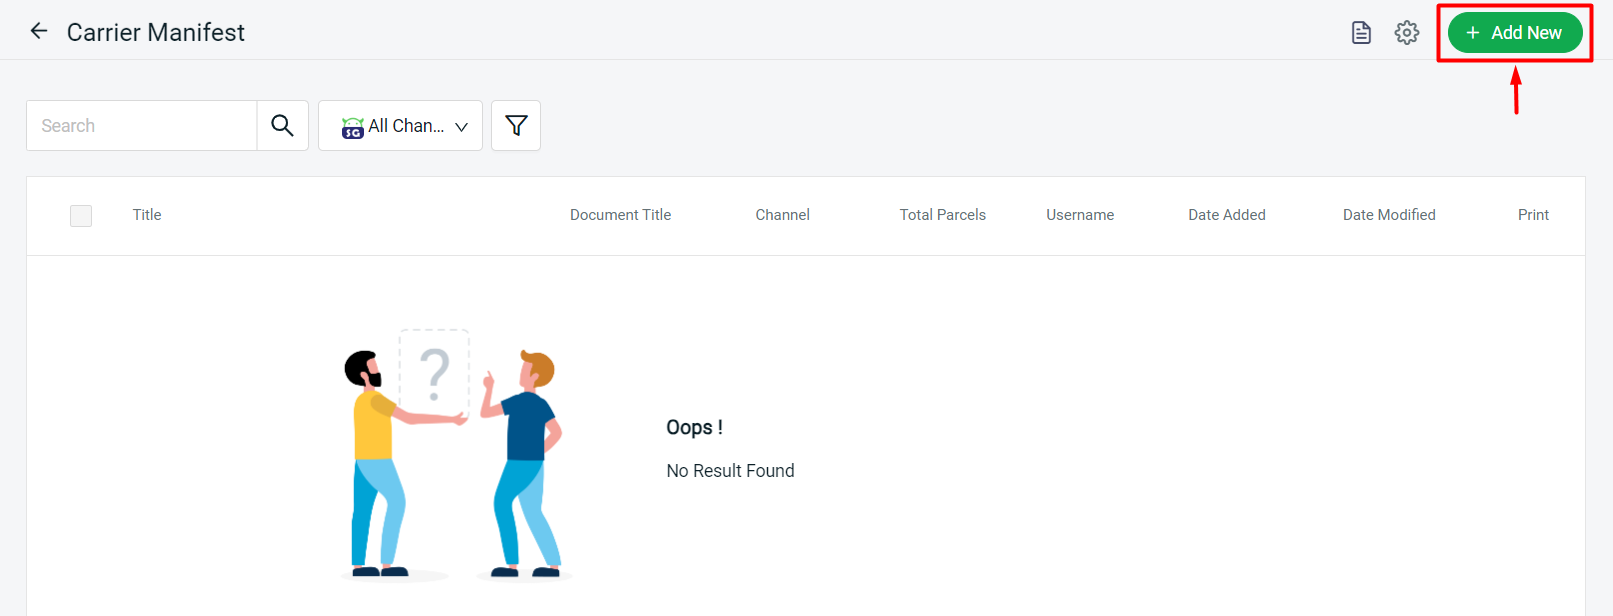
Step 4: Click on + Add New to create a new Carrier Manifest.
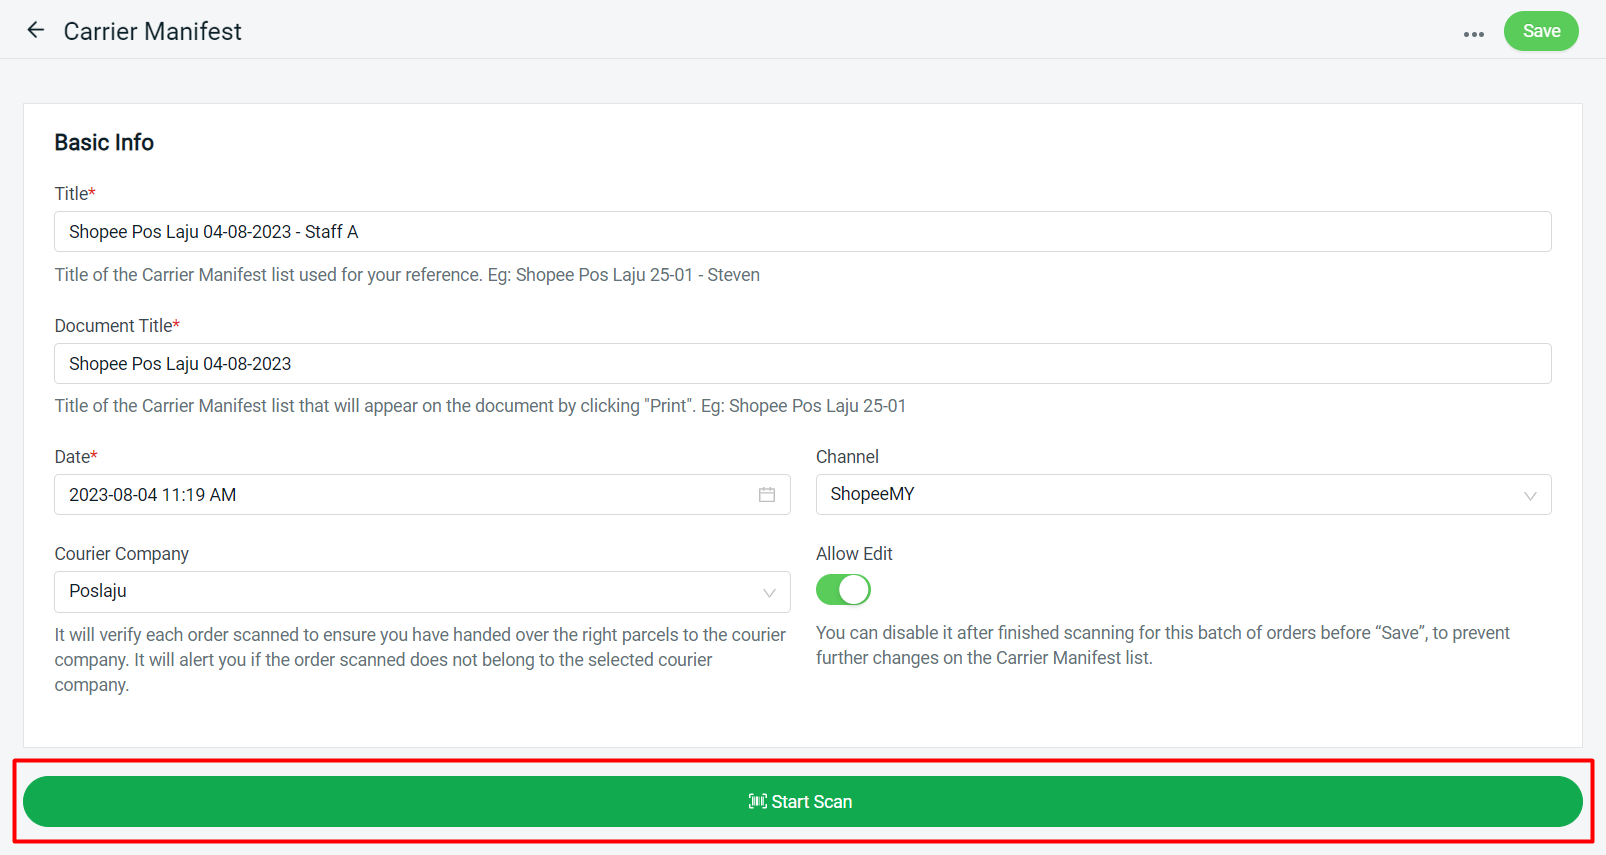
Step 5: Fill in the Basic Info and click on Start Scan.
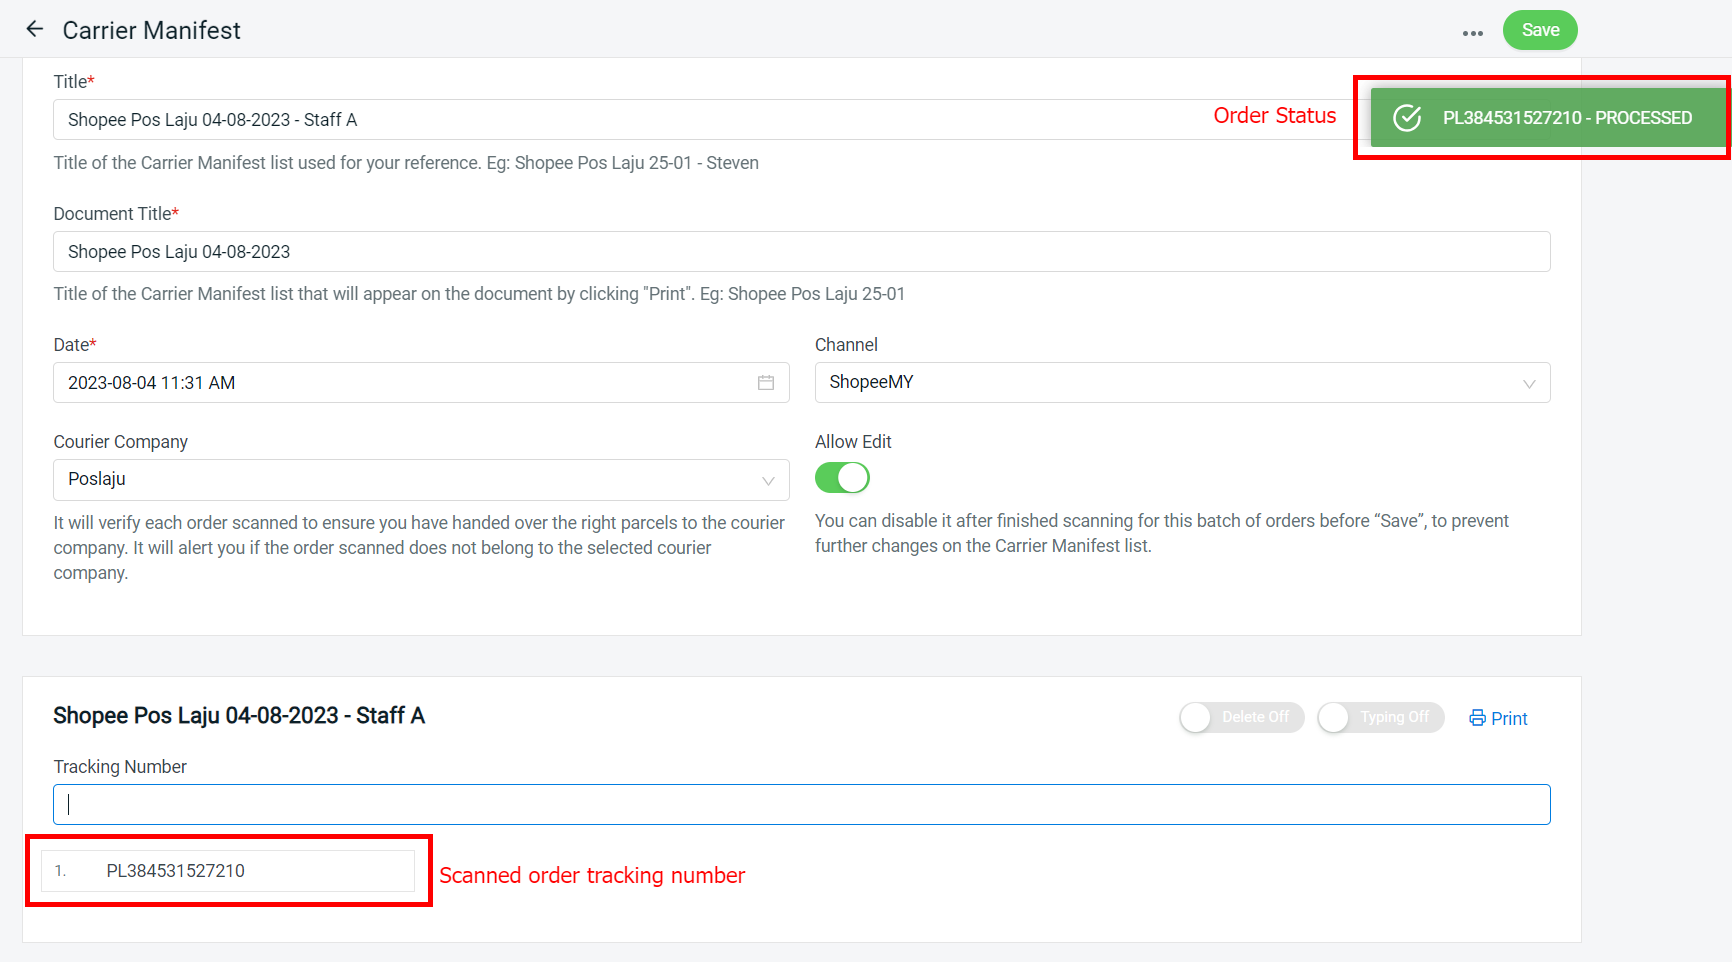
Step 6: The following section will appear and you may start to scan the tracking number on your shipping label in the column. If you don’t have a barcode scanner, you can also enable Typing to type the tracking number manually. Enable Delete if you wish to remove the scanned tracking number from the list.
Step 7: Once you scan or type the tracking number, the tracking number will be recorded and the status of the order will be displayed.
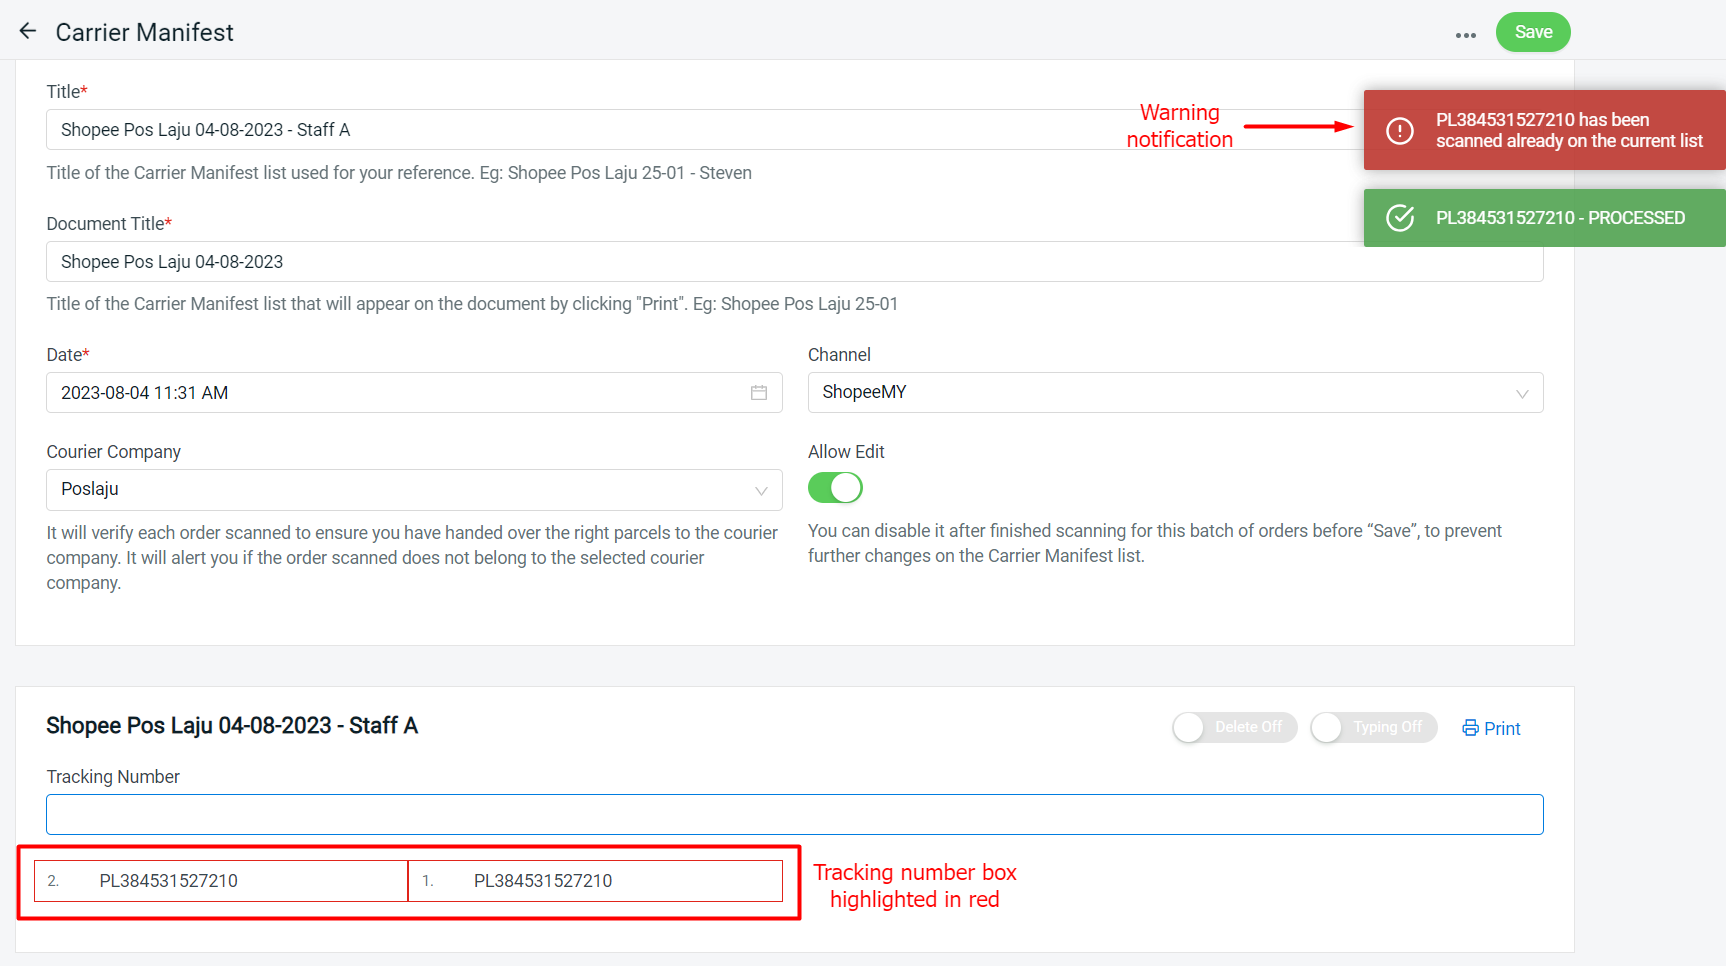
Step 8: When the order is duplicated, a warning notification will pop up.
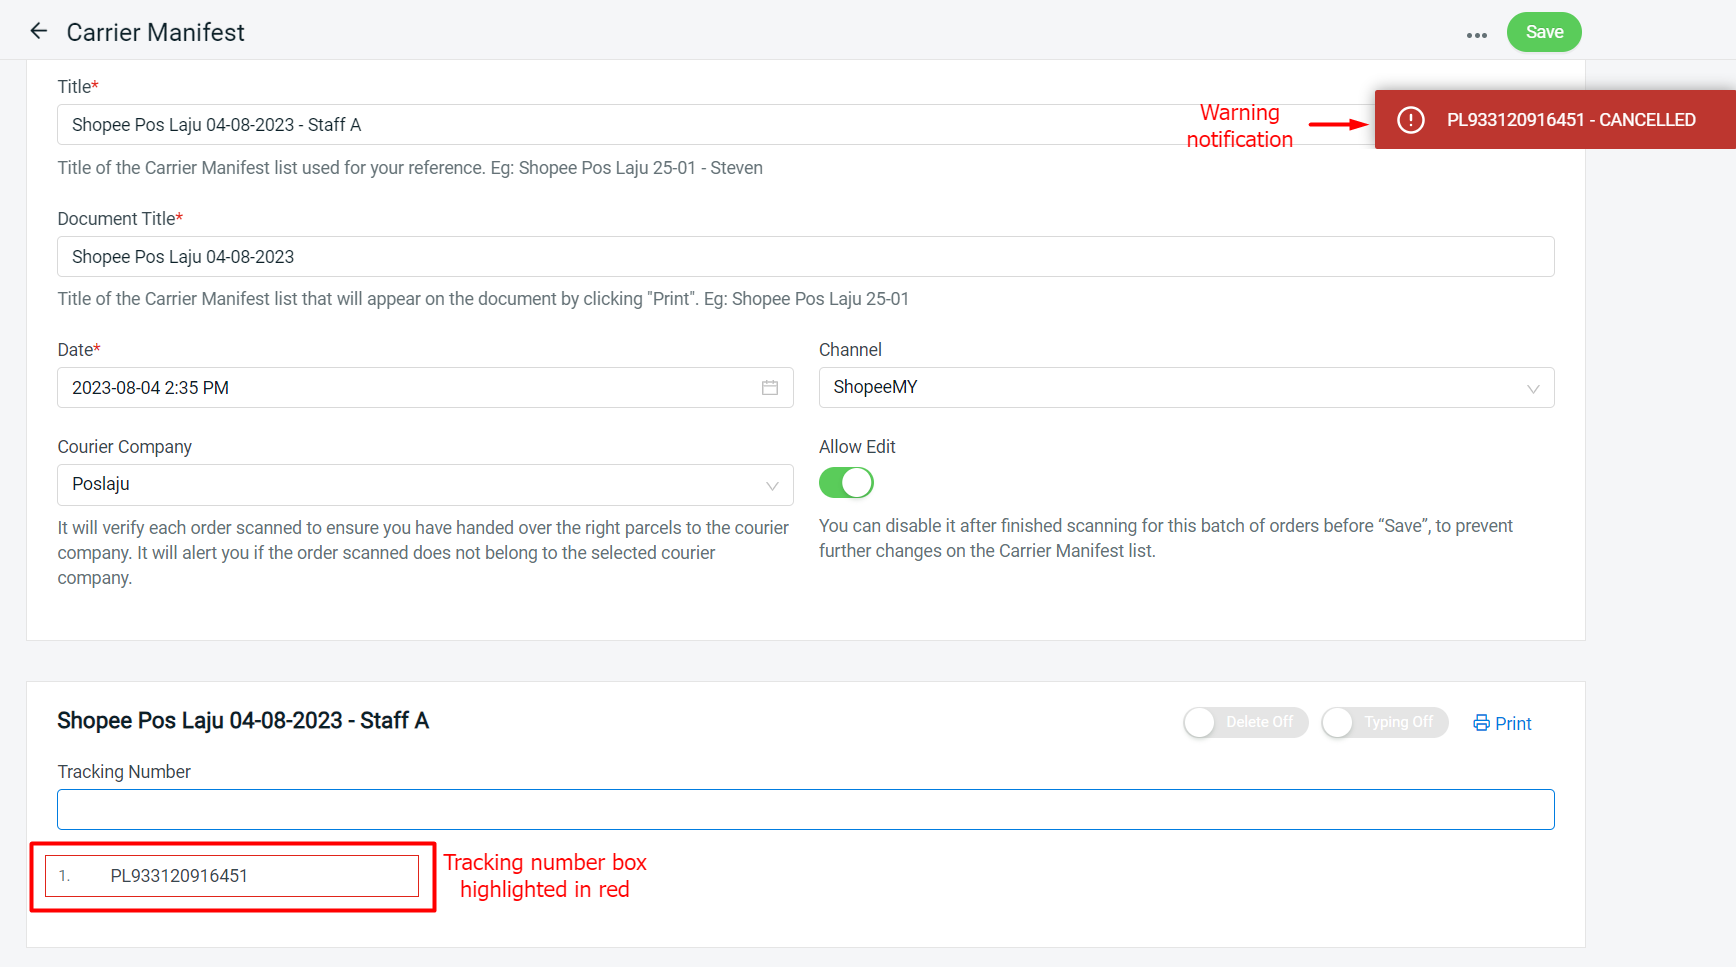
Step 9: If the order has already been cancelled, a warning notification will pop up.
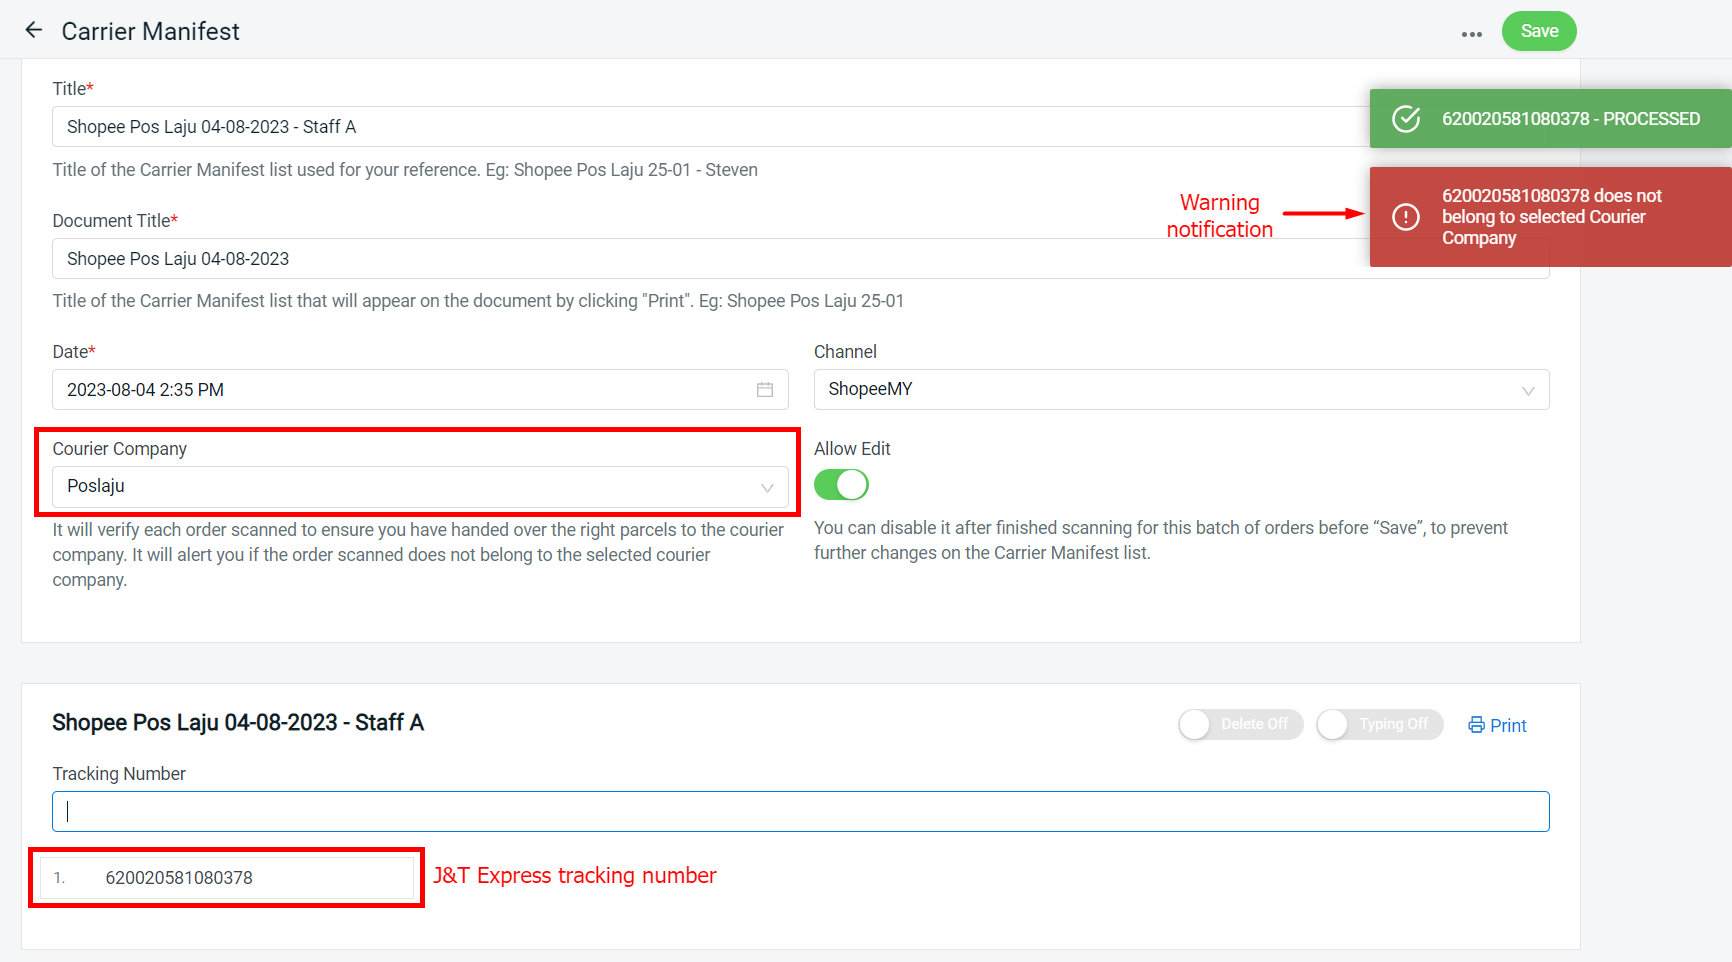
Step 10: If the scanned tracking number does not belong to the selected courier company, a warning notification will pop up. This ensures the parcel is not handed over to the incorrect courier company.
Step 11: Once done with all the scanning, you may click on Print to print out the carrier manifest.

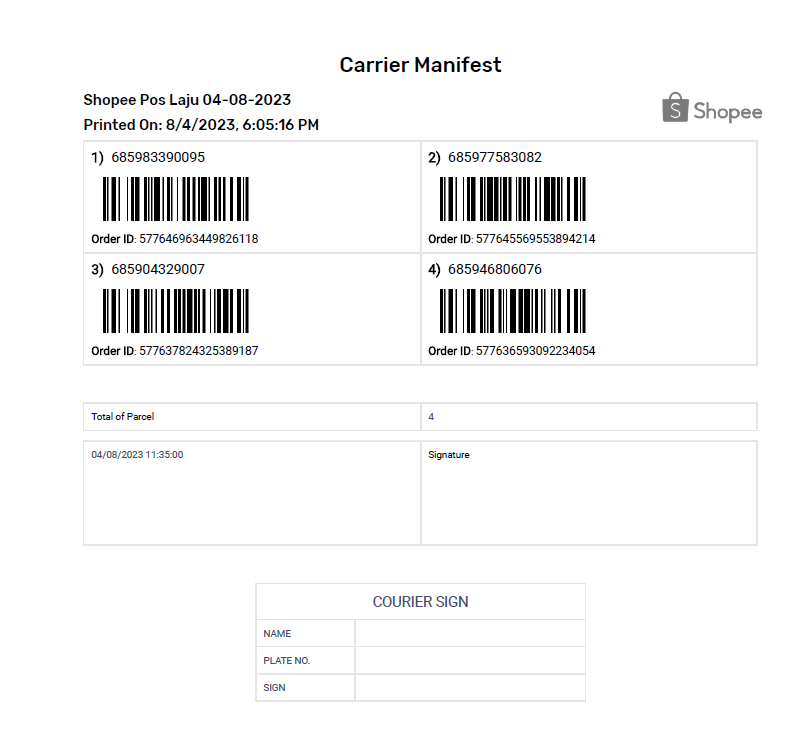
Step 12: The template below will be previewed and you may proceed to print it out. You may request the courier person to sign in the Courier Sign below as proof of parcel handling.
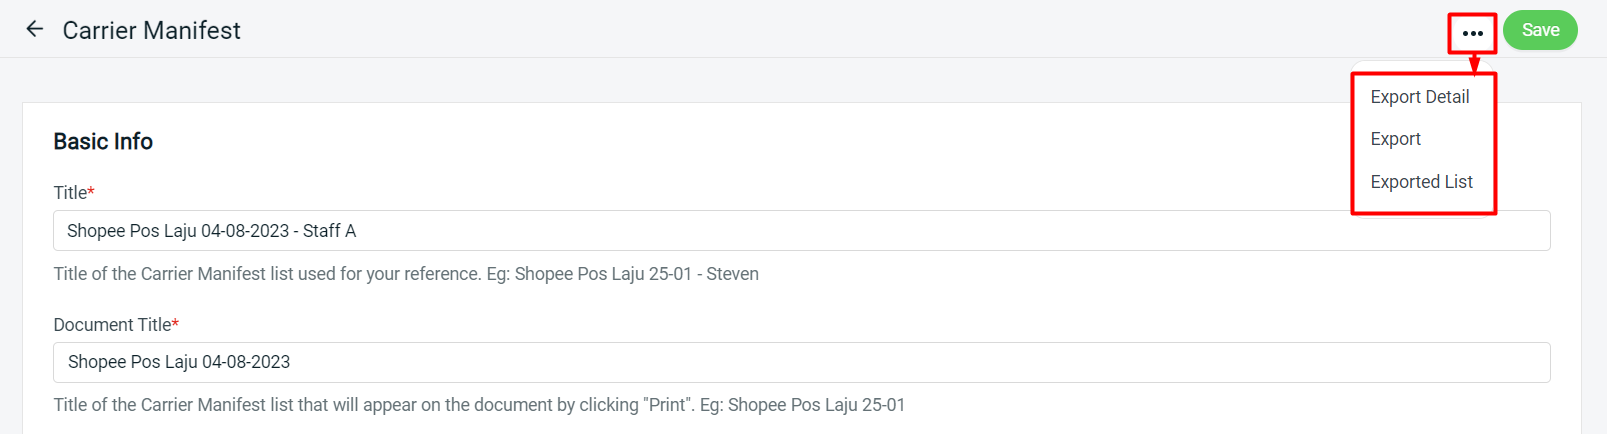
Step 13: You may also Export the carrier manifest to Excel for reference and record. (optional)
4. Marketplace Order Return Management
Sometimes, you may face a problem whereby the product is delivered to the customer, however, due to some unexpected circumstances, the customers might request a return and refund of the order. Another situation is, the parcel might fail to deliver to the customer due to some reasons, and you are unsure whether the parcel has been returned to you. With Marketplace Order Return Management, you can systematically manage your order returns and restock the items back into your inventory.
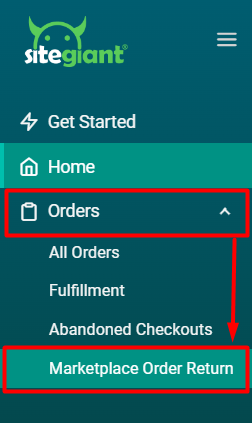
Step 1: Go to Order > Marketplace Order Return from the sidebar menu.
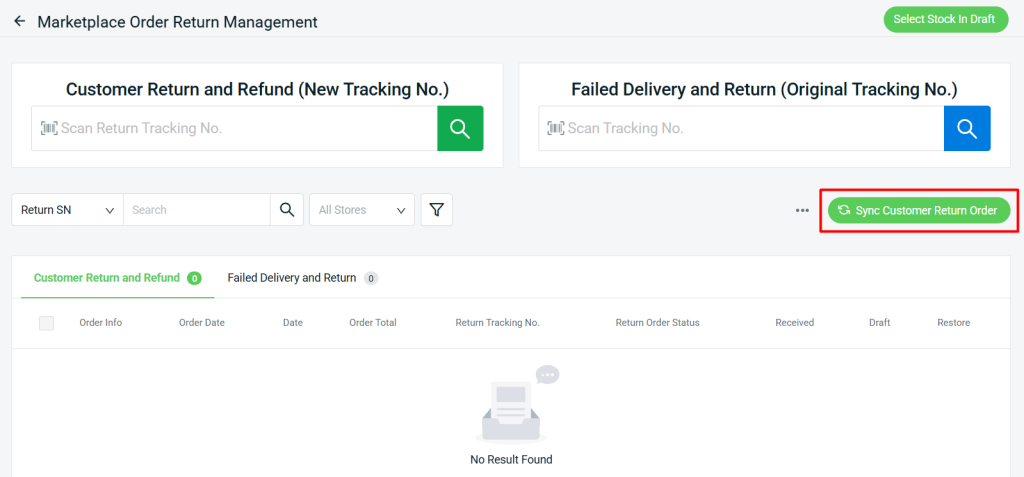
Step 2: Click Sync Customer Return Order to retrieve the marketplace return orders.
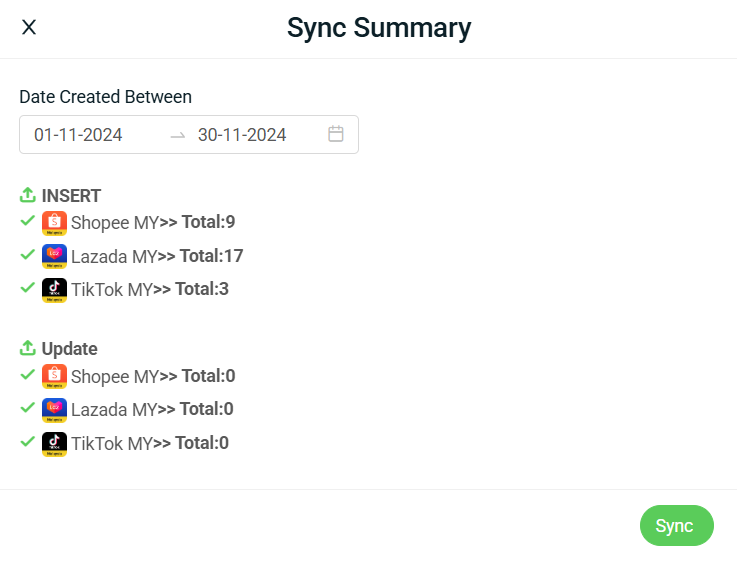
Step 3: Select Date Created Between > click Sync.
Step 4: You can check the Sync Summary for the total return orders inserted and updated.
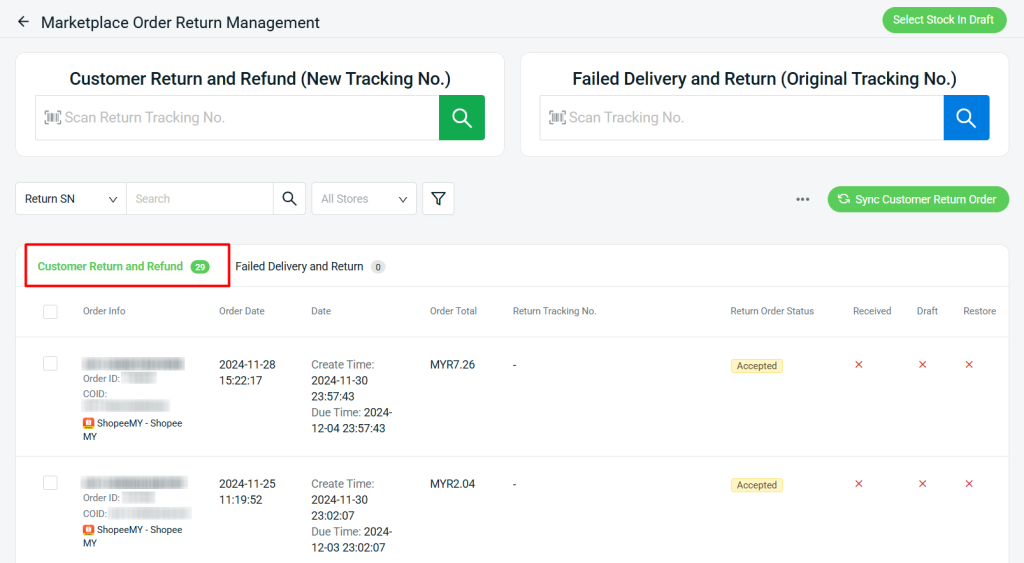
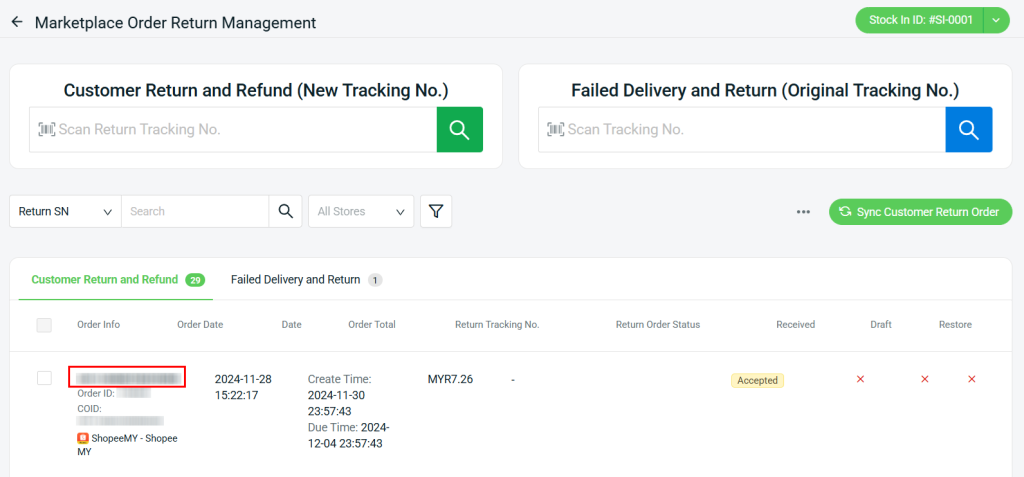
Step 5: The orders will be listed under the Customer Return and Refund tab.
Step 6: In cases of Failed Delivery or Return, you will need to scan or manually enter the original tracking number in the Failed Delivery and Return section. Once entered, the related order will be retrieved and displayed under the Failed Delivery and Return tab for further action.
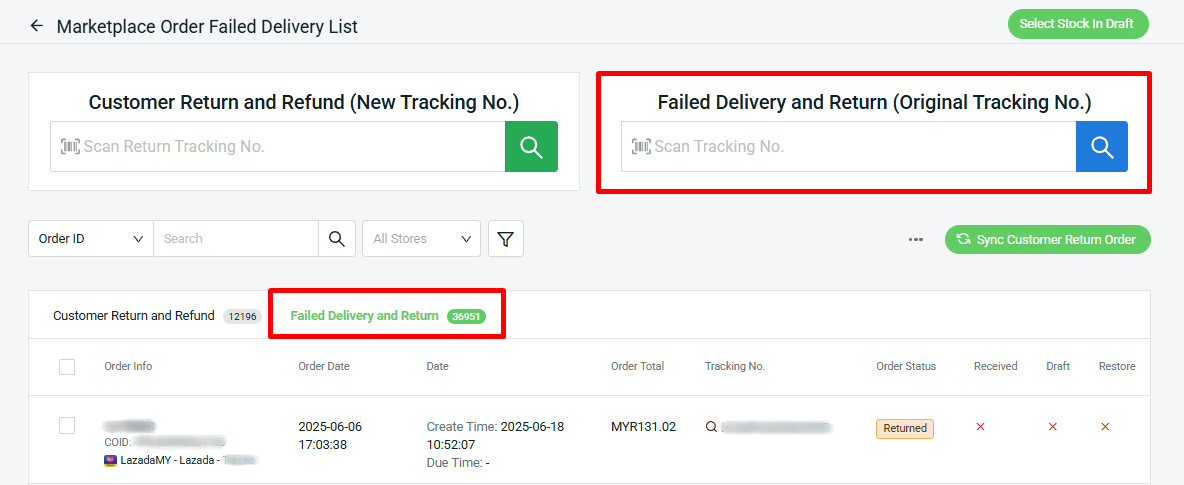
📌Note: Failed Delivery orders required scanning or inserting tracking numbers into the interface manually due to API limitations. This is because the API provided by marketplaces only allows the system to capture Customer Return orders.
Step 7: Then, you can proceed to Select Stock In Draft > Add Stock In Draft > fill in the Stock In details > Save.
Step 8: Click the Return SN of the order to view Marketplace Order Return Details.
Step 9: Click Receive Full Quantity or enter the quantity received manually in the Received column > tick the ‘Return parcel has been received’ checkbox > Confirm.
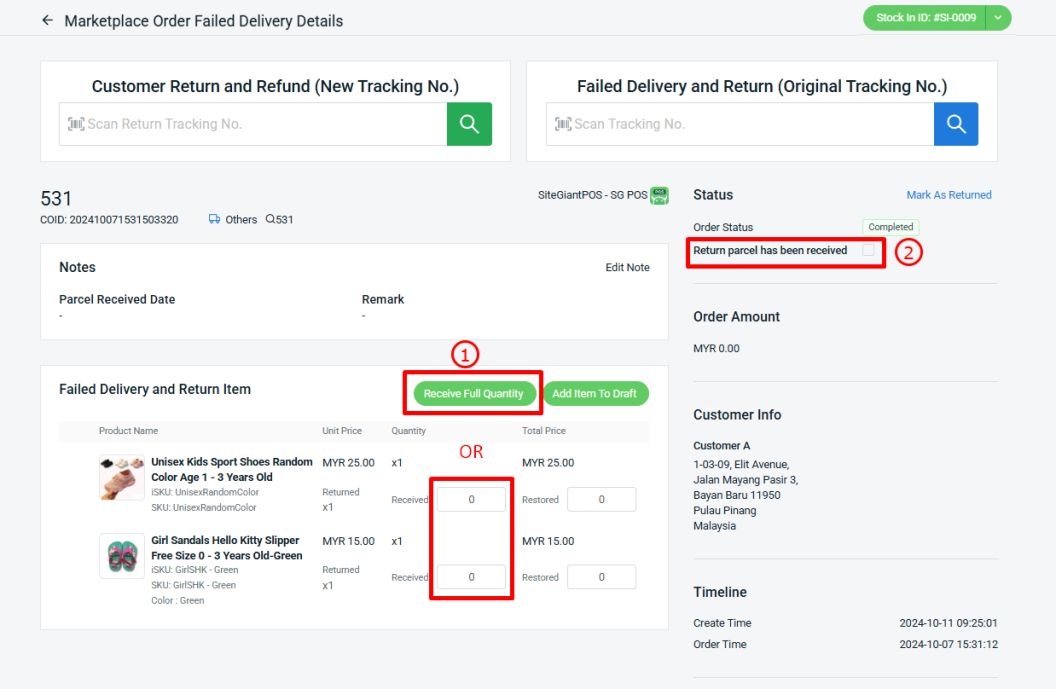
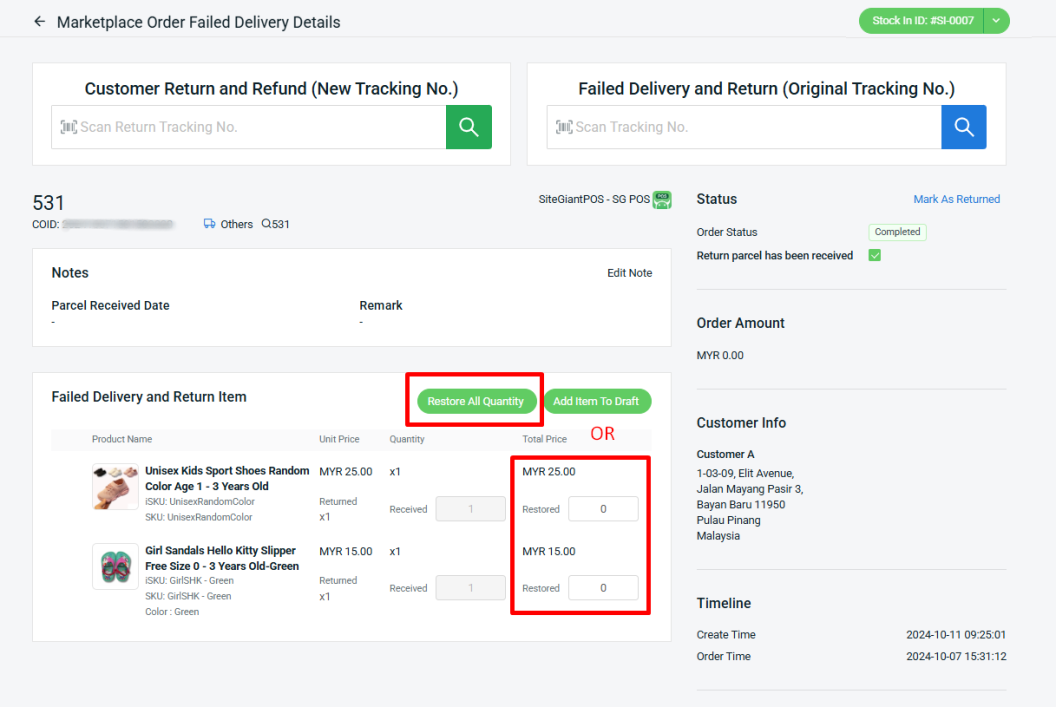
Step 10: Then, click Restore All Quantity or enter the quantity you would like to restore manually in the Restored column.
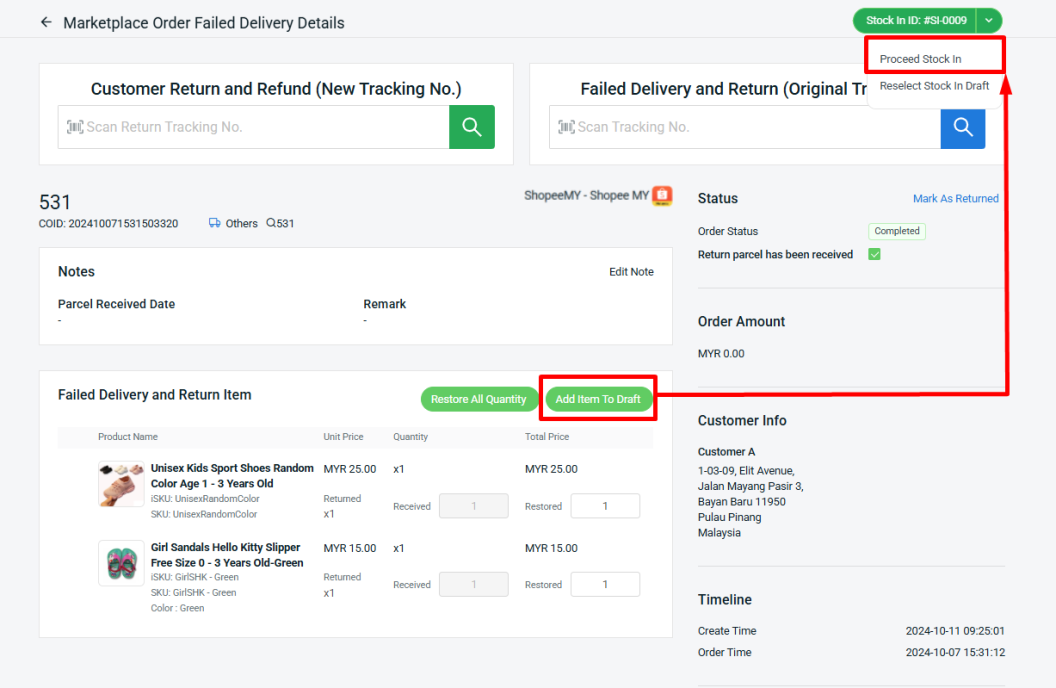
Step 11: Click Add Item To Draft > Proceed Stock In.
Step 12: Click Save.
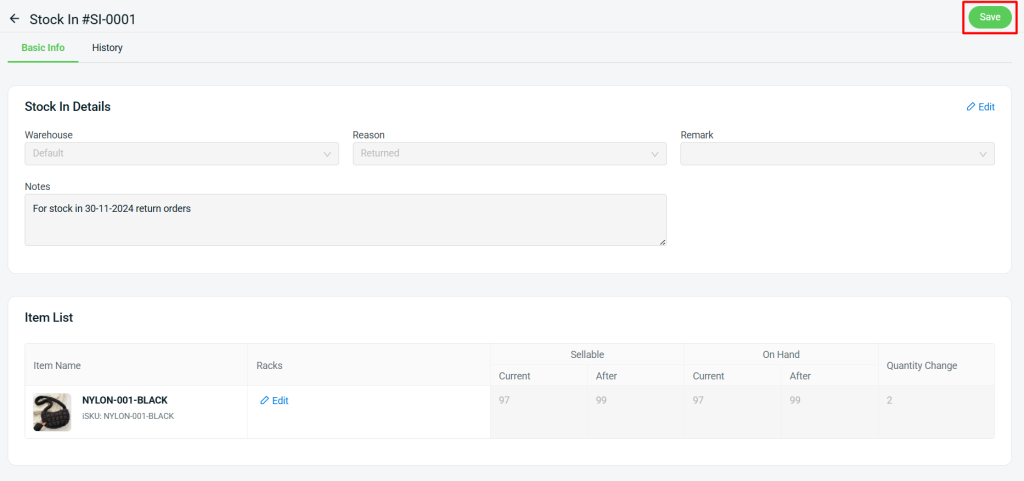
📌Note: You can only edit Remarks and Notes under Stock In Details.
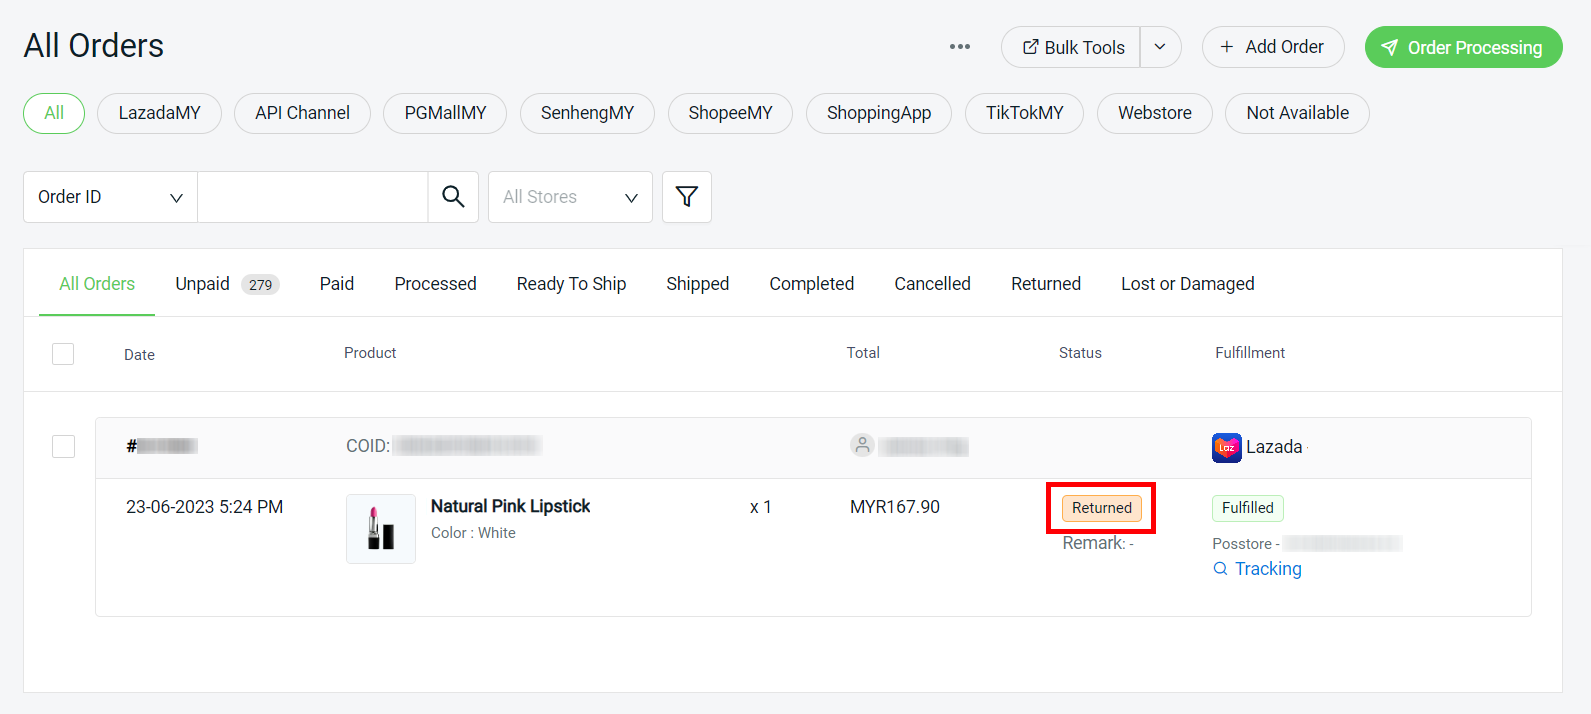
Step 13: When the order is shipped and fulfilled, the order status in SiteGiant will be updated to Completed, which will be the last status of the order. When the order is returned, the order status will not automatically update to marketplace status. Thus, you can manually mark the order as the Returned status for your record.

Step 14: The order status on the All Orders page will change from Completed to Returned.