
1. Introduction
2. Add And Update Product
3. Marketplace Category Mapping
4. Bulk Copy Listing
5. Master SKU
6. Marketplace Pricing Management
1. Introduction
In this Onboarding tutorial, we will walk you through the effective ways to add products and sync to other marketplaces to sell. We would suggest you add products to one of the sales channels (preferably Shopee), perform Bulk Inventory Linking and then use Bulk Copy Listing tool to copy the products to other sales channels.
In this guide, you will learn 1 more SKU term, which is Master SKU. Master SKU is used to group Parent SKU together and with that, you can easily sync products across the marketplaces in one page. After setting Master SKU, you may also utilize the Marketplace Pricing Management feature to edit and sync prices to all these marketplaces too.
2. Add And Update Product
We will use the Shopee channel as an example to guide you on adding and updating products.
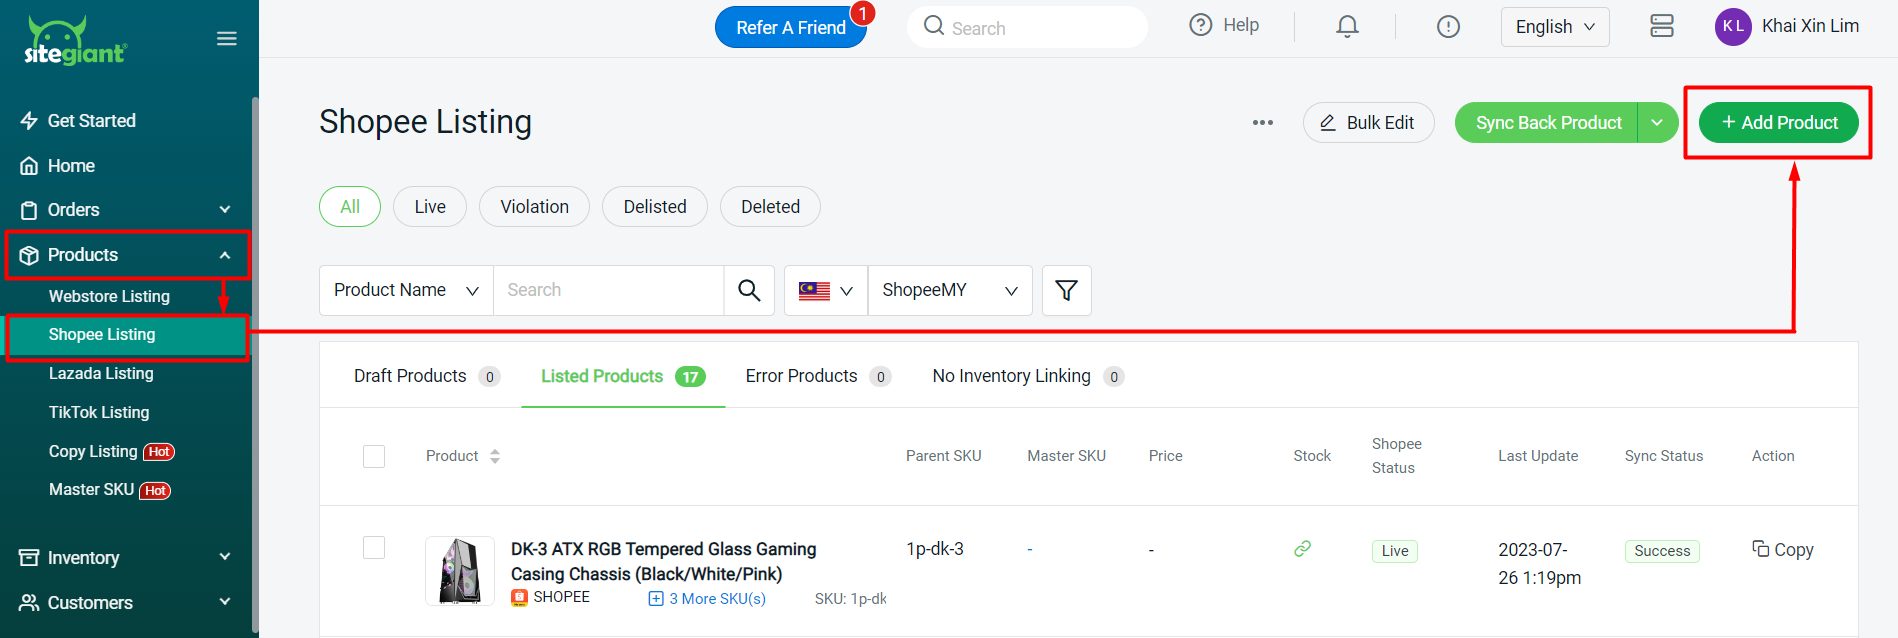
Step 1: Navigate to Products > Shopee Listing > + Add Product.
Step 2: If your product has variants, enable the Product has variants status > fill in the Parent SKU, Product Name, and Categories. The categories would be recommended based on the Product Name.

💡Tips: Giving your product a structured name.
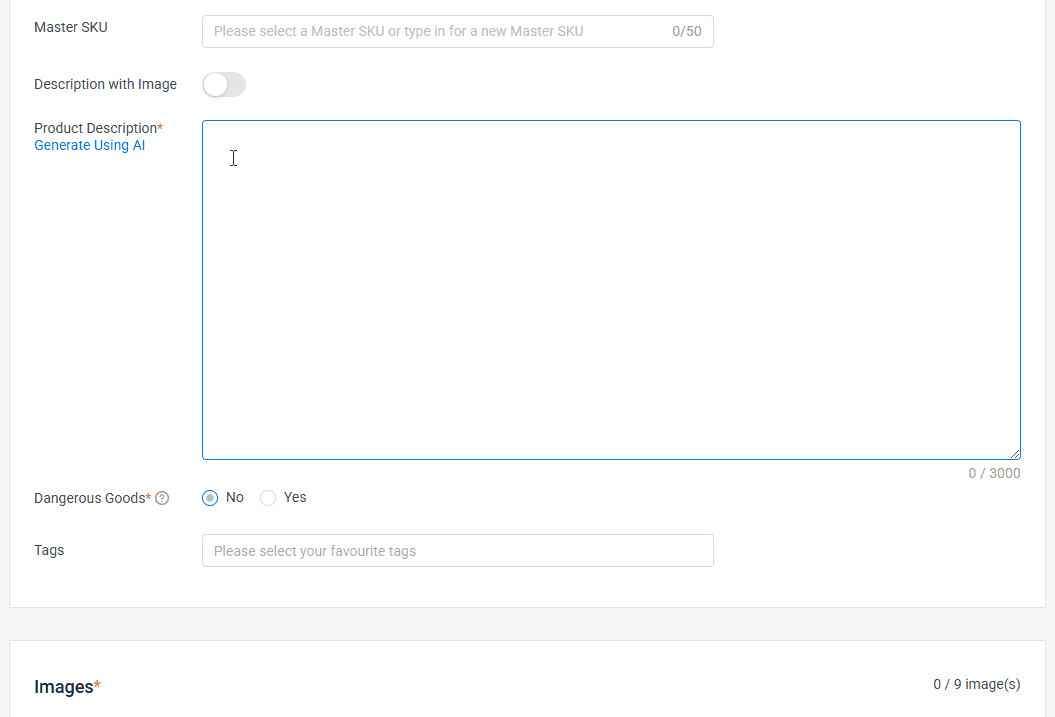
Step 3: Insert a complete and detailed Product Description to give customers a better understanding of the product. Only certain selected whitelisted sellers are able to upload images in the Description. If this applies to you, you may enable the Description with Image status and upload images in the description.
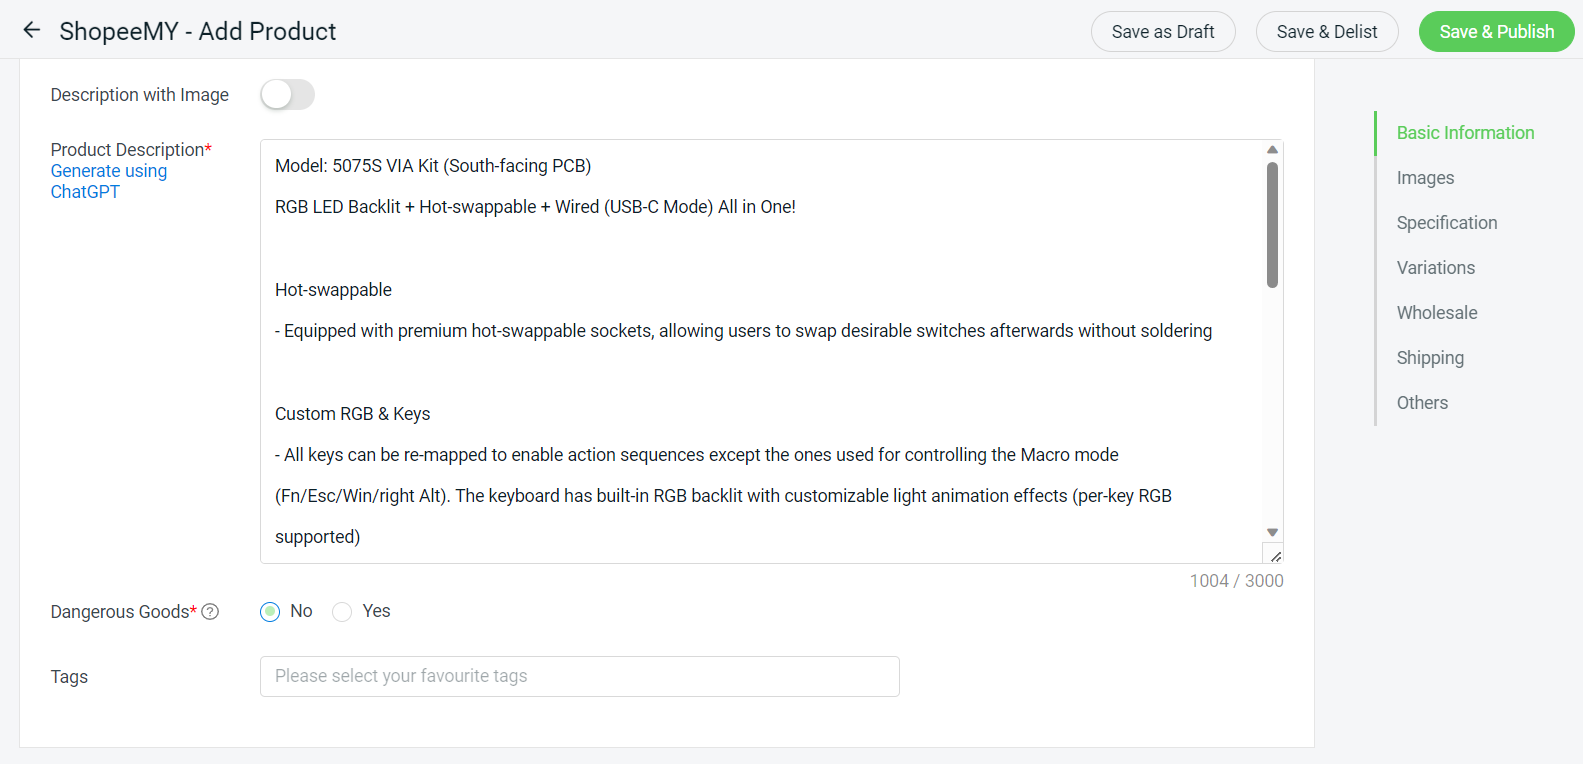
💡Tips: If you have no idea what to write in the Product Description, introduce you to the Generate Using AI feature which require Top Up SiteGiant Wallet.
Step 4: Upload your product images. (Maximum size 2MB)
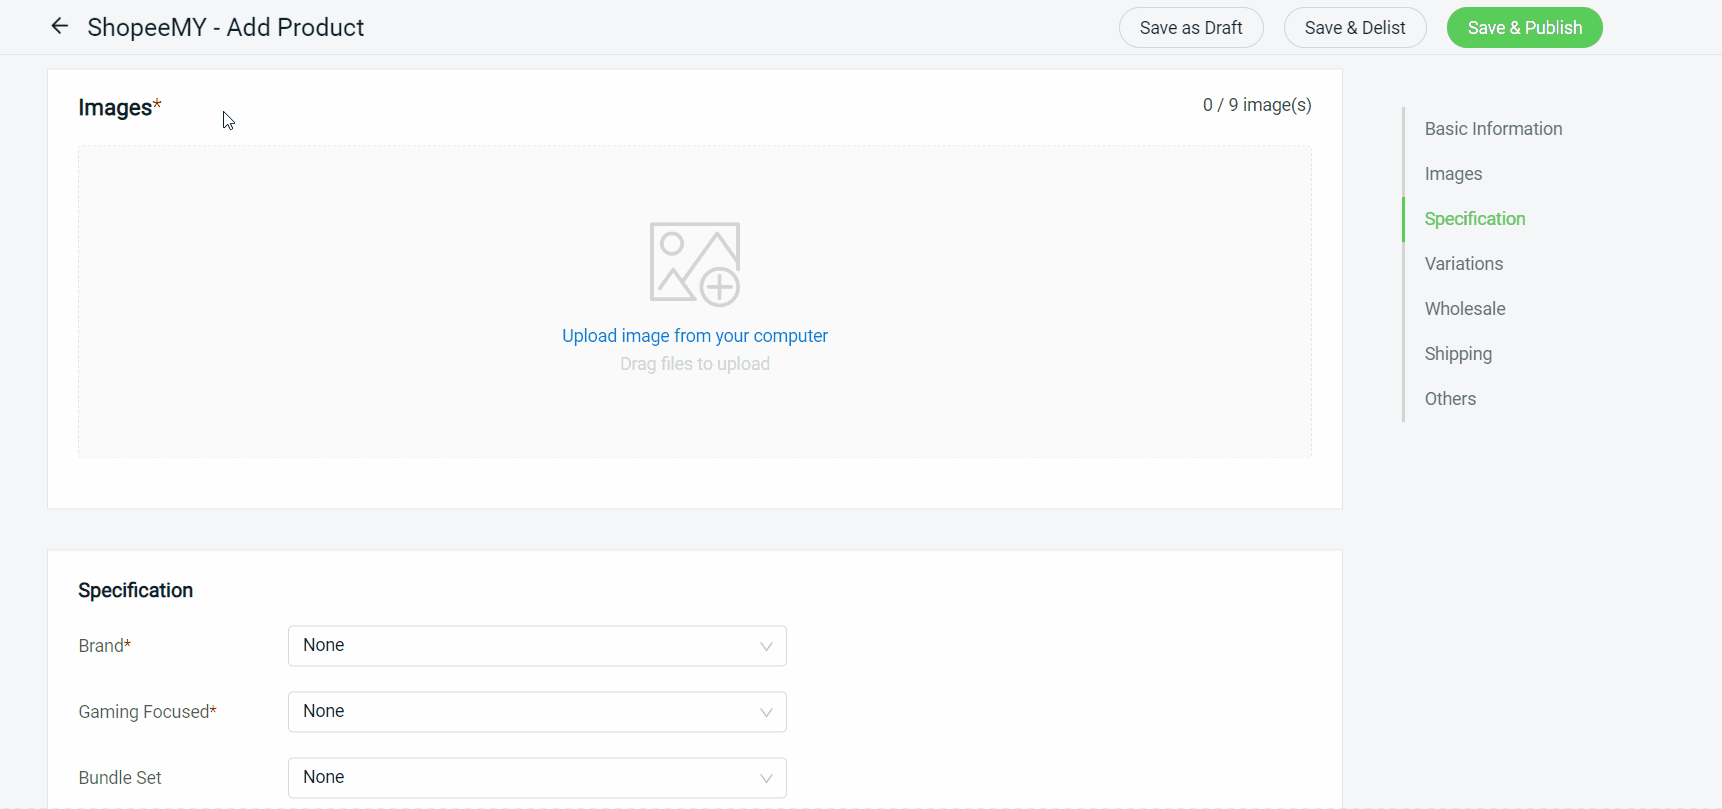
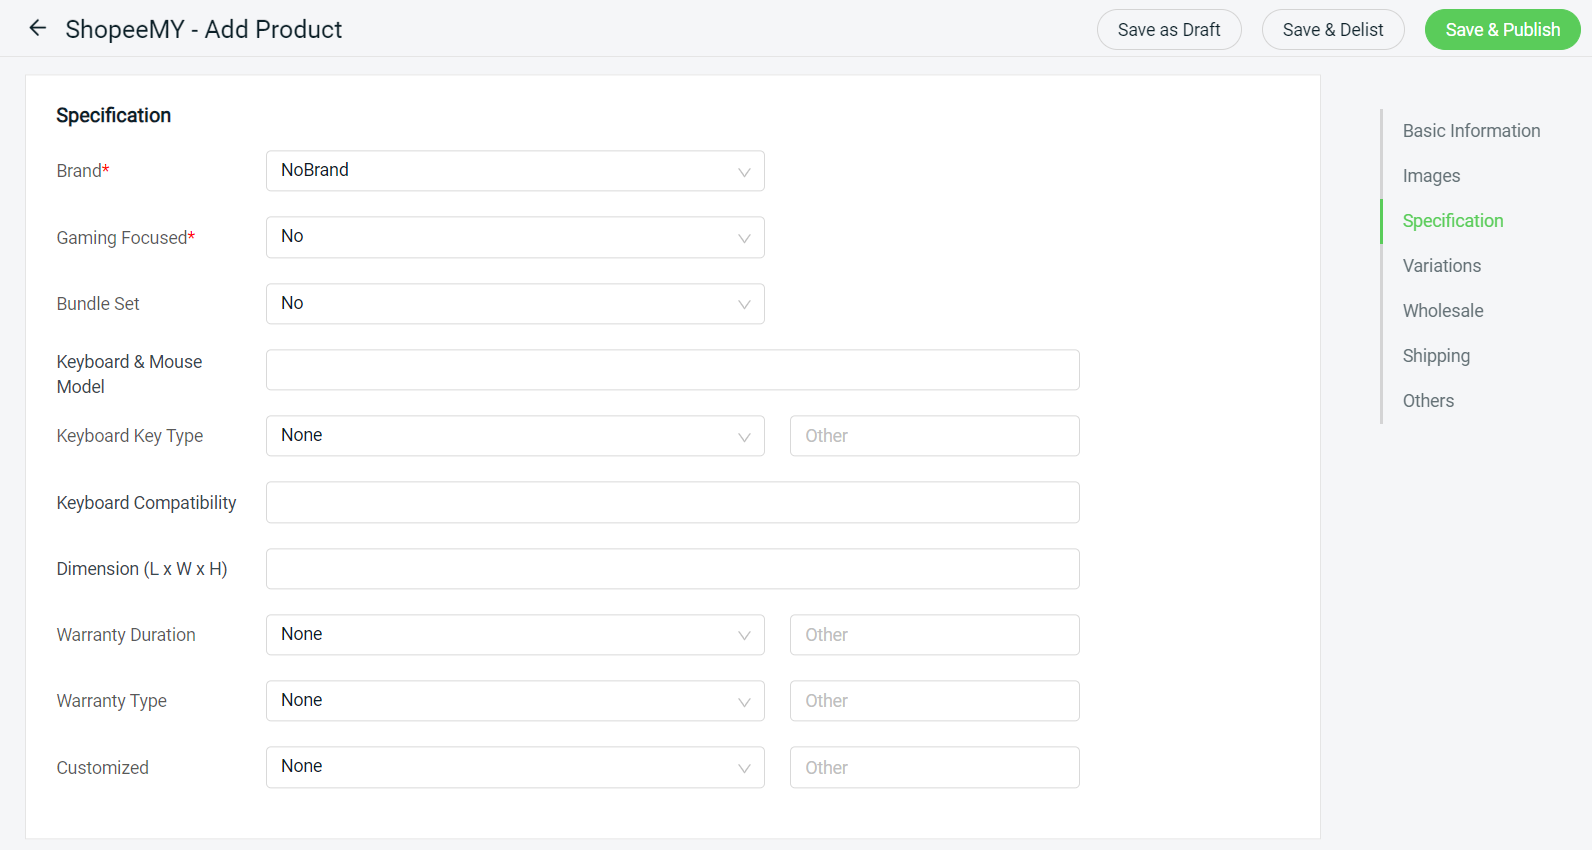
Step 5: Fill up the Specification based on the selected category.
Step 6: If the Product has variants enabled, you will find this Variations section. Enter the Variation Name and Options. You can also choose to add an image for each of the variations options. Maximum can up to 2 types of Variation.
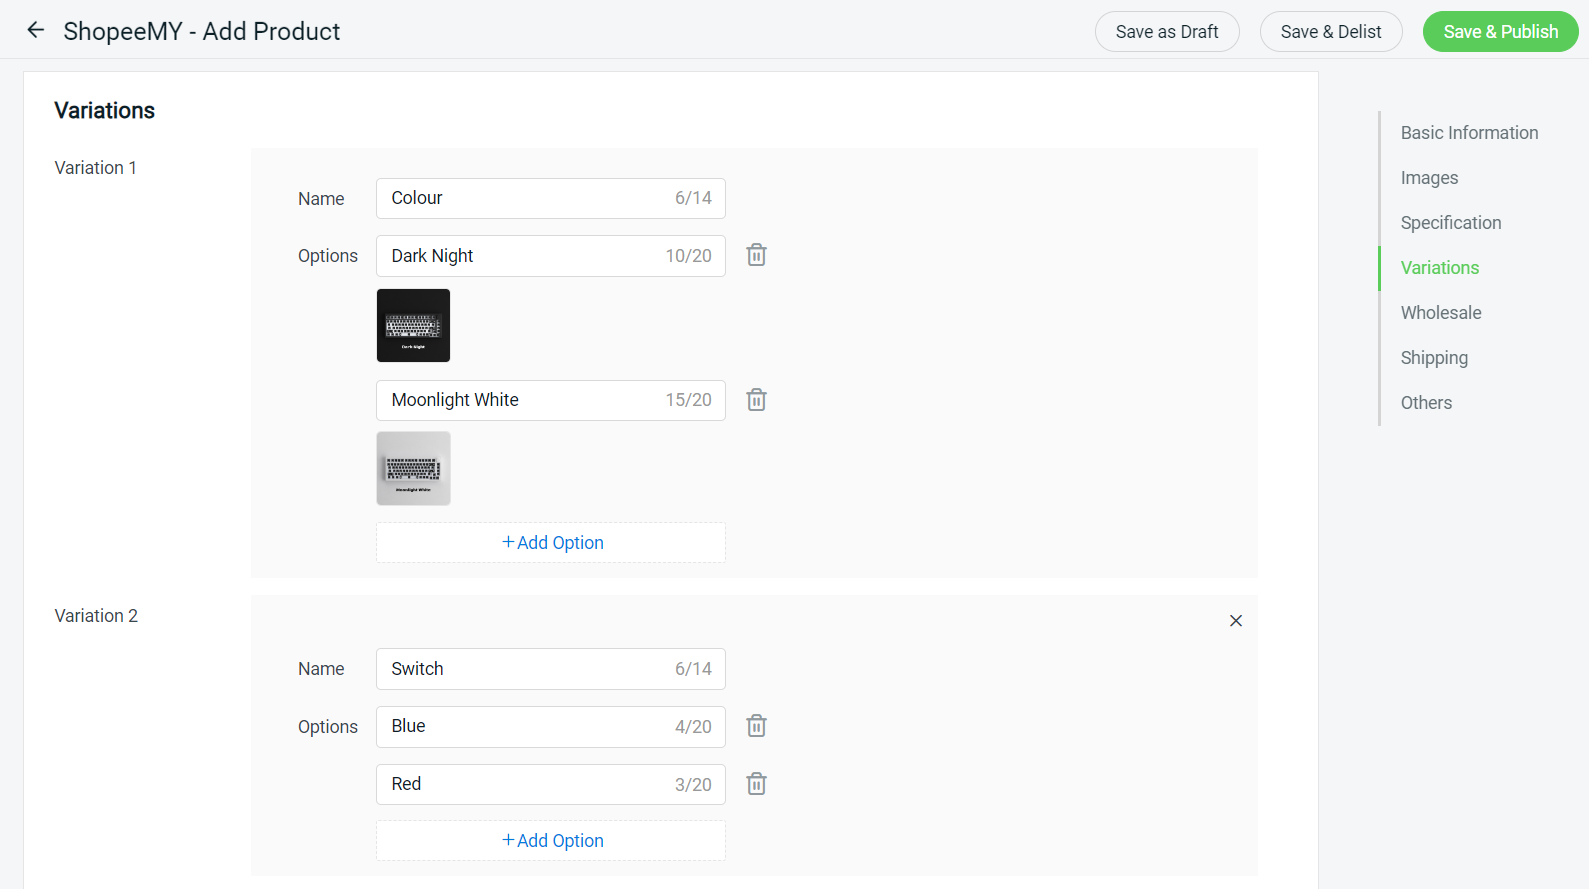
📌Note: For one variation type (single-tier variation), you can add up to 50 options. For two variation types, the variations combinations cannot exceed 50.
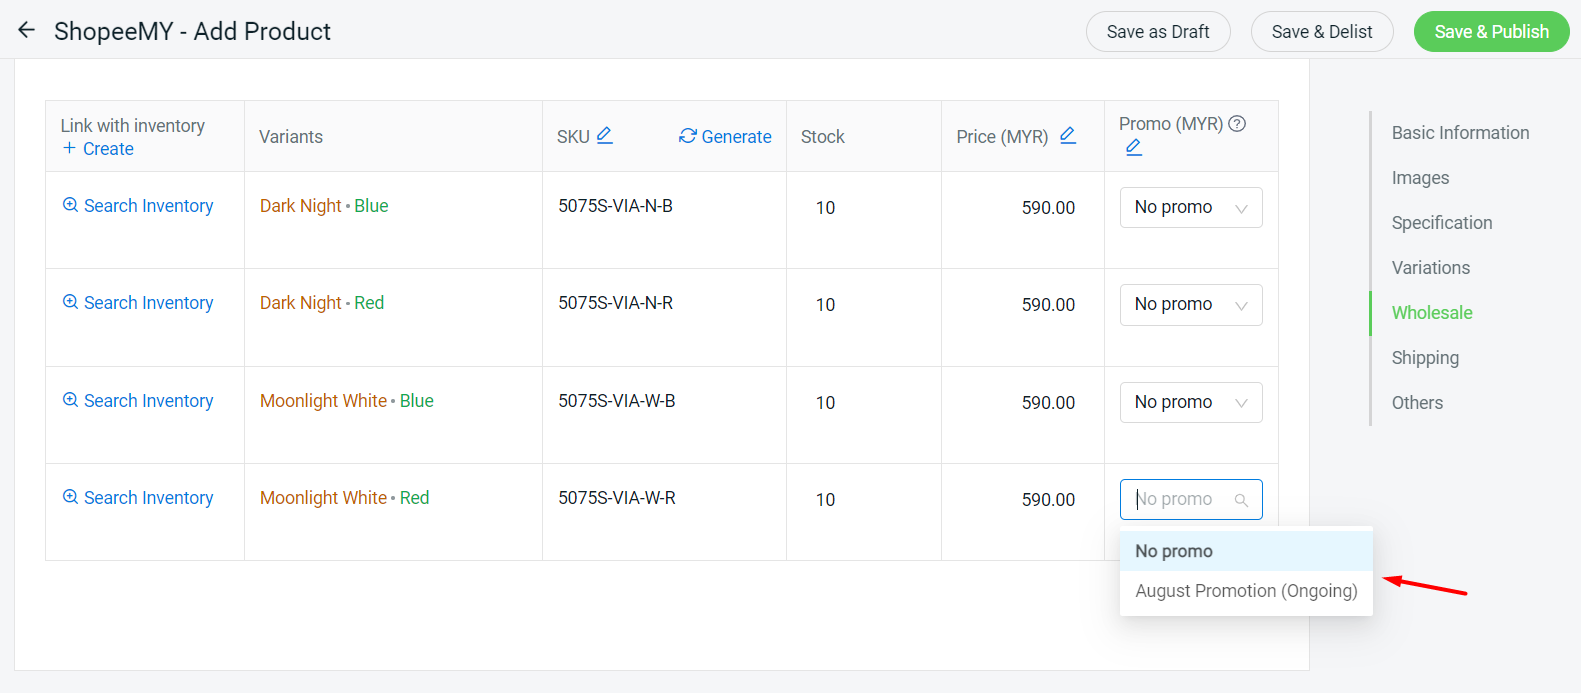
Step 7: Fill in the Variant SKU, Stock, Price, and Promo for the variations.
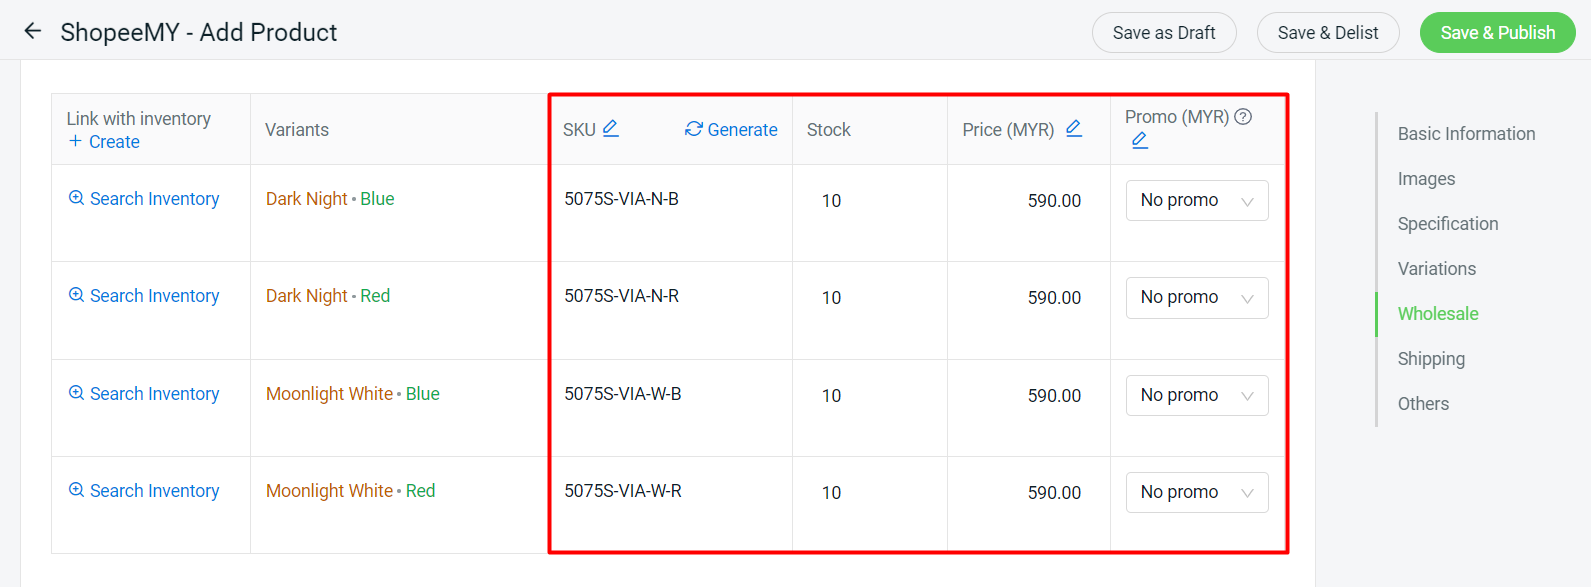
💡Tips: If your product doesn’t have an SKU code, you may use the Generate function to generate an SKU for your variations. The format would be [Parent SKU]-[Variation 1 Options]-[Variation 2 Options]
📌Note: For the Promo, the Discount Promotion must be created in Shopee Seller Center first, then go to Apps > Marketplaces > Shopee Promotion Listing to sync back the promotion. After that, only you are able to add the variation into the Discount Promotion and set the promotion price.
Step 8: If you wish to create a Wholesale Promotion, you may enable the Wholesale Product Status, and then set the Price Tier Quantity and Unit Price.

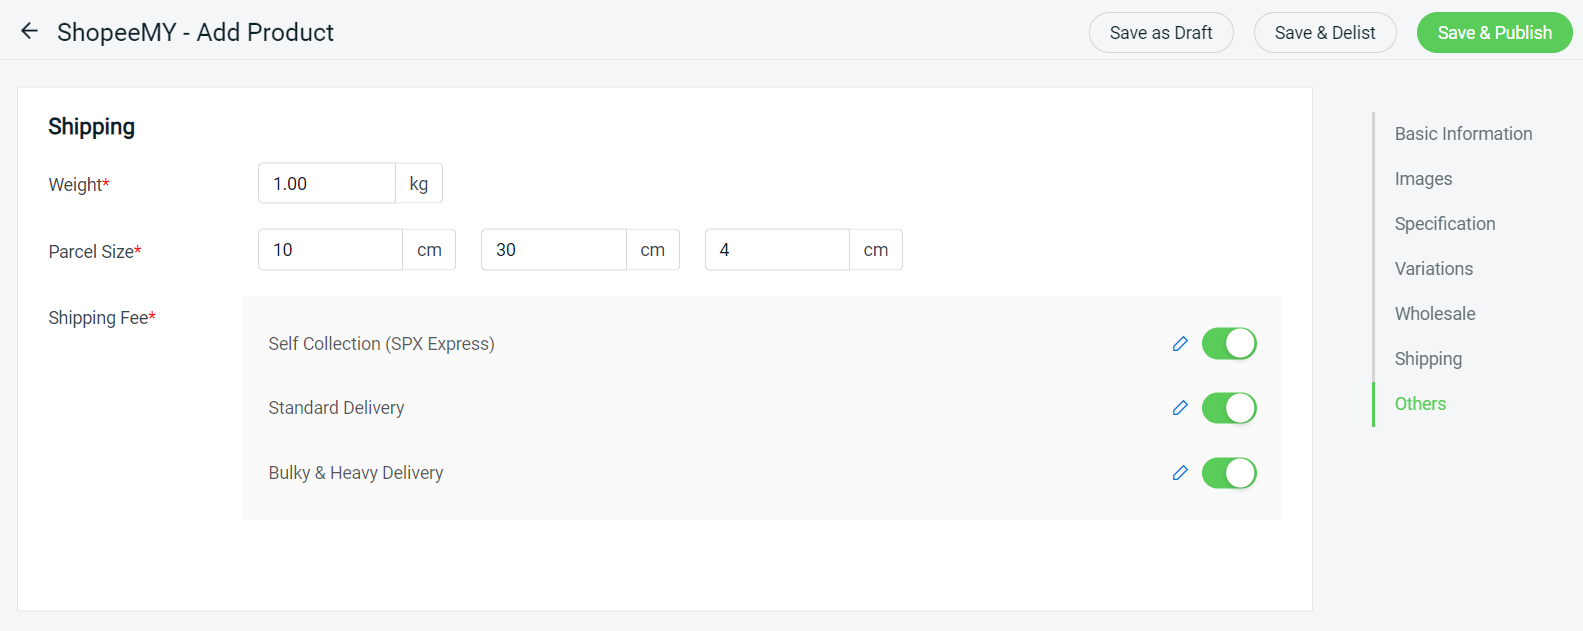
Step 9: Under the Shipping section, fill in the Weight, Parcel Size (WxLxH), and the Shipping Fee.
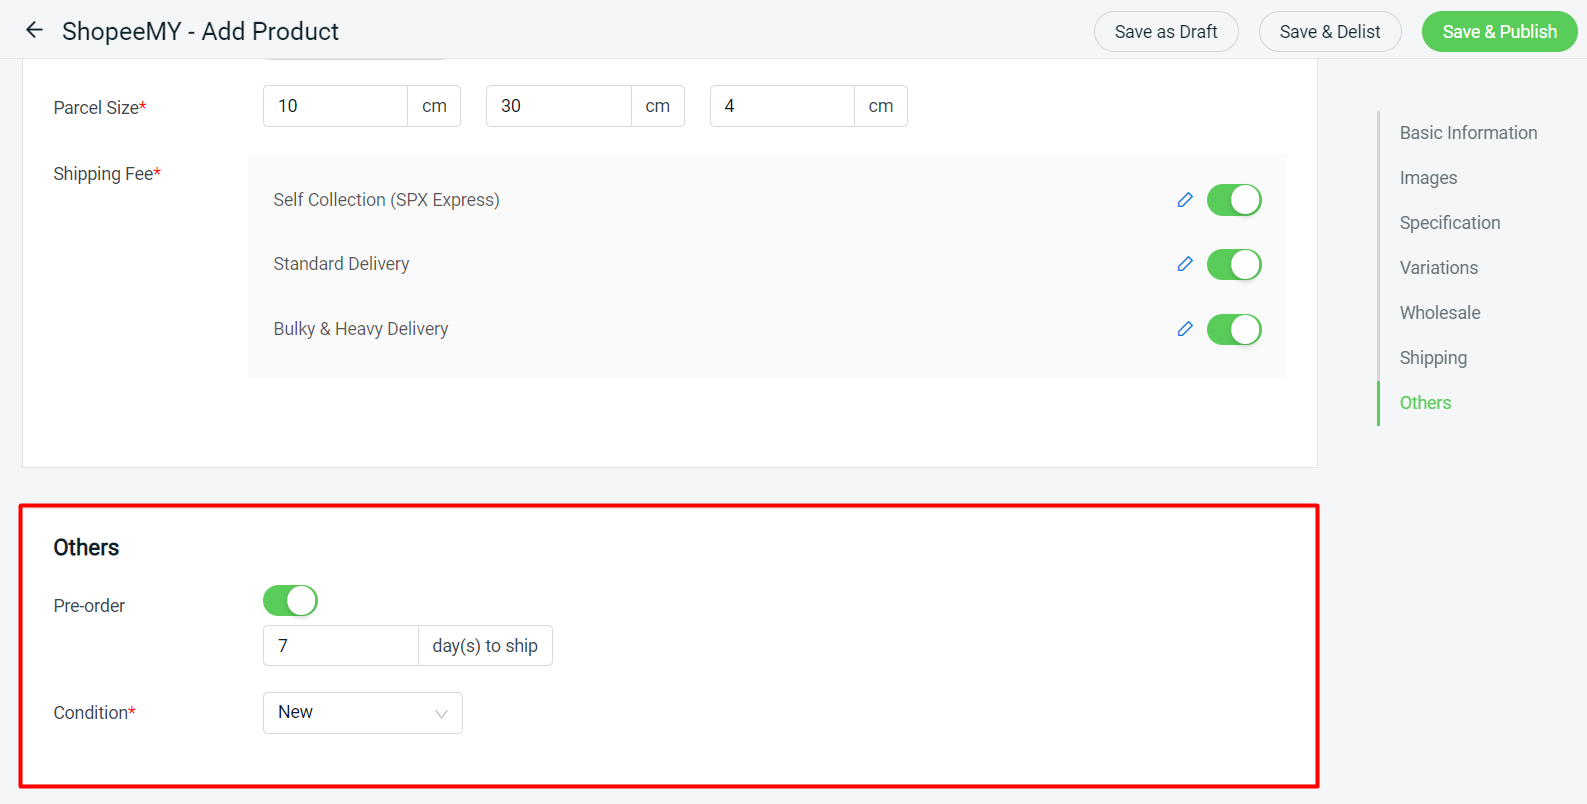
Step 10: If your product is a Pre-order product that requires a longer time (7-30 days) for order preparation, you may turn on the Pre-order status and set the days to ship > set the Condition of the product whether is New or Used.
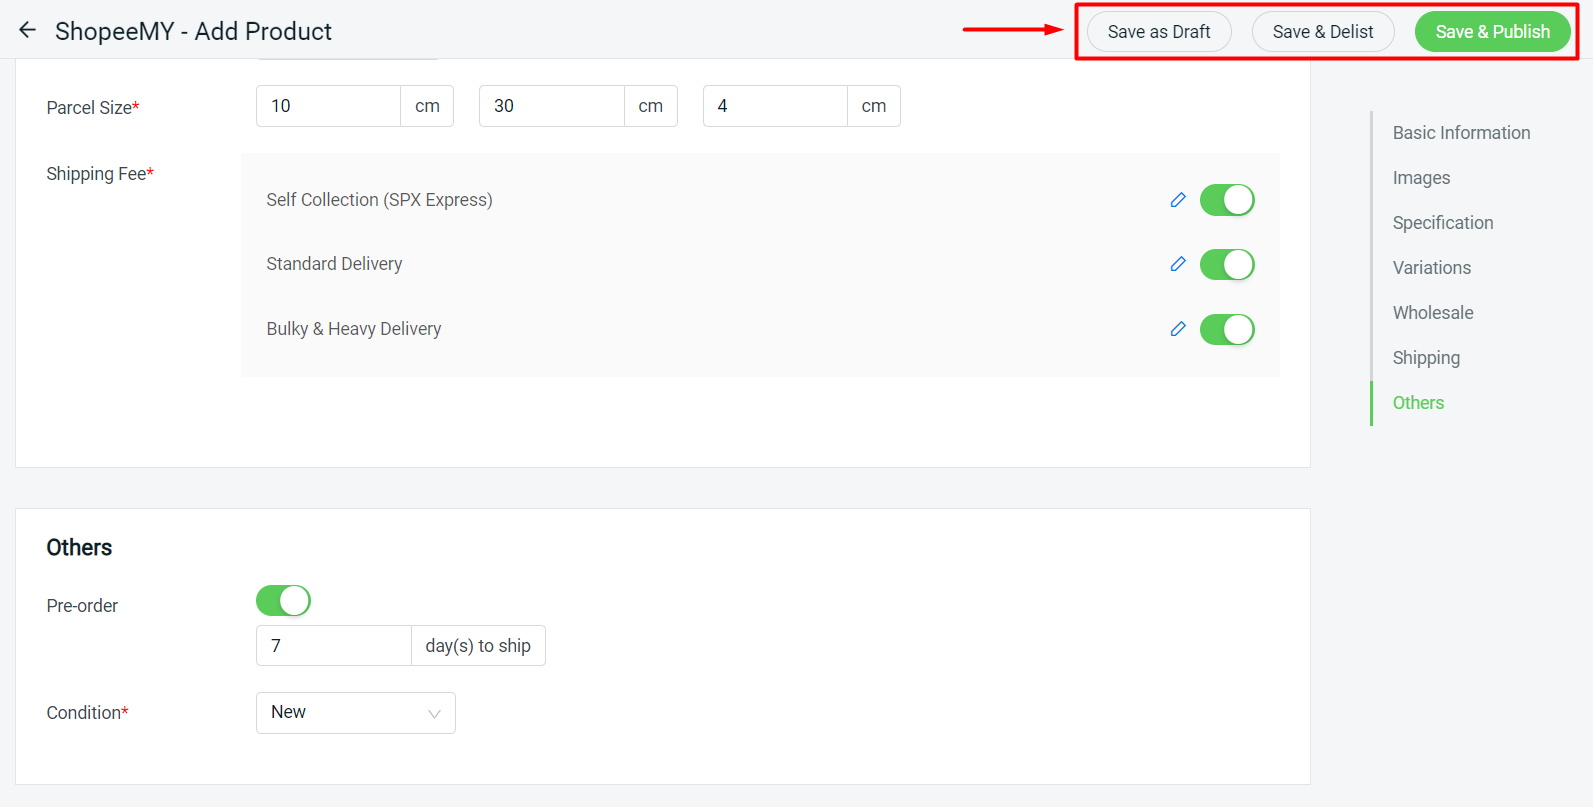
Step 11: Once all information is done, click on the Save & Publish or Save & Delist button on the top right to sync the product over to Shopee Seller Center. However, if your product details are incomplete, you may click on Save as Draft to continue it later.
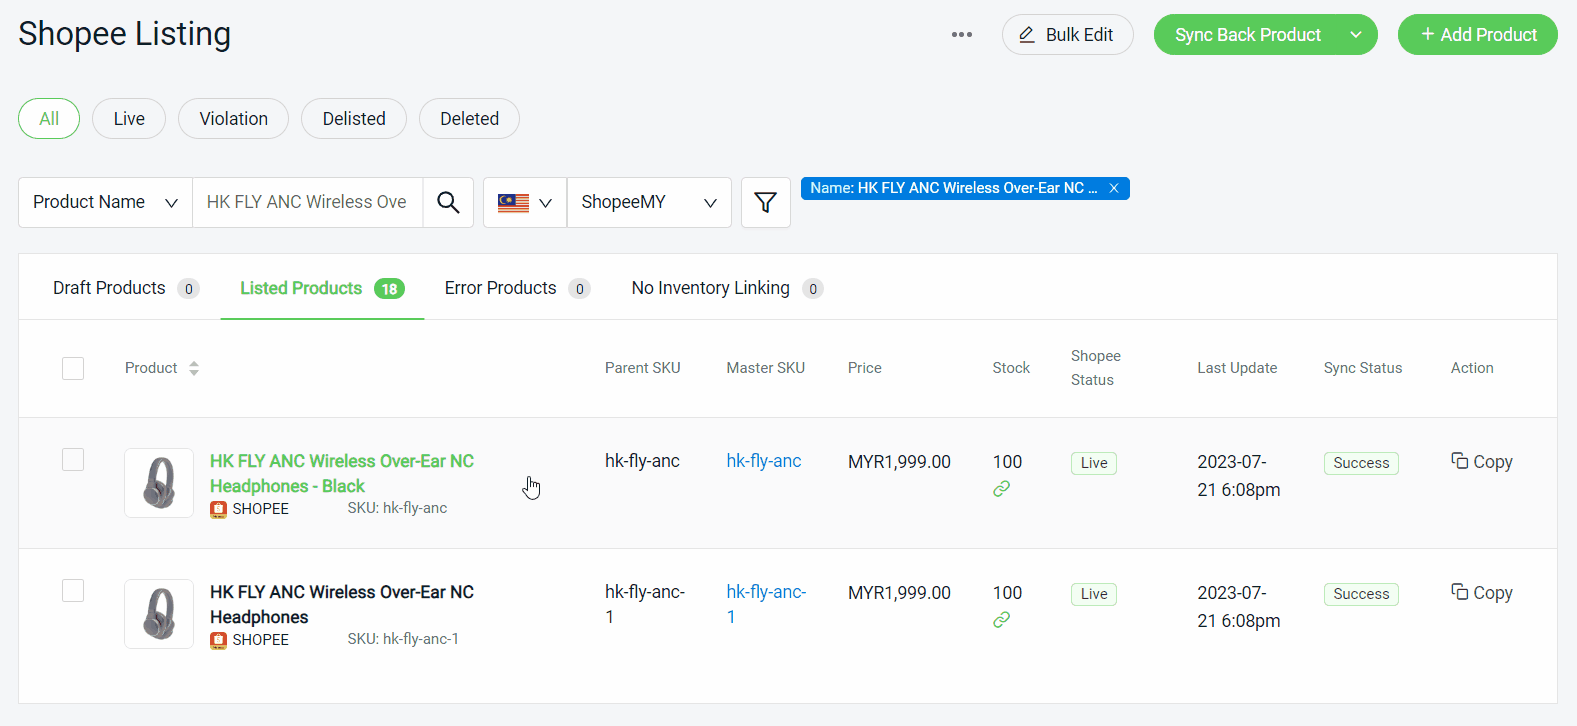
Step 12: If the product is successfully synced, it will appear in Listed Products. Otherwise, if it has any error in the syncing process, it will move to the Error Products tab. You may check the error message, amend the product listing, and then sync it again.
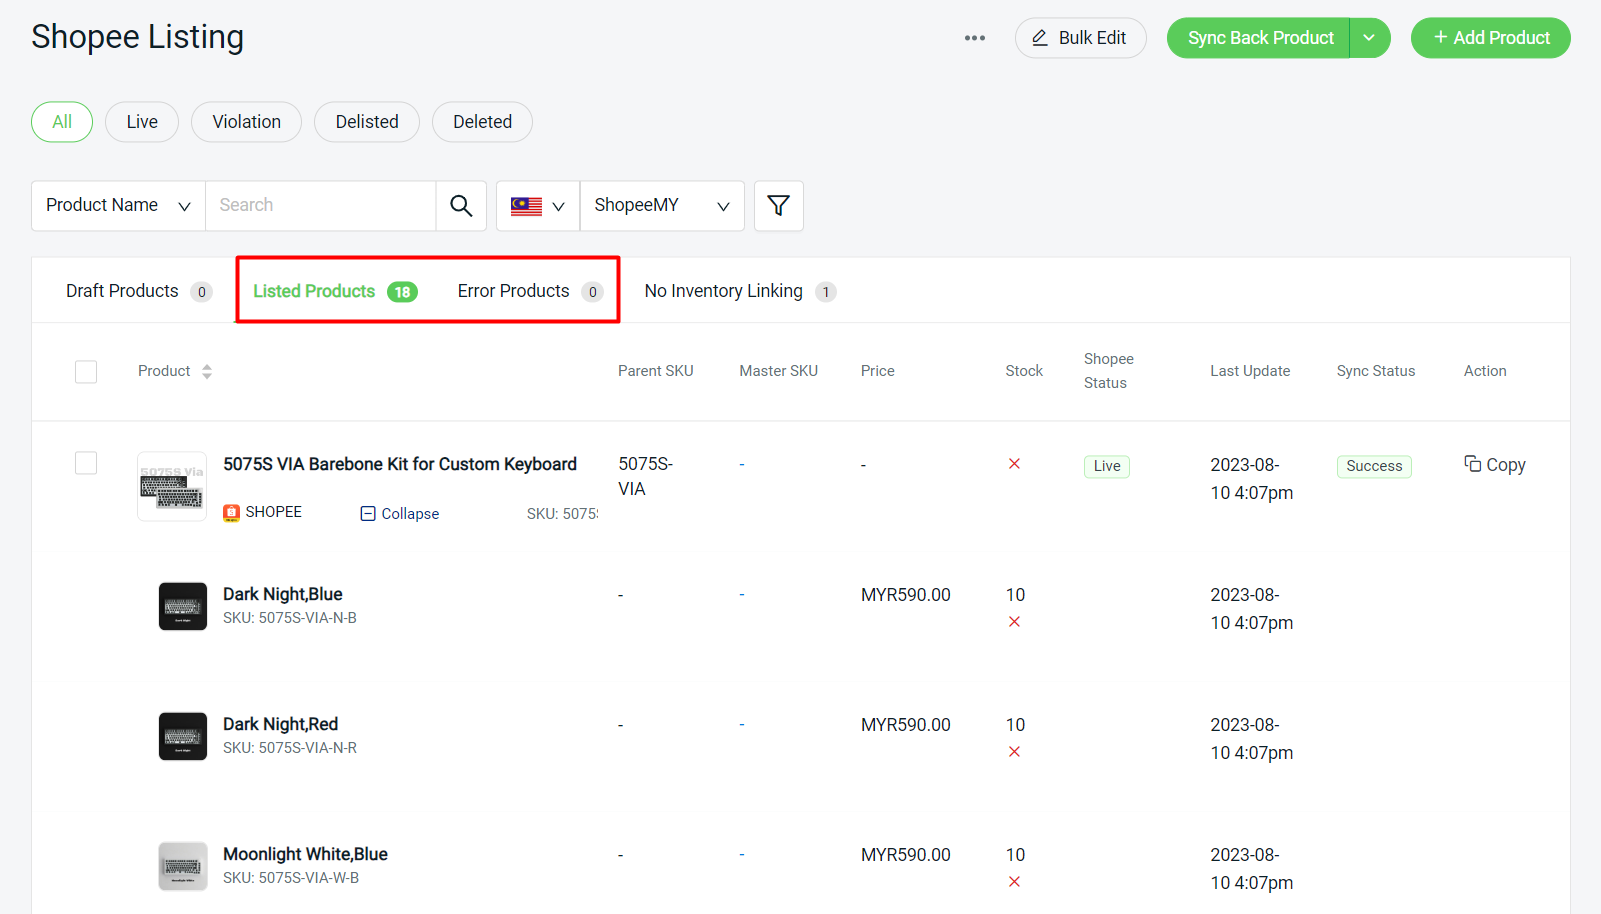
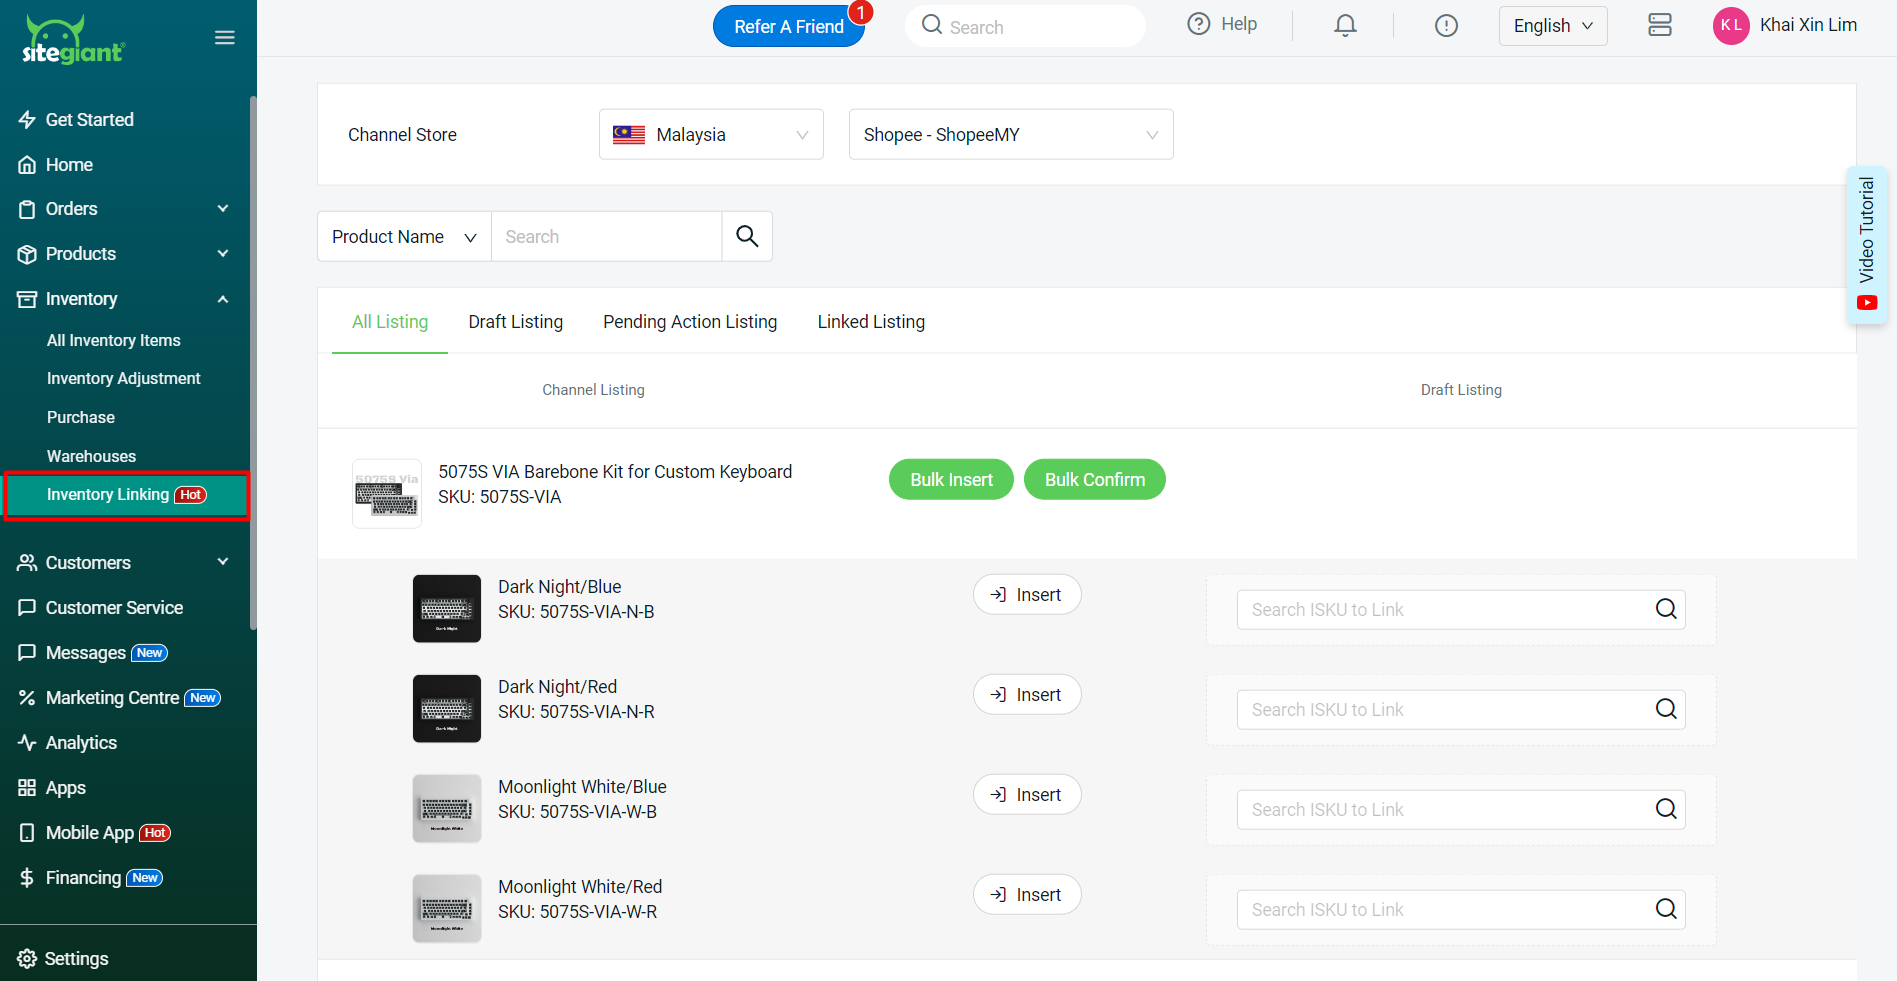
Step 13: After creating the new product, you may go to Inventory Linking to insert or link your SKU with Inventory iSKU.
3. Marketplace Category Mapping
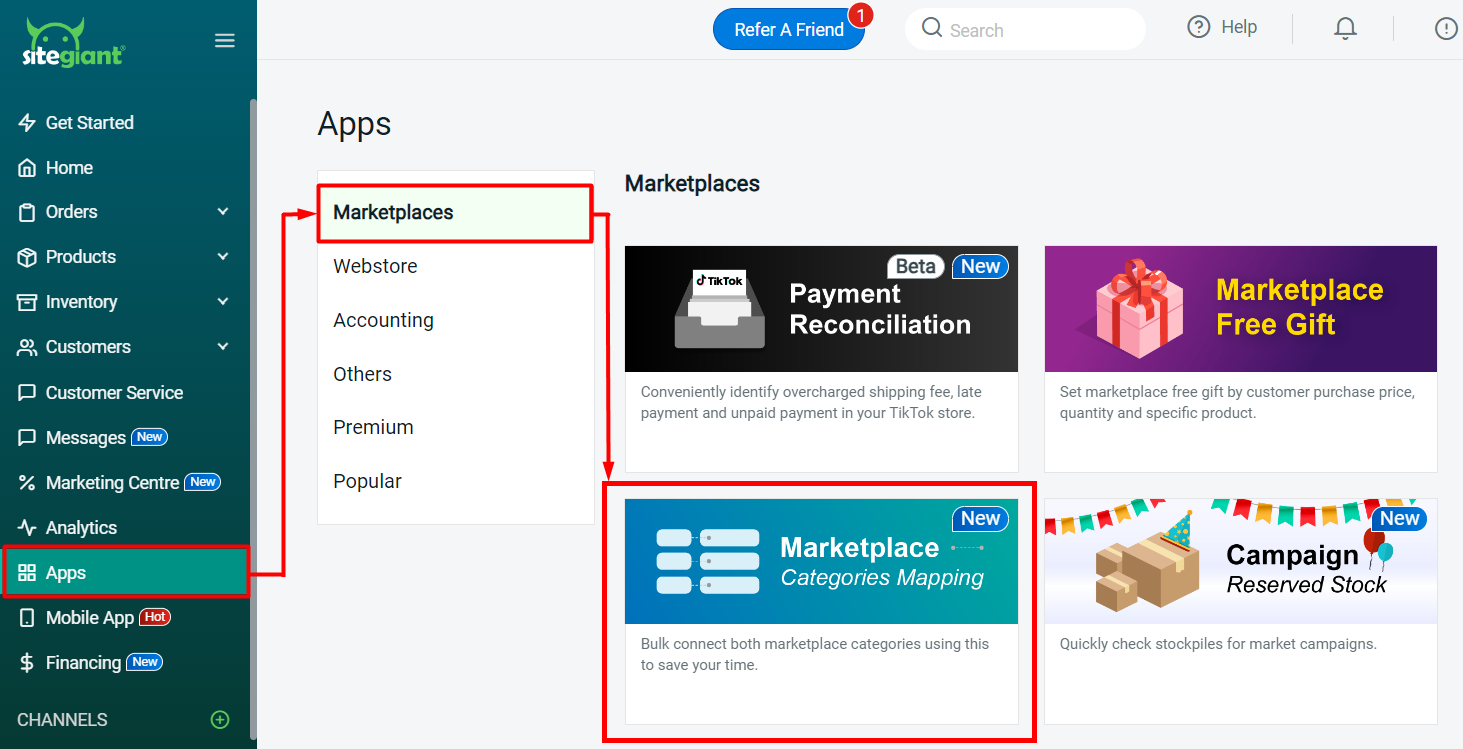
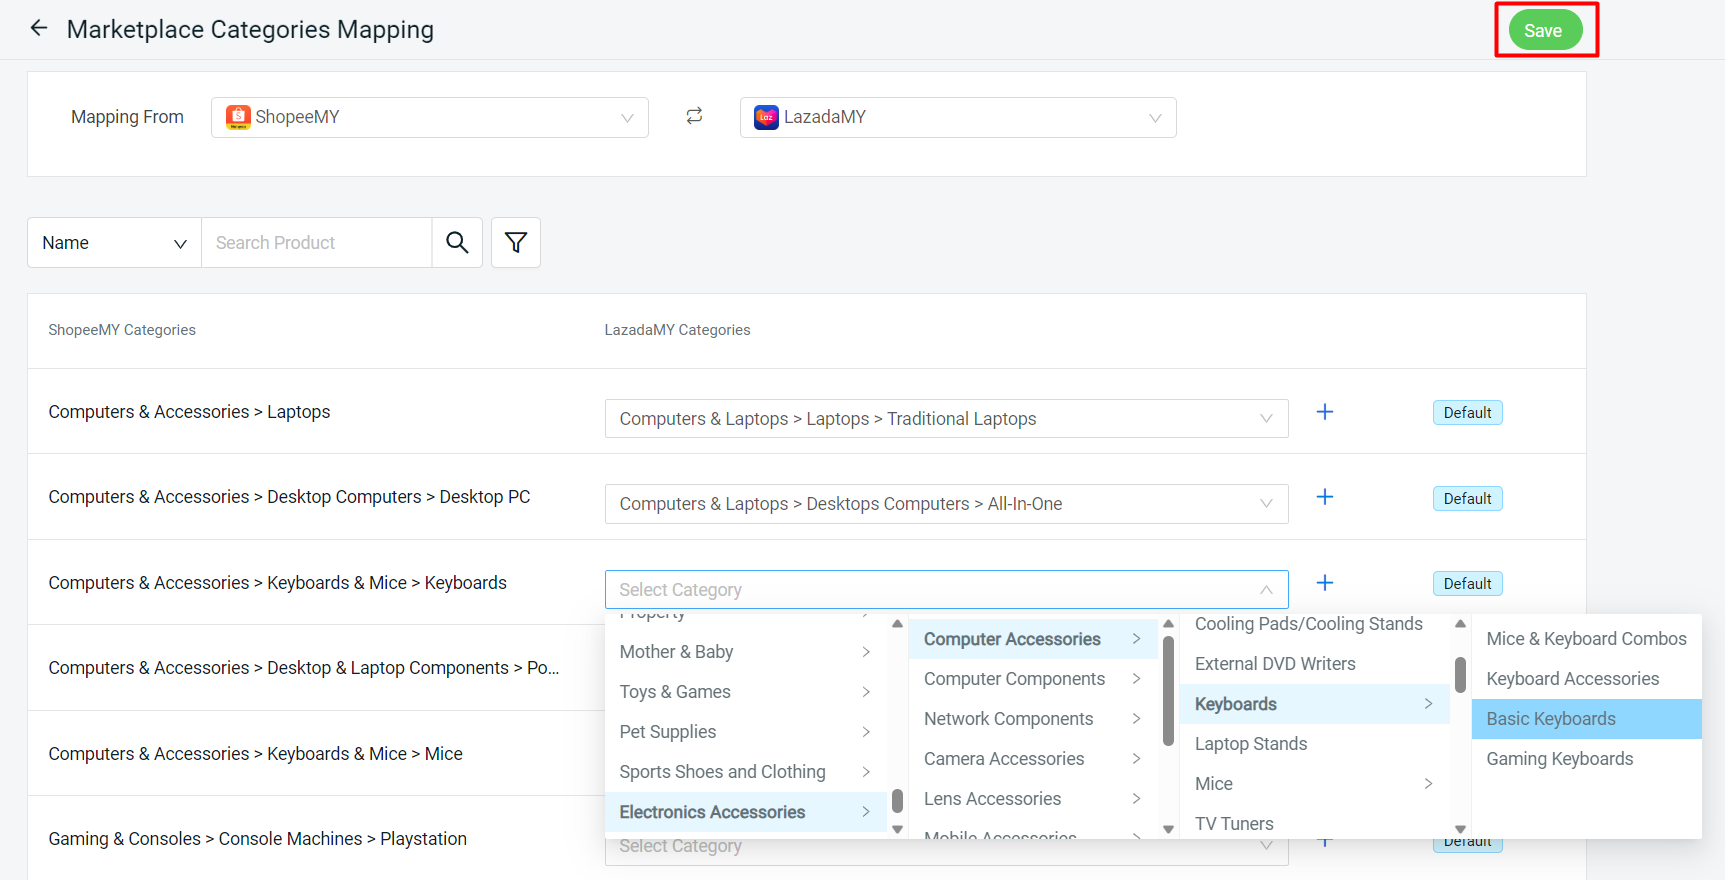
Now that your new product is created, you will perform Bulk Copy Listing to copy it to other sales channels. But before that, you can use Marketplace Categories Mapping to bulk connect both marketplace categories. It is a mandatory step if you copy products to TikTok channels.
Step 1: Go to Apps > Marketplaces > Marketplace Categories Mapping.
Step 2: Choose the marketplace to map from > the marketplace categories of your products will be listed.
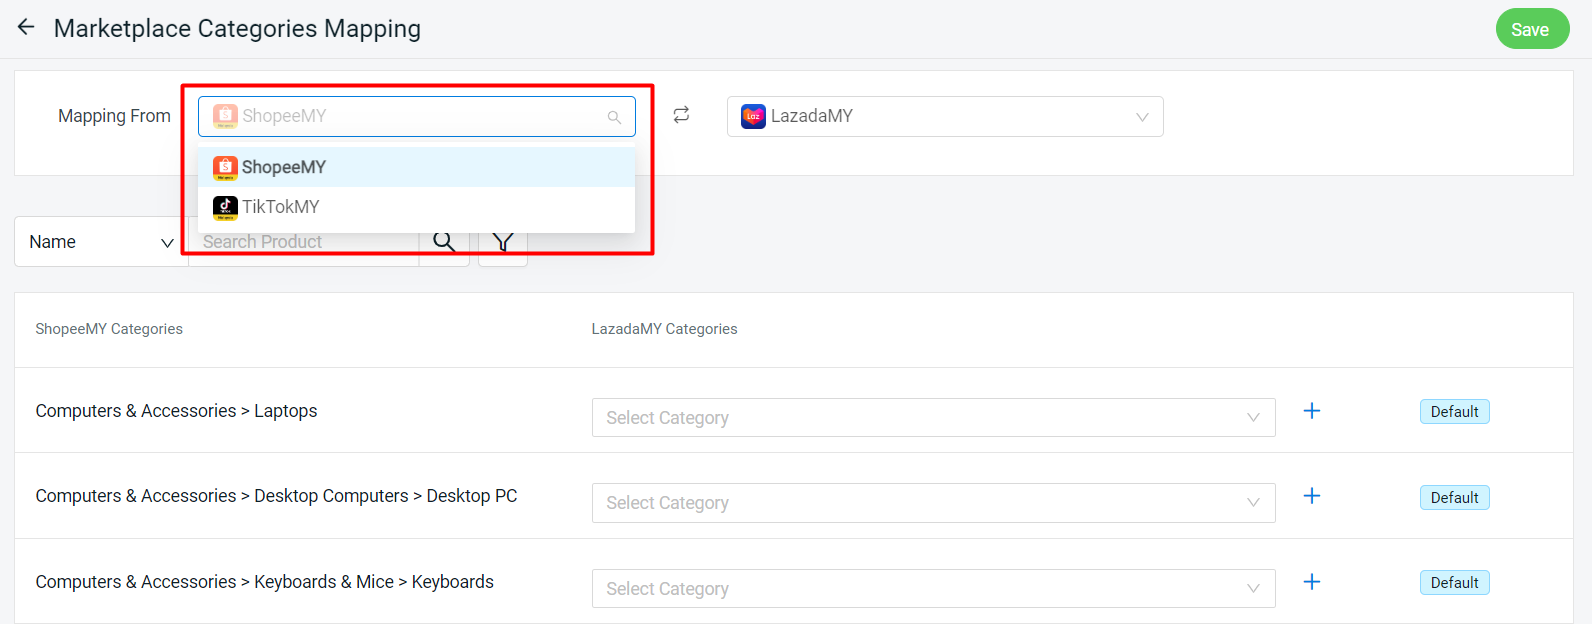
Step 3: Choose the destination marketplaces to map with.
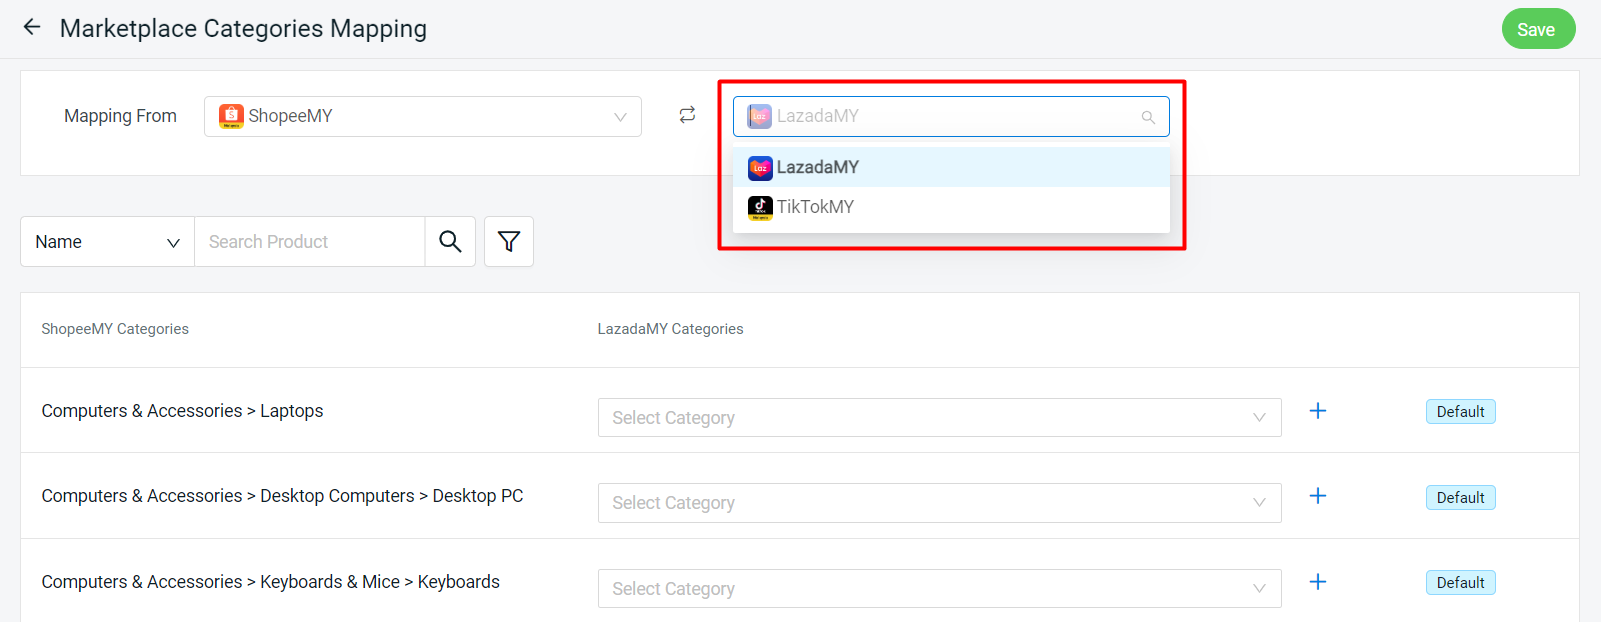
Step 4: Set the corresponding categories > Save.
4. Bulk Copy Listing
This feature is used to copy the product from one sales channel to another sale channel.
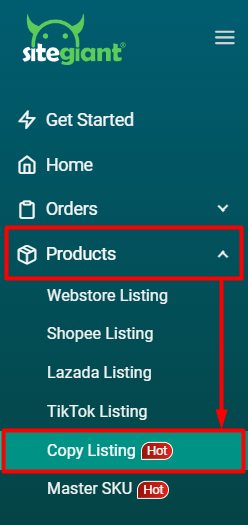
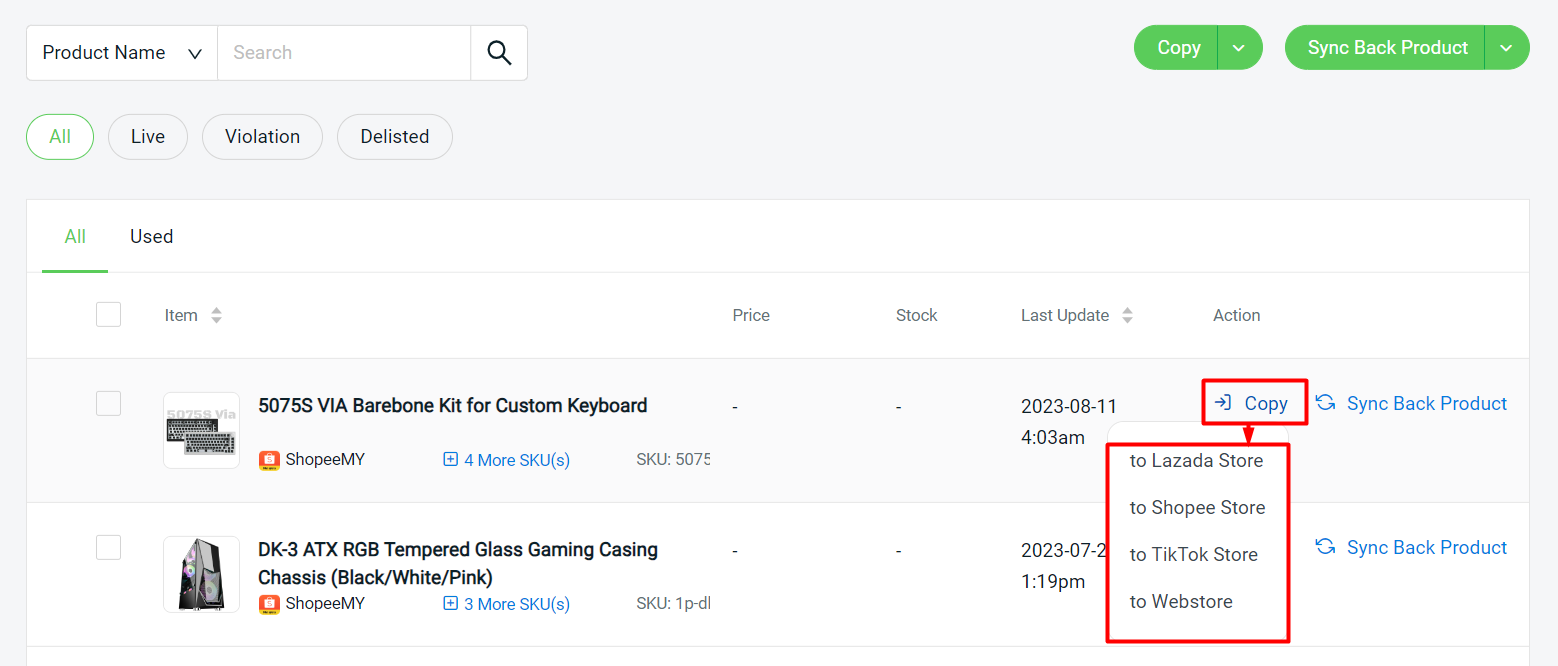
Step 1: Go to Products > Copy Listing from the sidebar menu.
Step 2: Select the Sales Channel you want to copy from > the products of the selected Sales Channel will be listed.
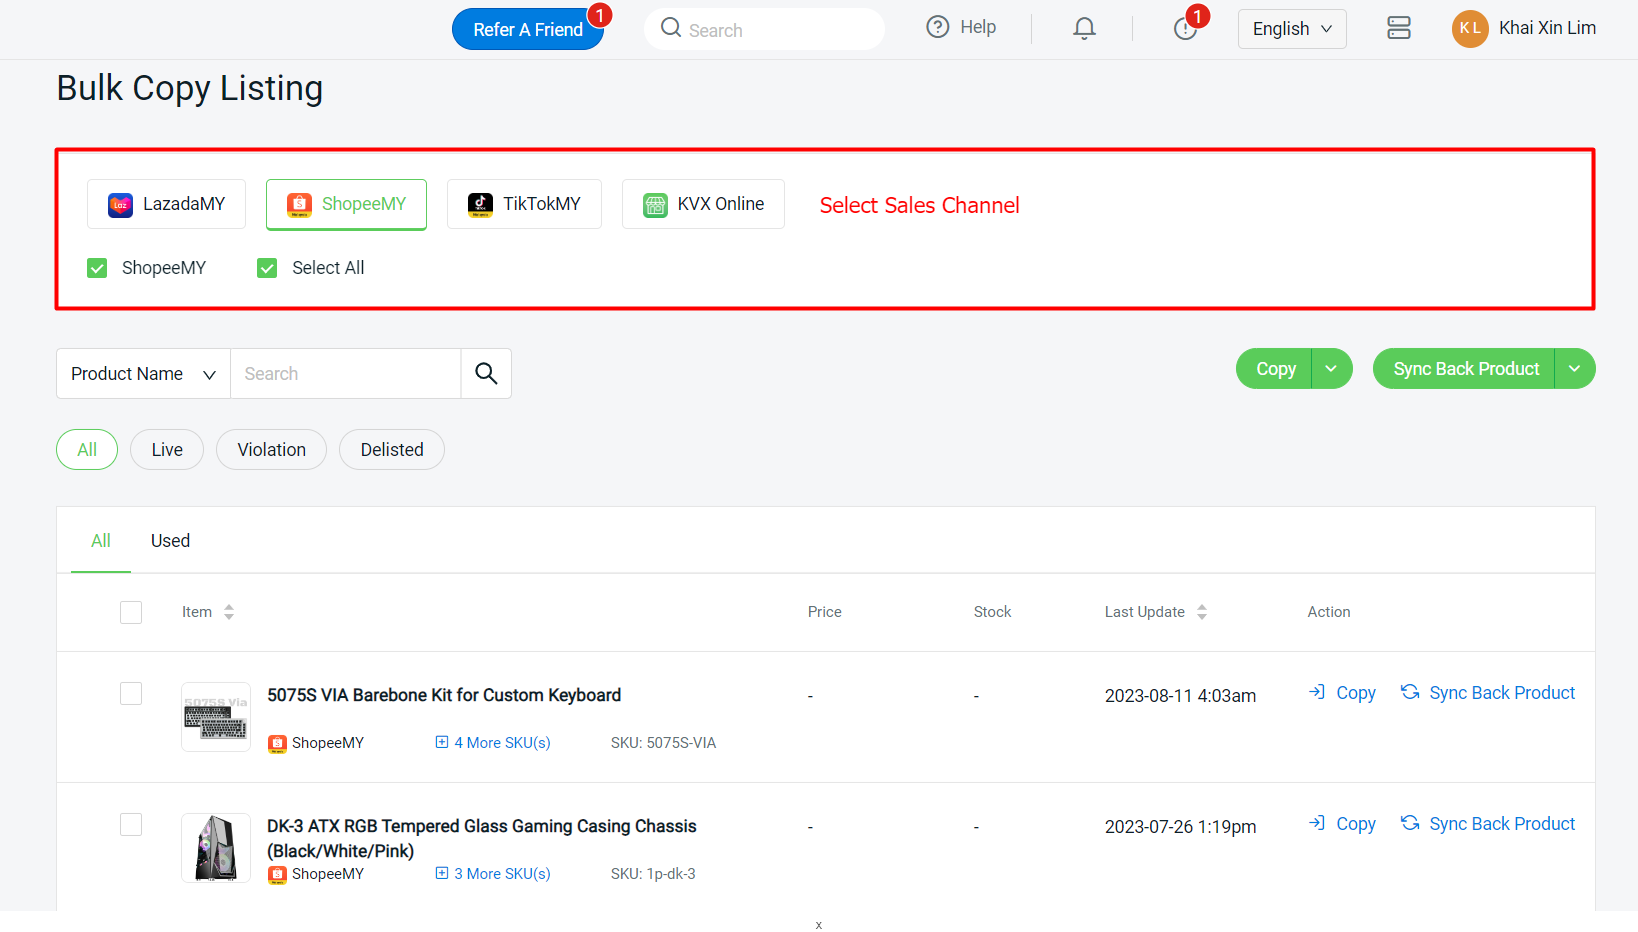
Step 3: To copy a single product, hover on Copy at the product listing > select the channel you would like to copy to.
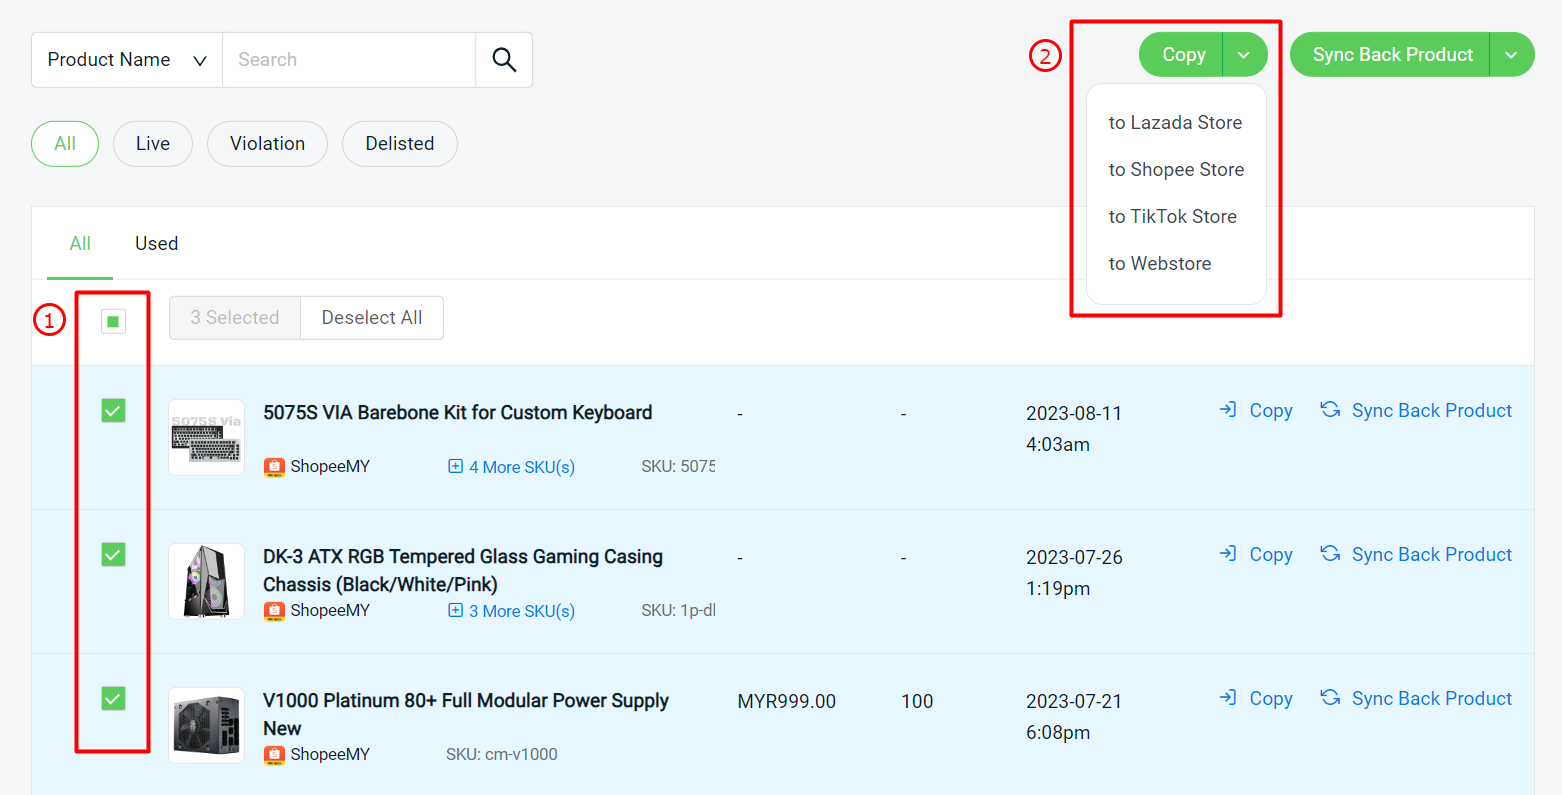
Step 4: To bulk copy multiple products, select the products you wish to copy > click on the Copy button above > choose the channel you want to copy to.
Step 5: Select the stores you would like to copy to, it is able to copy to multiple stores from the same marketplace > choose whether to Copy or Skip if there are duplicate products in the same store > click on the Copy button.
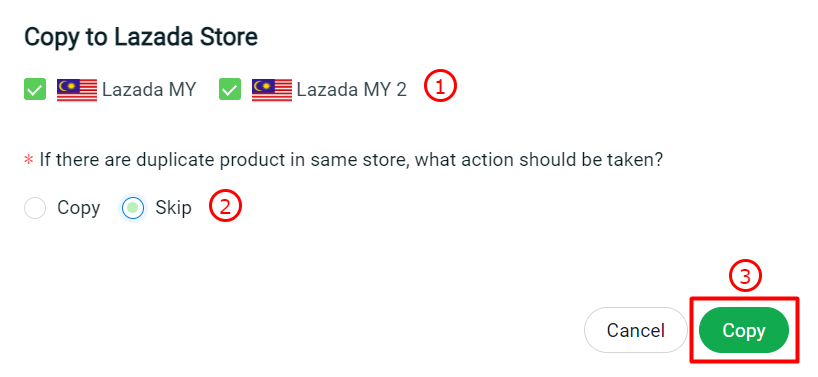
Copy: The product will be copied over as a new product regardless of the same SKU or Product Name.

Skip: The product will not be copied if the same Parent SKU or Product Name is existing in the marketplace.
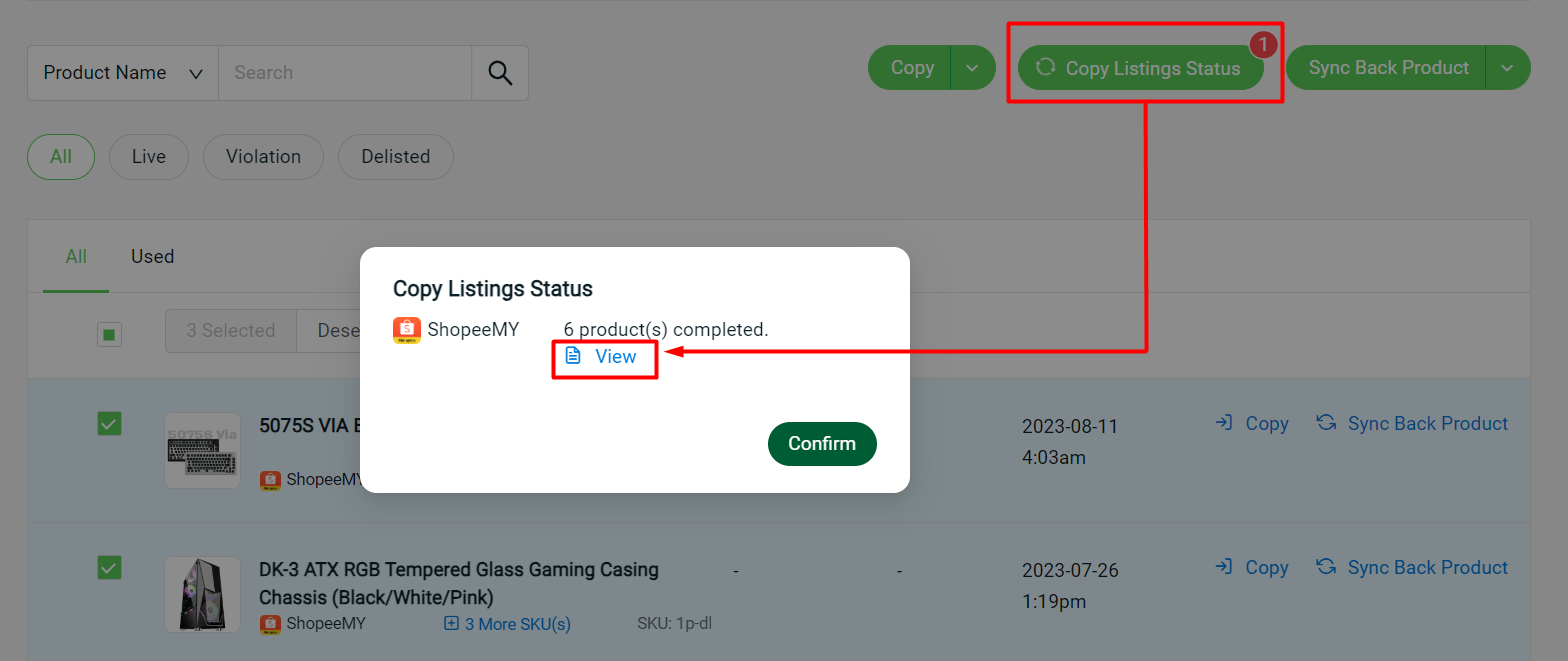
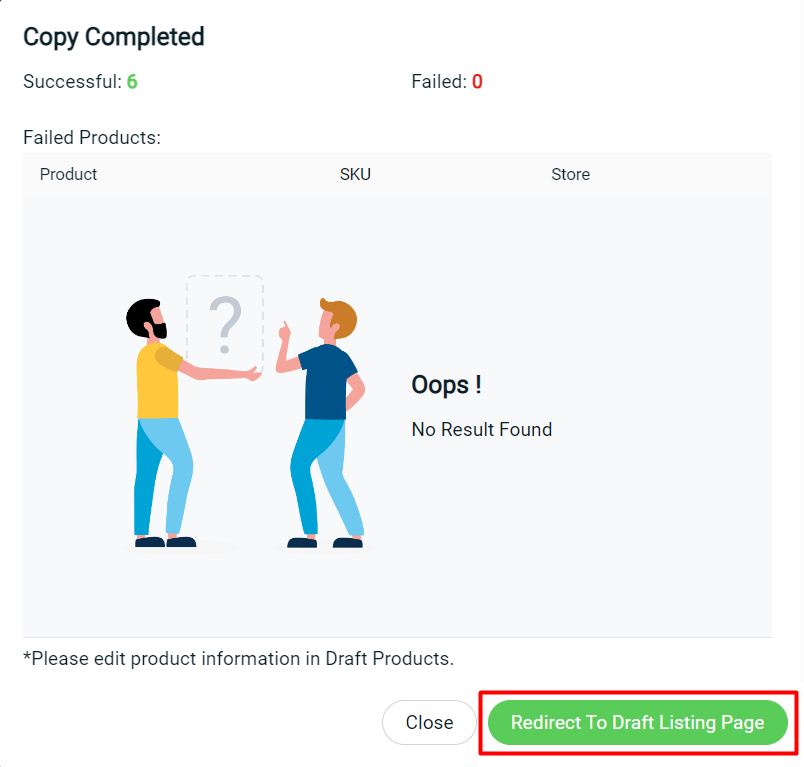
Step 6: The system will take some time to copy the product, you may click on the Copy Listing Status to check the progress. Once it is done, you may click on View to check the result.
Step 7: If you wish to stay on this page, you may click on the Close button. You can click on Redirect To Draft Listing Page to publish the products, the system will open a new tab for the Draft Listing page.
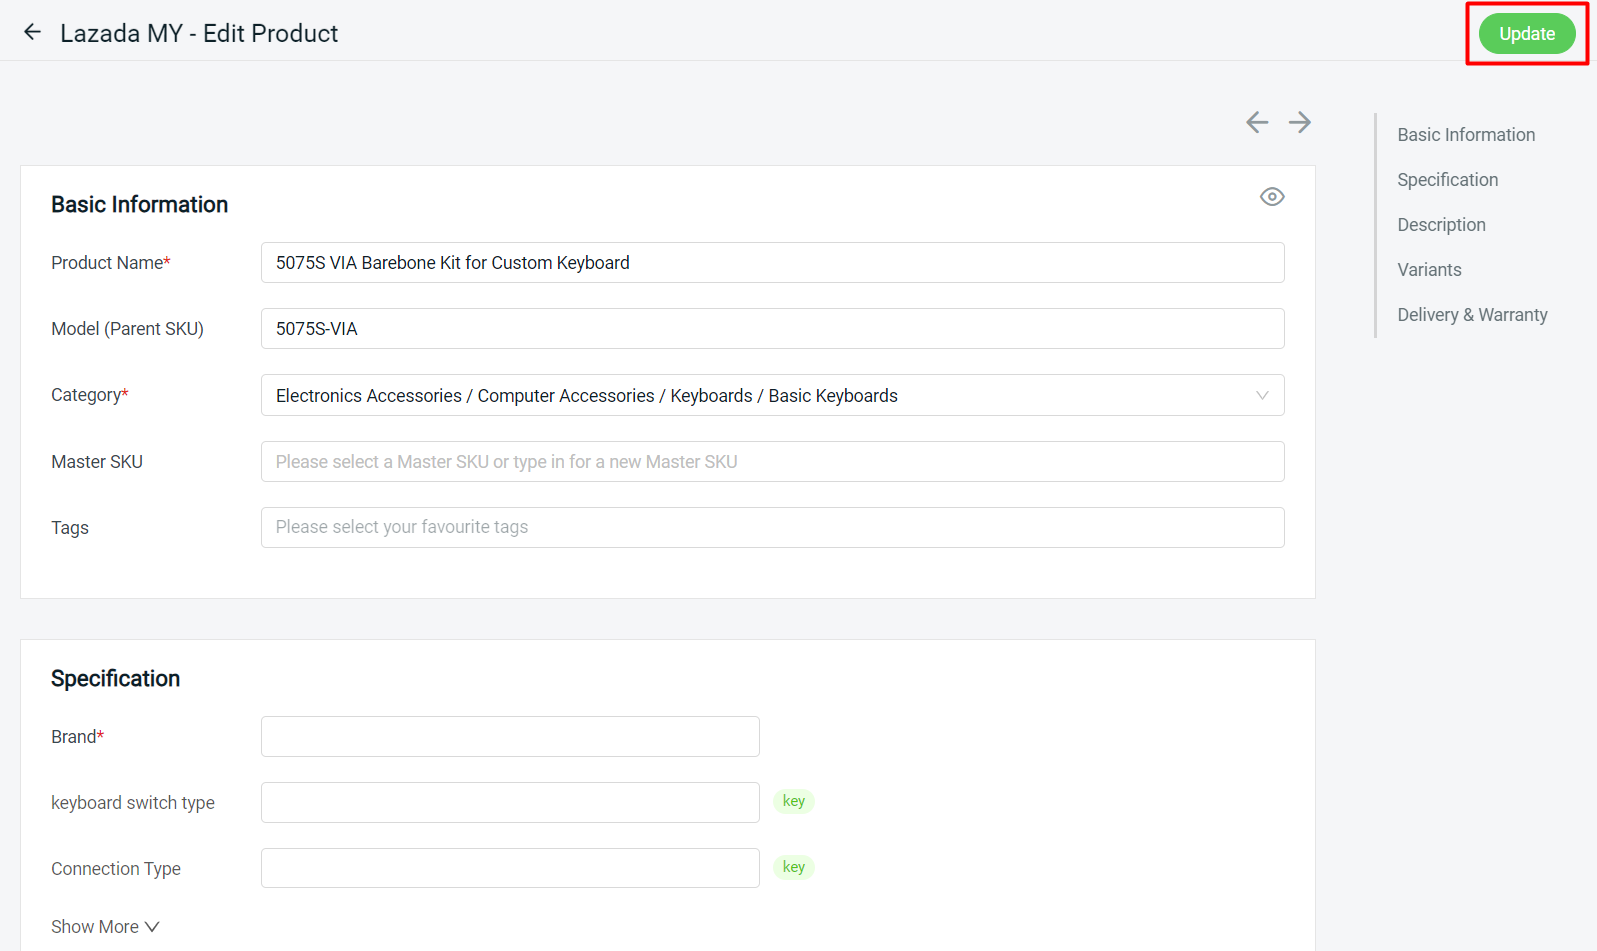
Step 8: All copied products will appear in the Draft Products tab > click on the Product Name to map the category and the variation information.
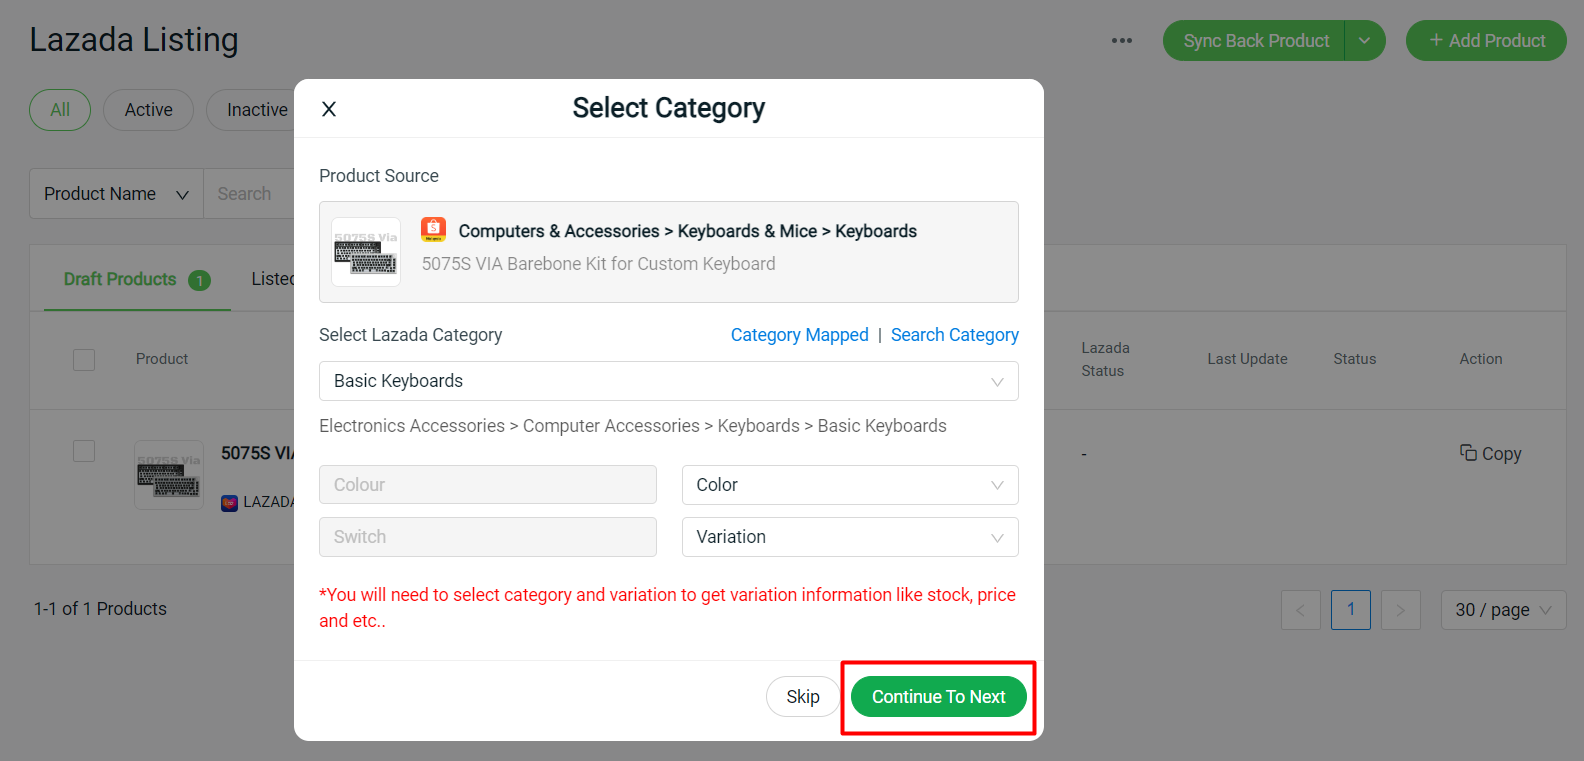
Step 9: Complete the product information > Update.
5. Master SKU
Now that your products have been copied to every store to start selling, when there are changes to the product details, you will need to amend them in every marketplace. With Master SKU, you can group them together, then you can edit the product details on one page and sync them together with a click. Master SKU only supports Webstore, Lazada, Shopee, and TikTok channels.
This feature is only available in SiteGiant ERP Value Plus Plan and above.
Step 1: Navigate to your Product Listing which has the most product listings (Webstore/ Lazada/ Shopee) > select all products > Copy Parent SKU to Master SKU.
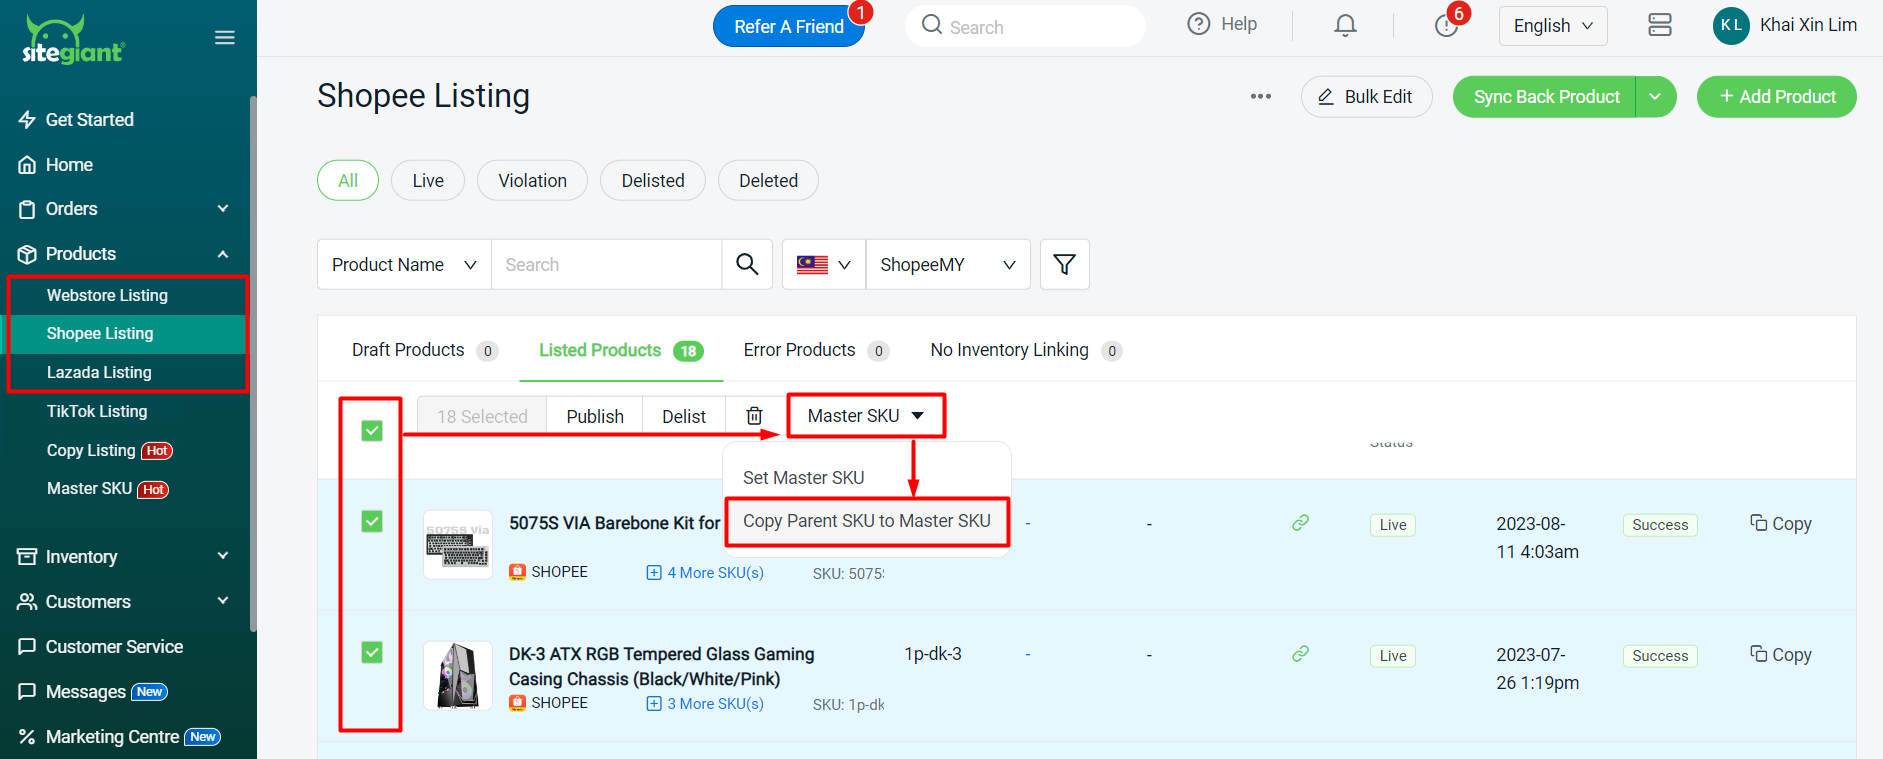
📌Note: It will be failed to copy if Parent SKU is empty or too long (max. 50 characters).
Step 2: If you have Multi-Listing products that are the same product but with different Parent SKU, you will need to group them into the same Master SKU.
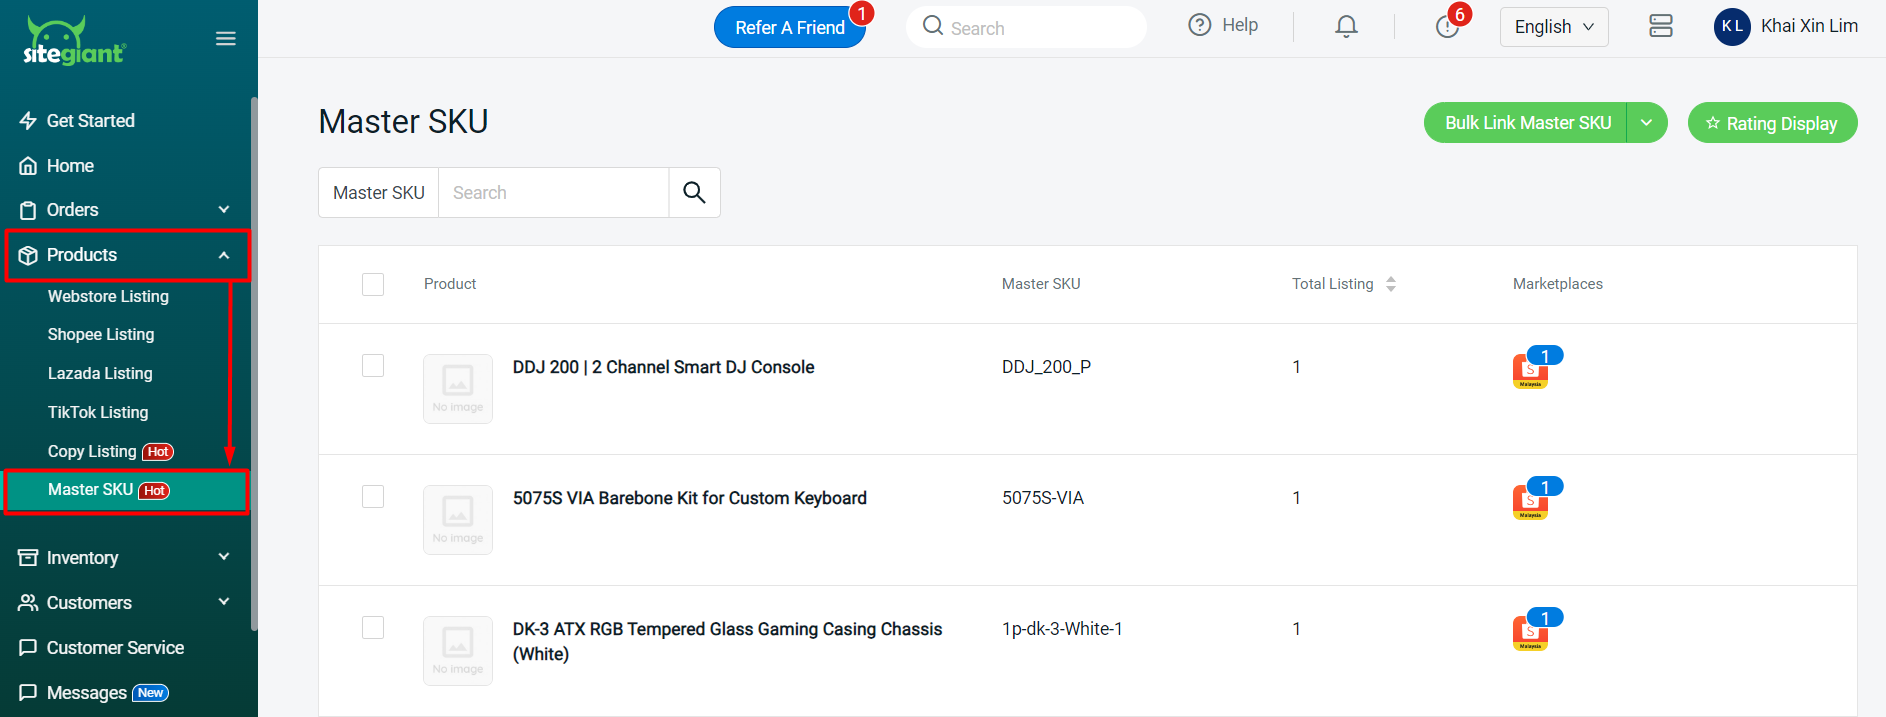
Step 3: Navigate to Products > Master SKU, Master SKU created will be listed here.
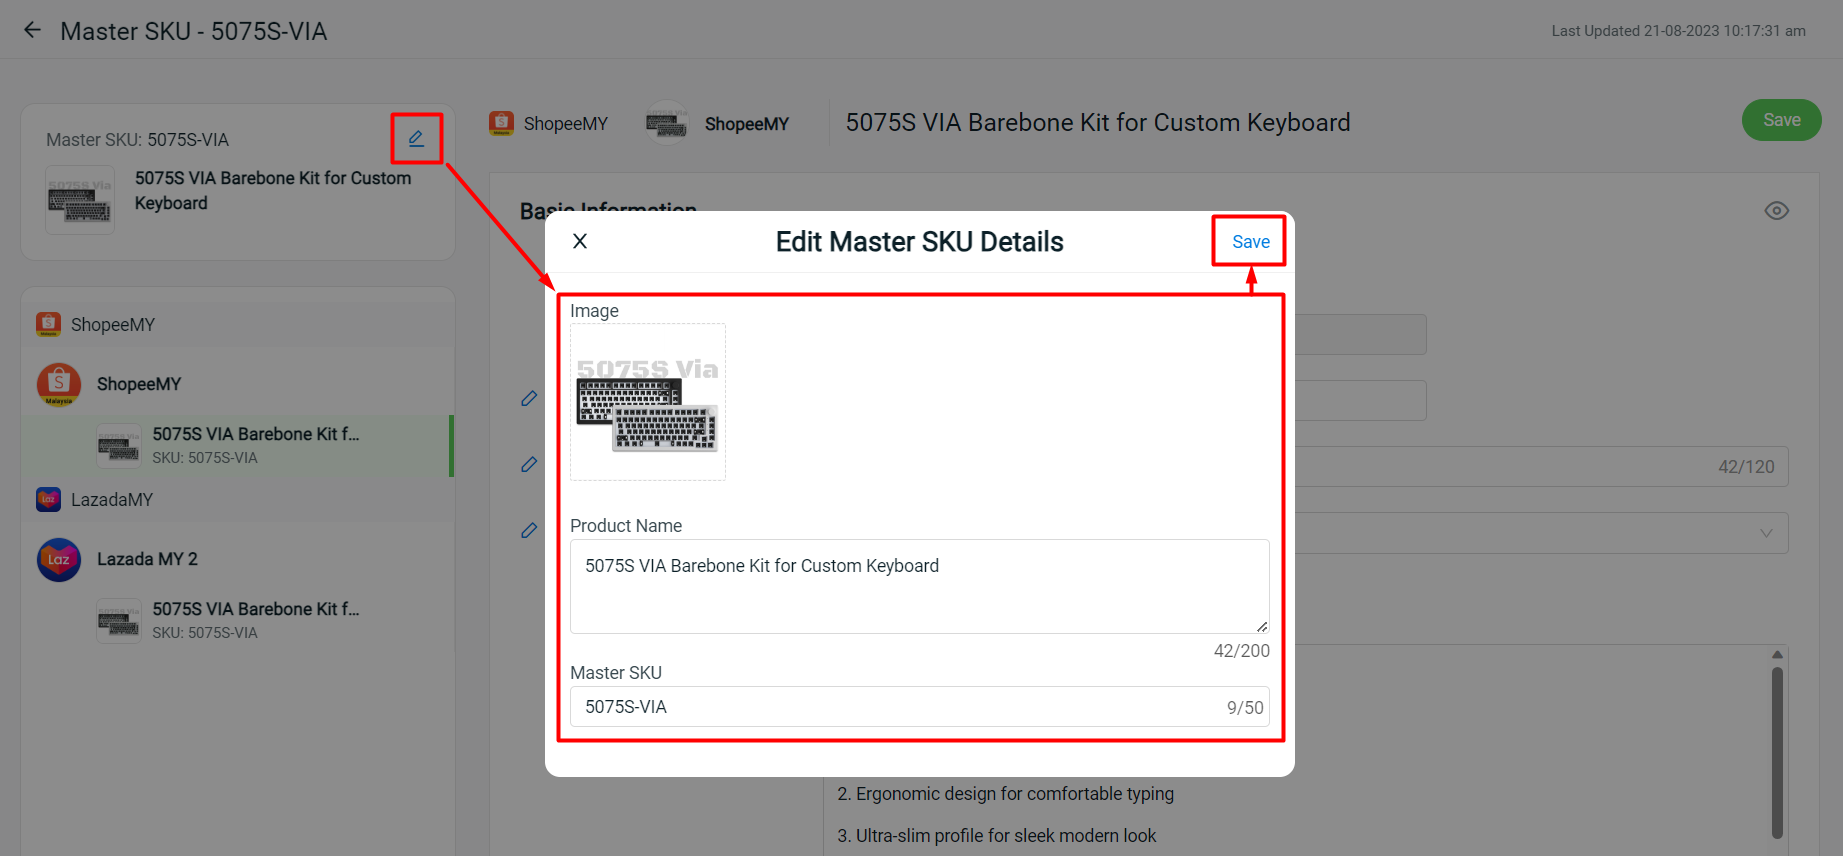
Step 4: The Master SKU image will not be retrieved from the product listing. You may upload an image and edit the Product Name and Master SKU by clicking on the Master SKU > click the edit icon > Save.
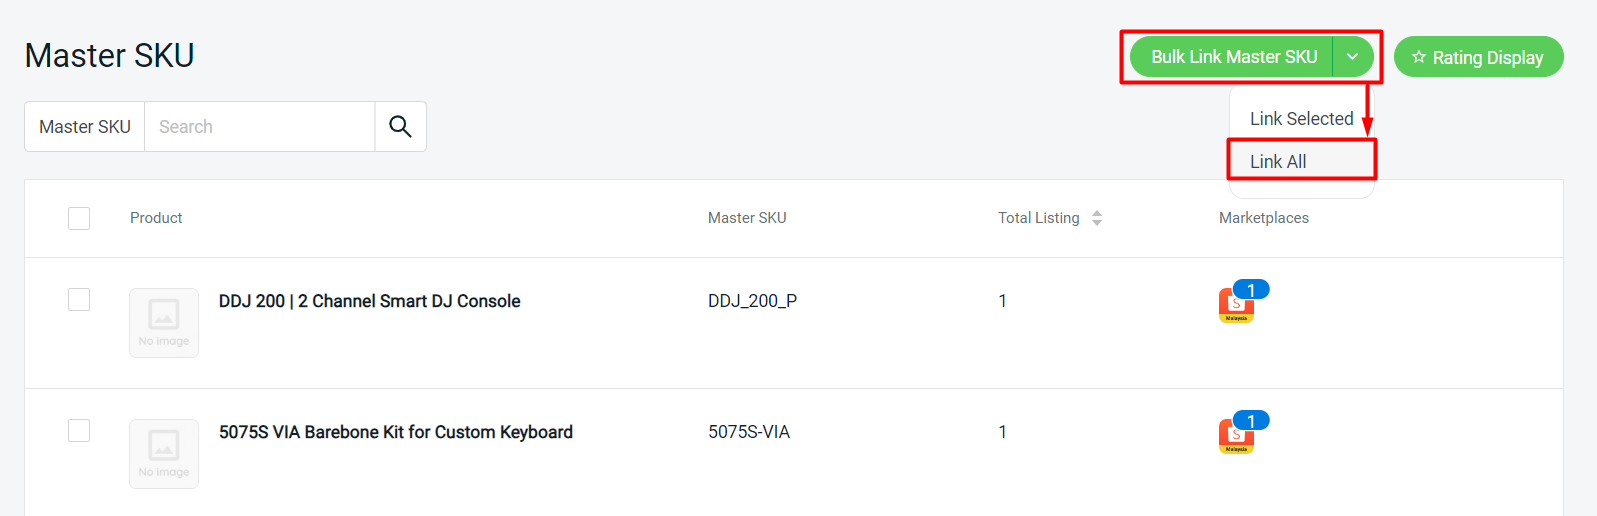
Step 5: Next, you can use the Bulk Link to link the same products with the same inventory item (iSKU) linking across the marketplaces with the existing Master SKU. Navigate to the Bulk Link Master SKU button > select Link All.
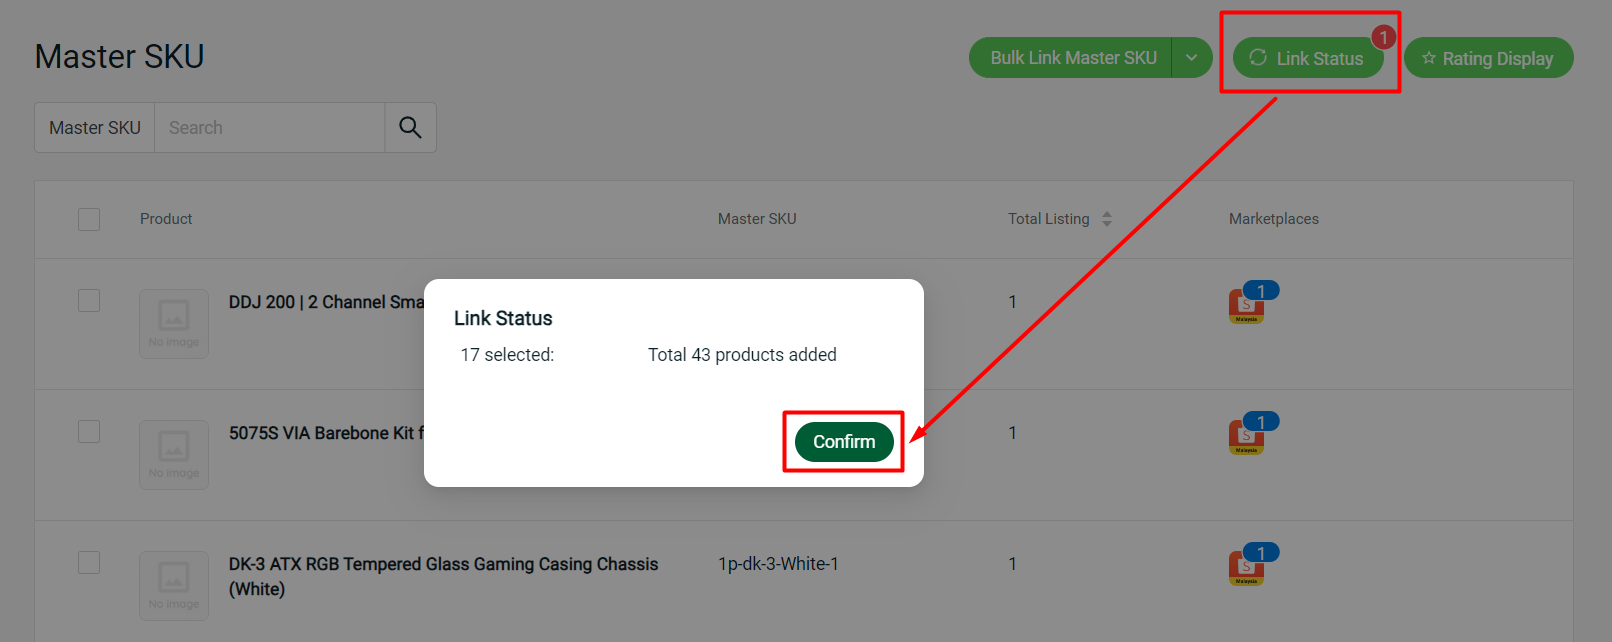
Step 6: The system will take some time to bulk link the products, you may click on the Link Status to check the progress. Once it is done, you can see how many products are added then click on Confirm.
Step 7: Products with the same inventory linking will be automatically grouped together with the Master SKU. You may hover over the marketplaces to check the product.
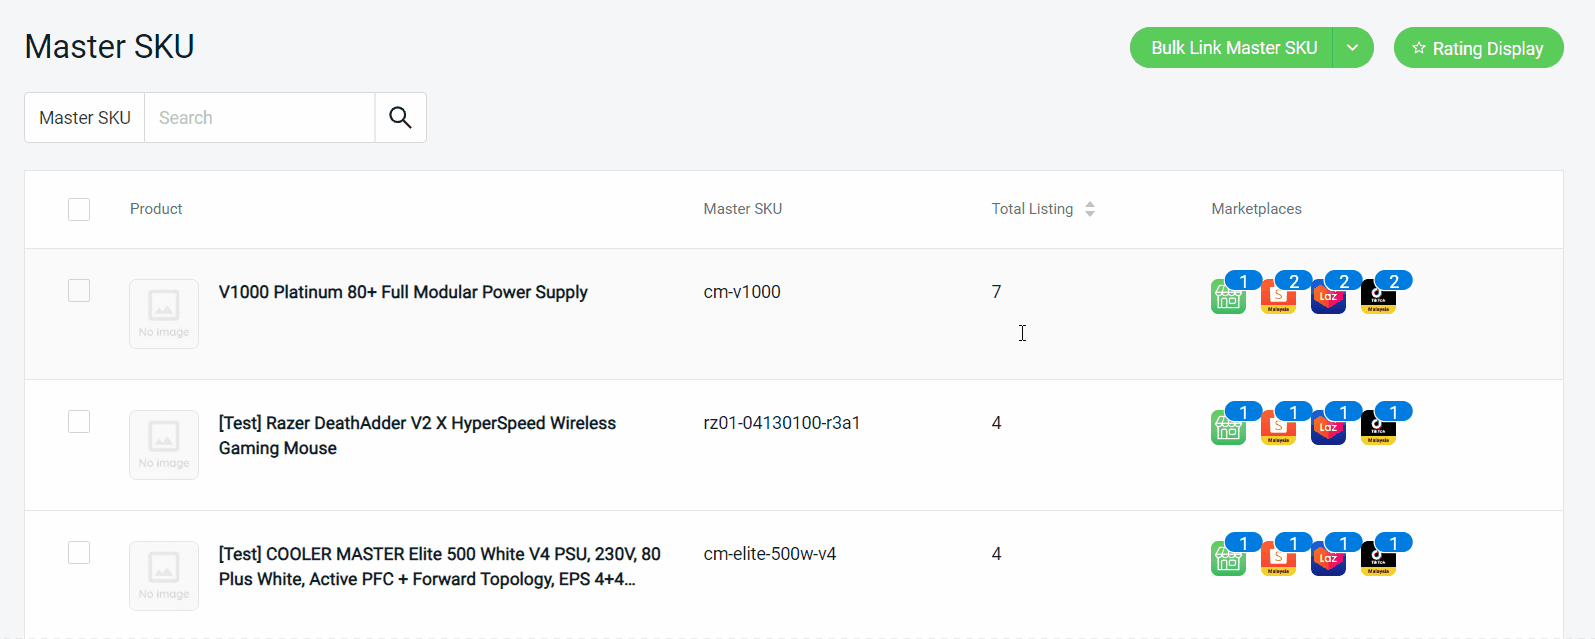
📌Note: A Master SKU can have a maximum of 30 listings only.
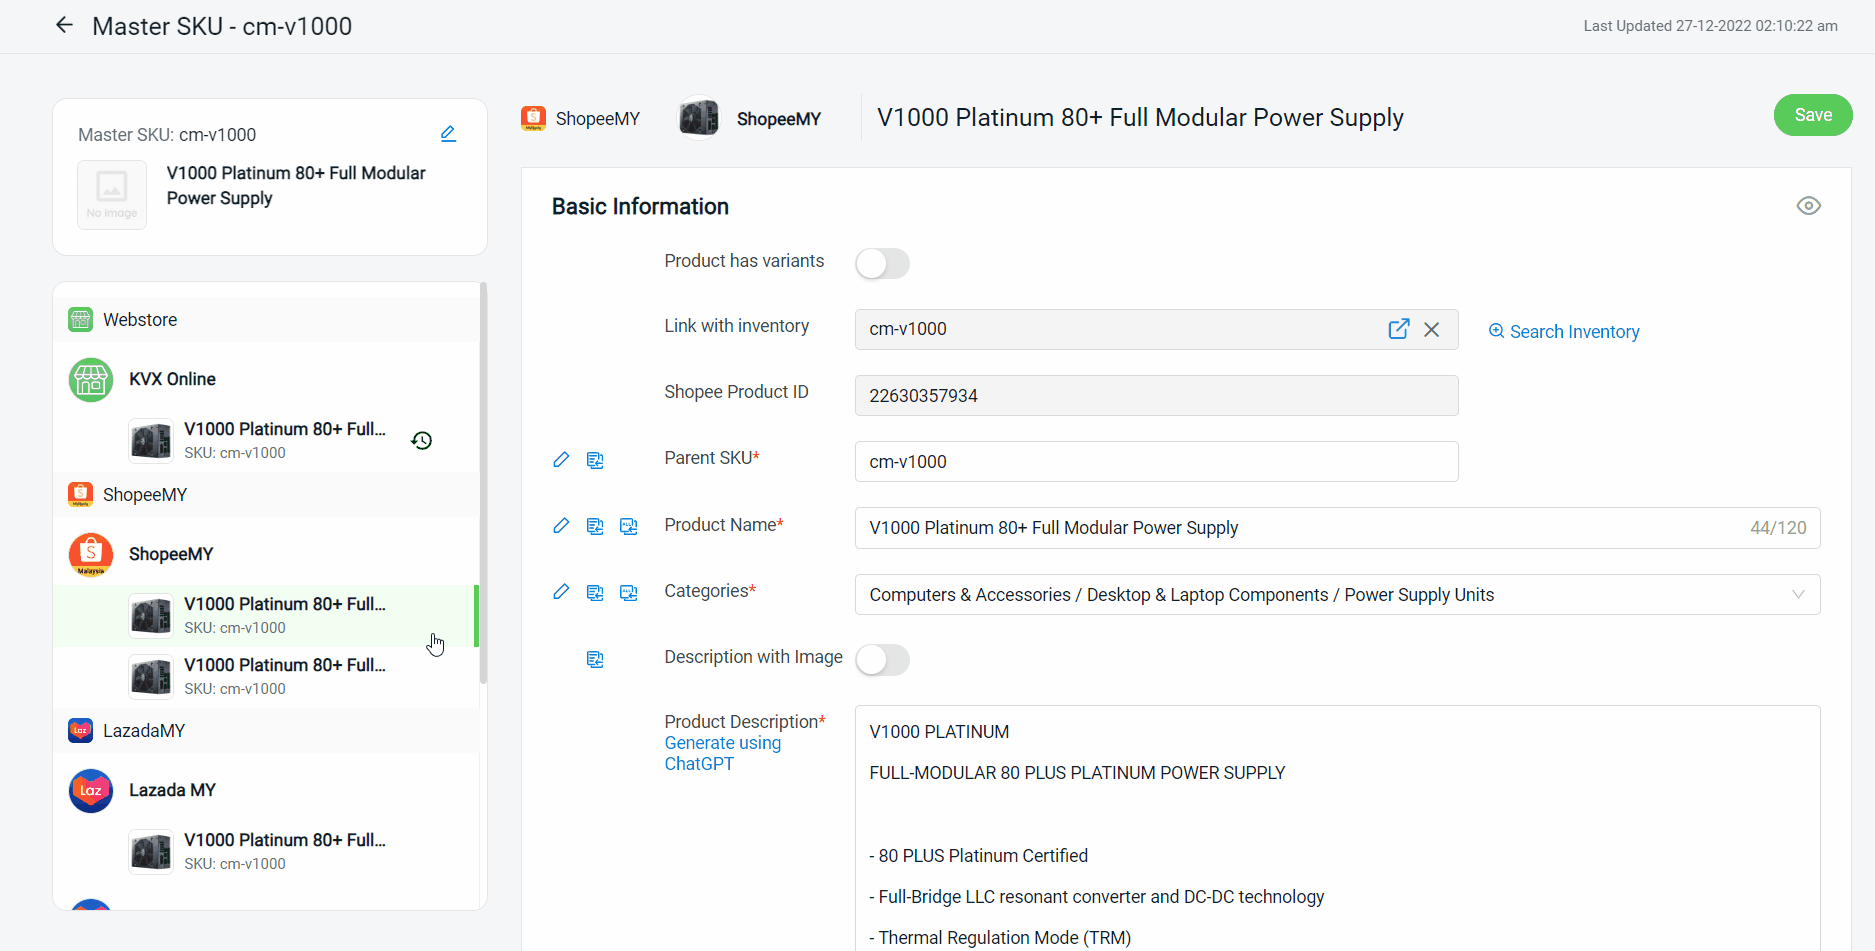
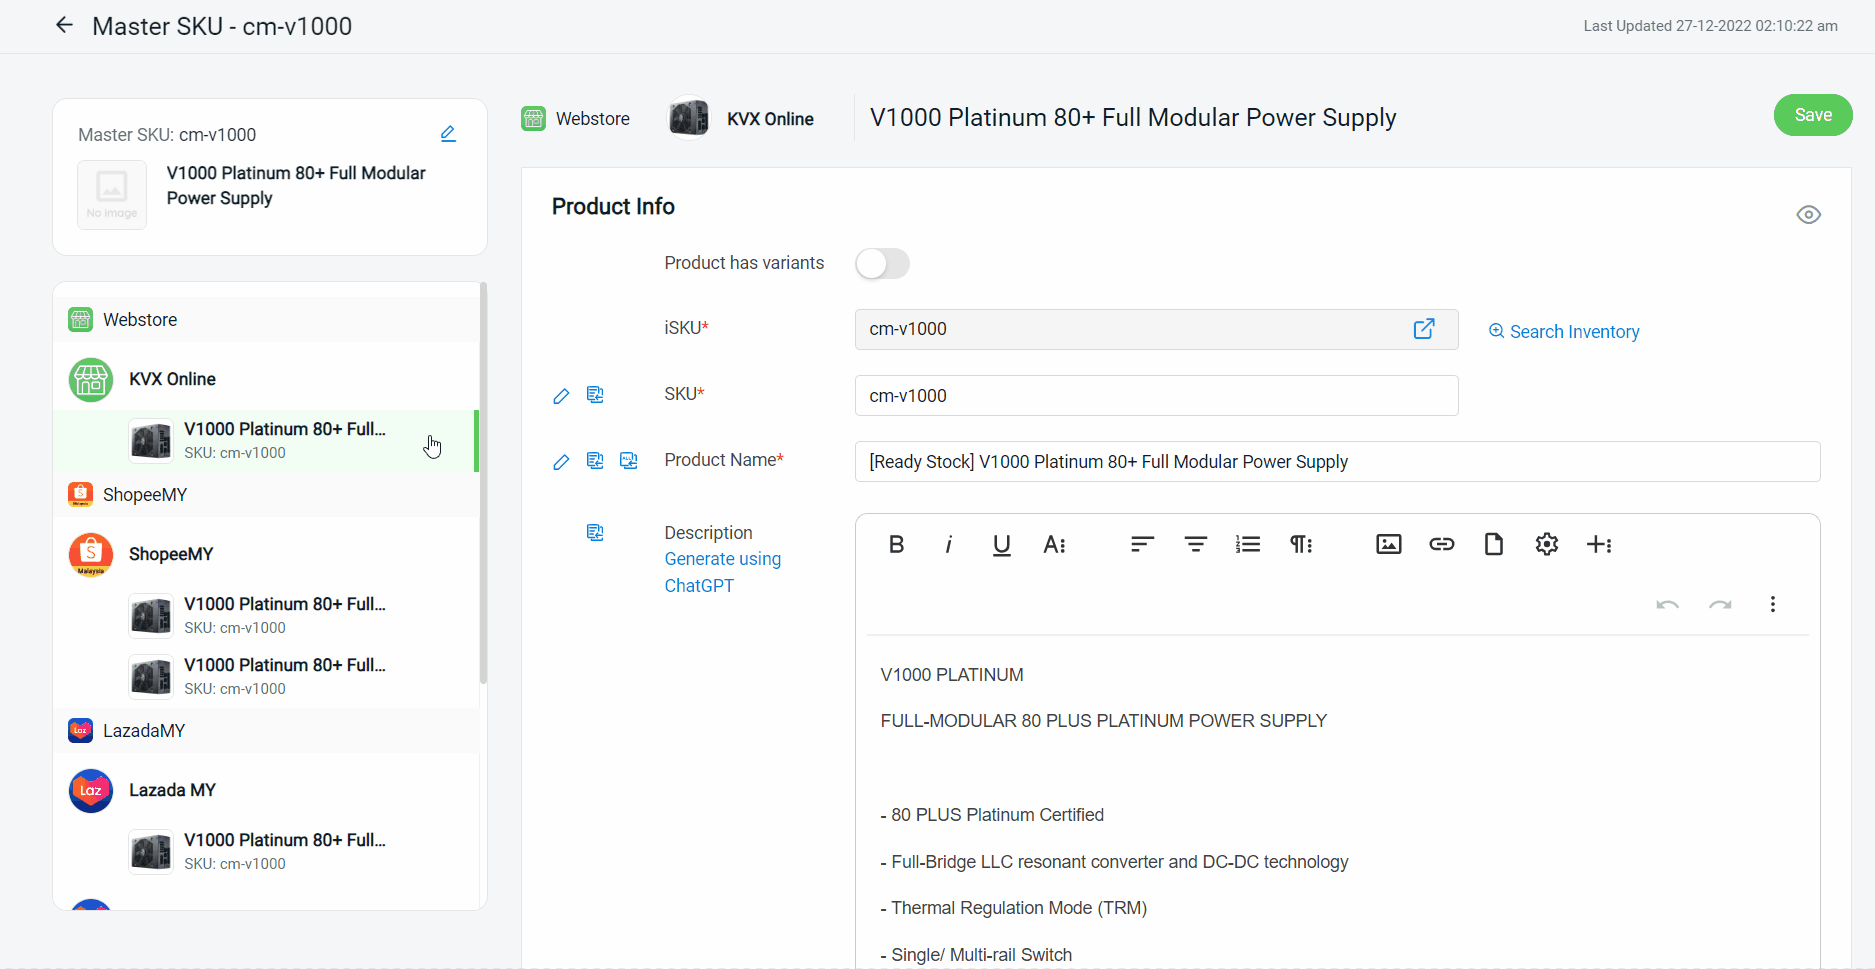
Step 8: You can view and edit the product details from the different marketplaces on one page.
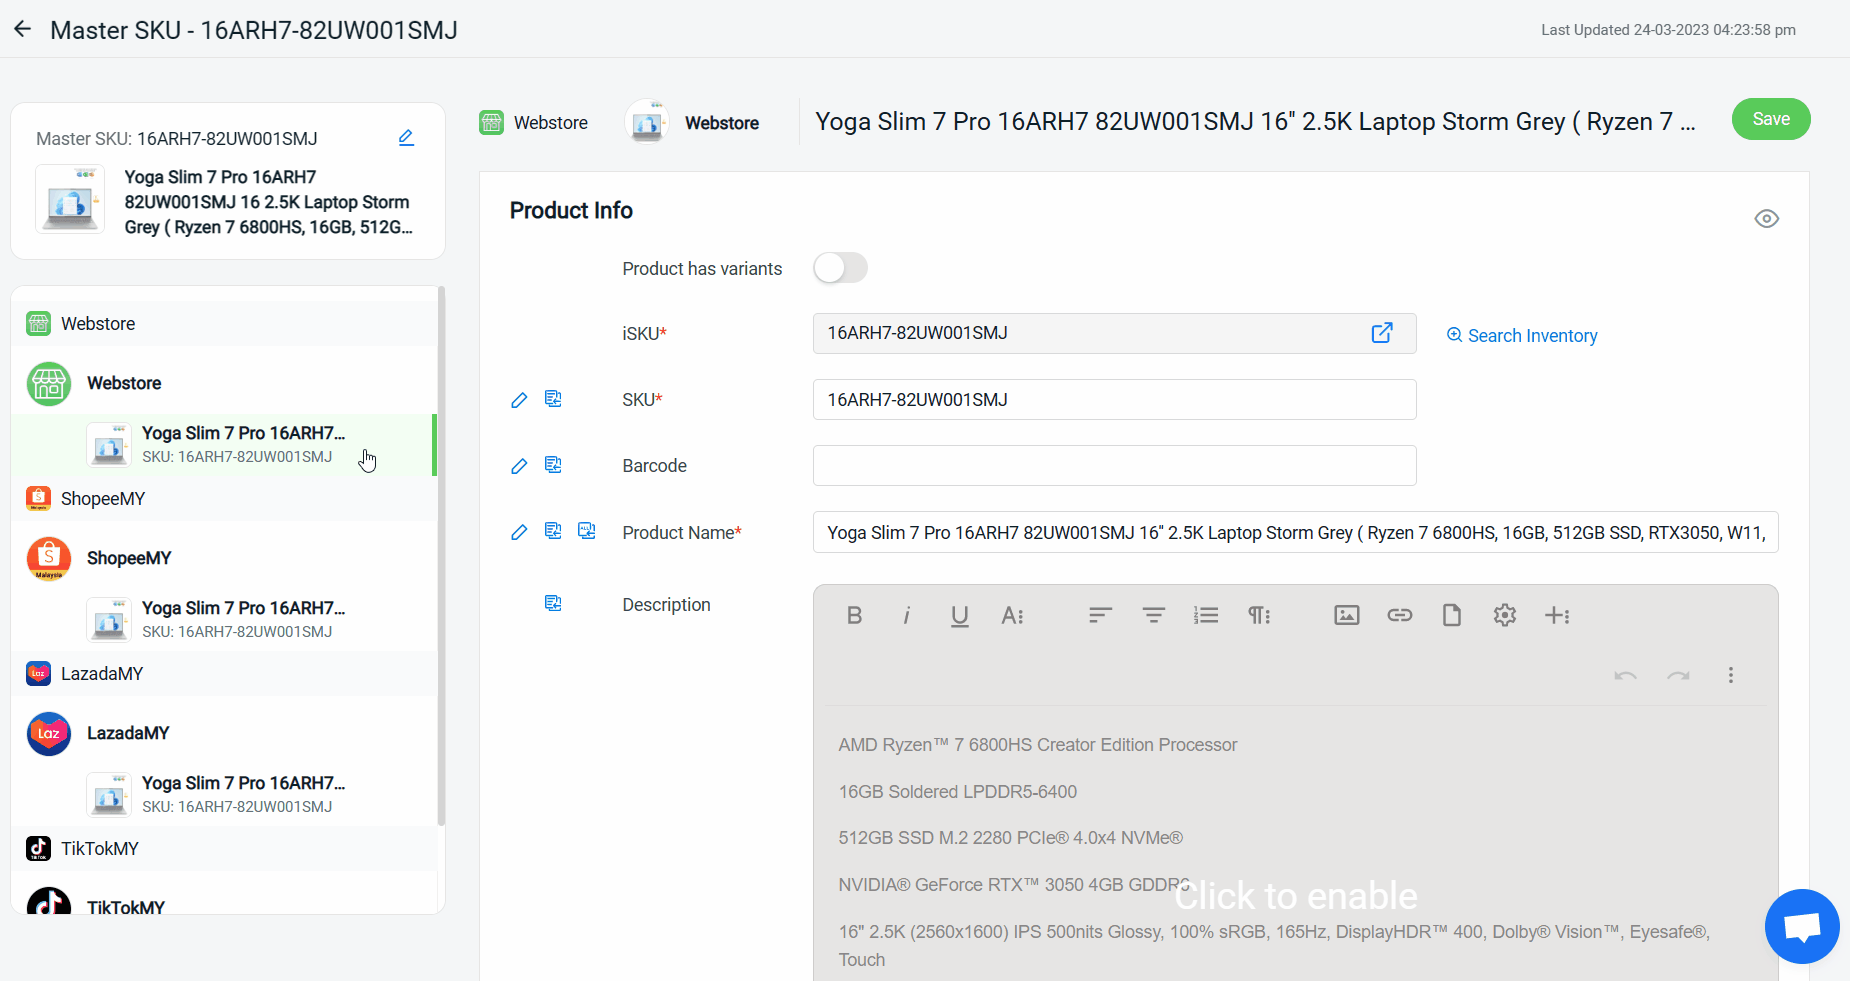
Step 9: You may perform Bulk Edit within the same marketplace, copy to the same marketplace or copy to all stores.
Same Marketplace Bulk Edit
Copy to Same Marketplace
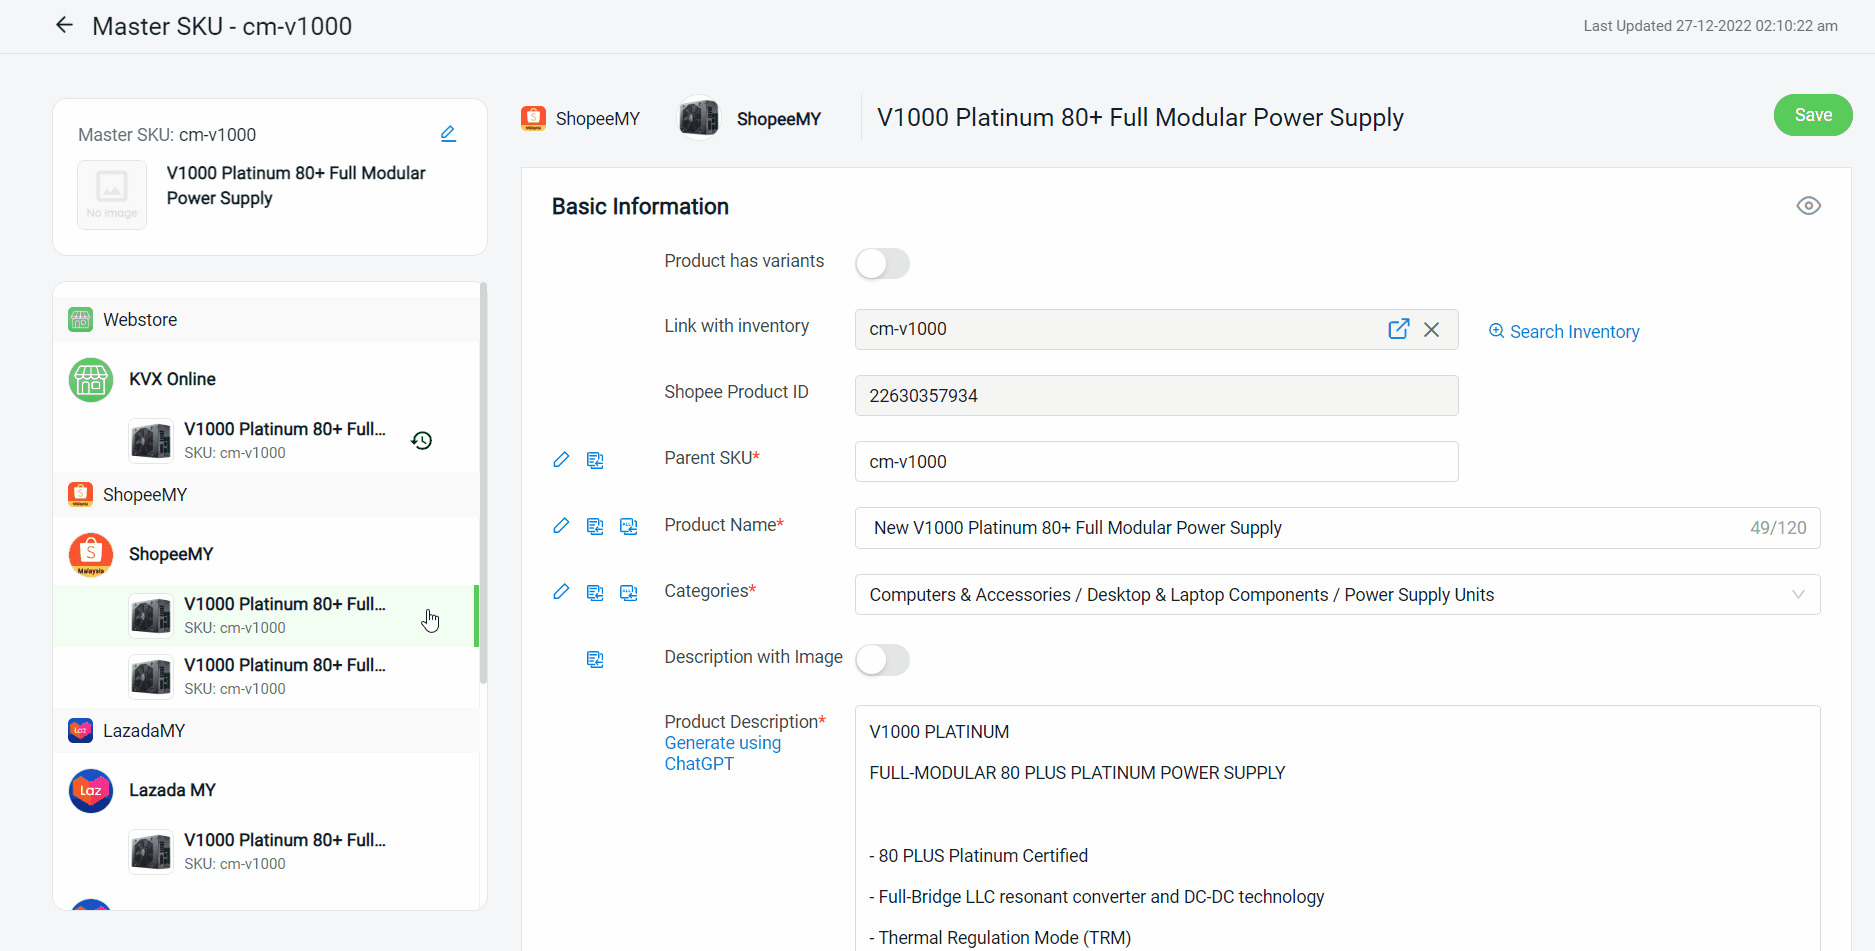
Copy to All Store
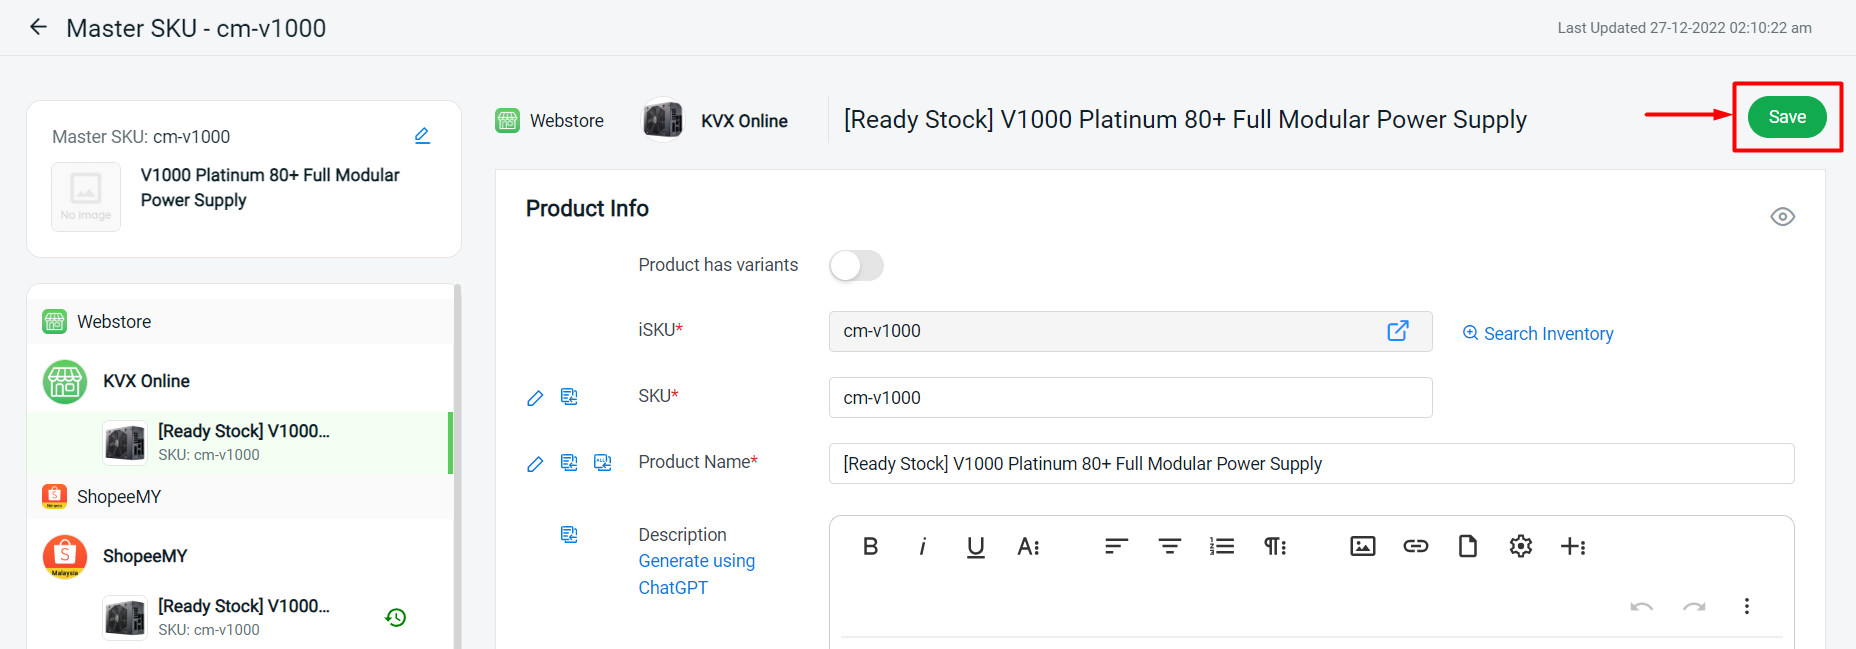
📌Note: If there are any error icon 🛈 beside the product name, it will not be able to Save. Thus, look out for the error icon before you proceed to edit the product details.
Step 10: Once done editing the product details, click on the Save button to sync the product to the marketplaces at once.
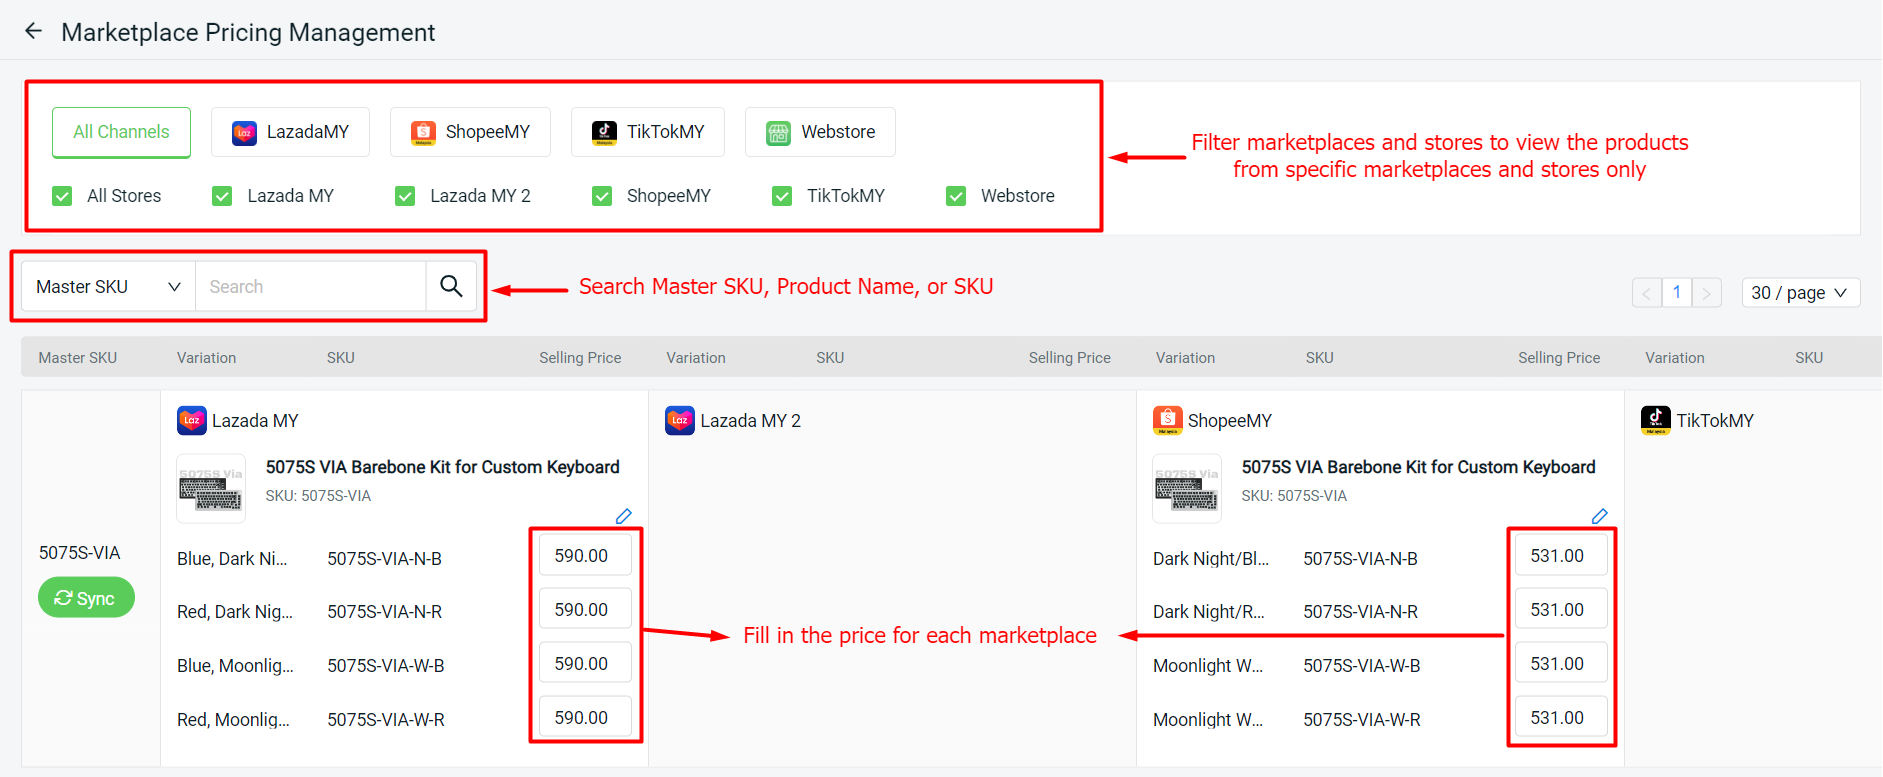
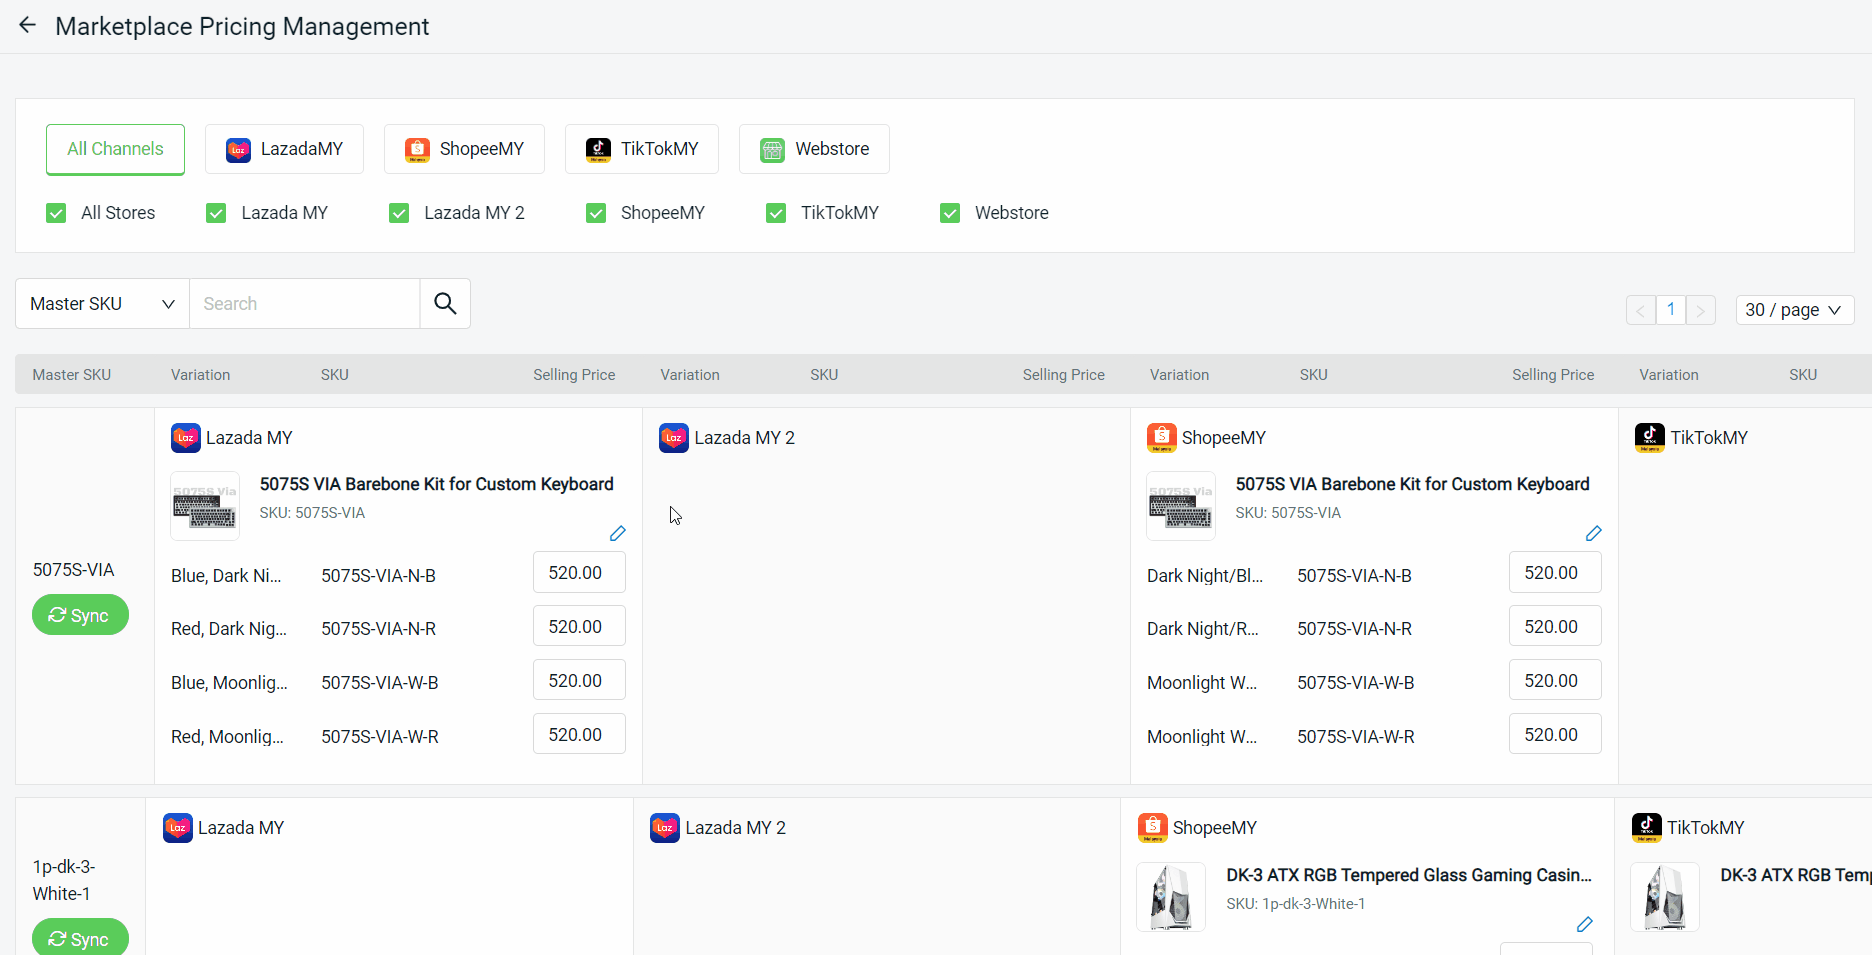
6. Marketplace Pricing Management
Marketplace Pricing Management allows you to manage your product selling price and promotion prices of Webstore, Lazada, Shopee, and TikTok marketplaces in one place. It is useful when there is an increase or decrease in product prices, so you can use Marketplace Pricing Management to update new prices to marketplaces. You can also set different prices for your products and sync them to different marketplaces.
This feature is only available in SiteGiant ERP Turbo Plan and above.
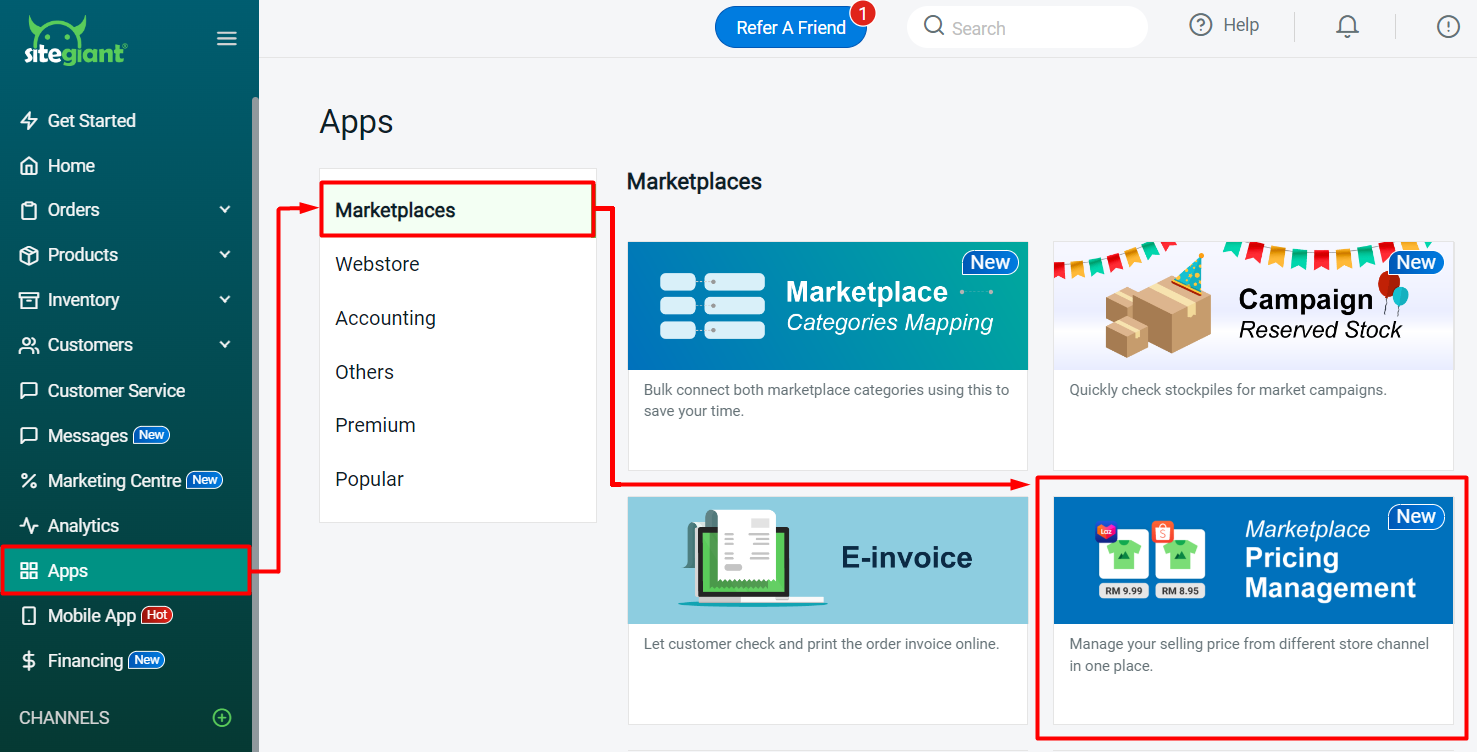
Step 1: Navigate to Apps on the sidebar menu > Marketplaces > Marketplace Pricing Management.
Step 2: You can select a specific marketplace and store to view > you can also search by Master SKU, Product Name, or SKU > fill in the prices that you wish to sync in each marketplace.
📌Note: The Selling Price will show Promotion Price if your products are in a promotion.
Step 3: You can also click on the Edit button to view and update the promotion/ discounted price > click on the Sync button to update the price for the products under this Master SKU.
📌Note: For Shopee and TikTok channels, it is unable to assign the products to a promotion. Only products that are already in the promotion are able to edit and sync the promotion price.