Managing return requests manually can be time-consuming for Webstore admins. The Webstore Order Return feature simplifies the process by notifying you whenever a customer submits a return request. You can review and update the return status directly from the backend, track returned items as they are received and restored to inventory, and initiate refunds, all in one system. This streamlines workflow and ensures a seamless experience for both admins and customers.
This feature is available to the SiteGiant Webstore Pro and ERP Value Plus Plan and above.
2. Return And Refund Settings
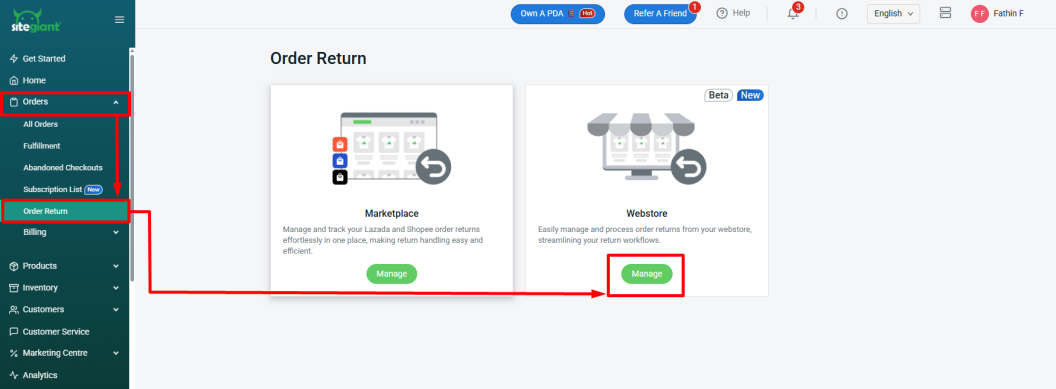
Step 1: Navigate to Orders on the sidebar menu > click Order Return > Manage Webstore.
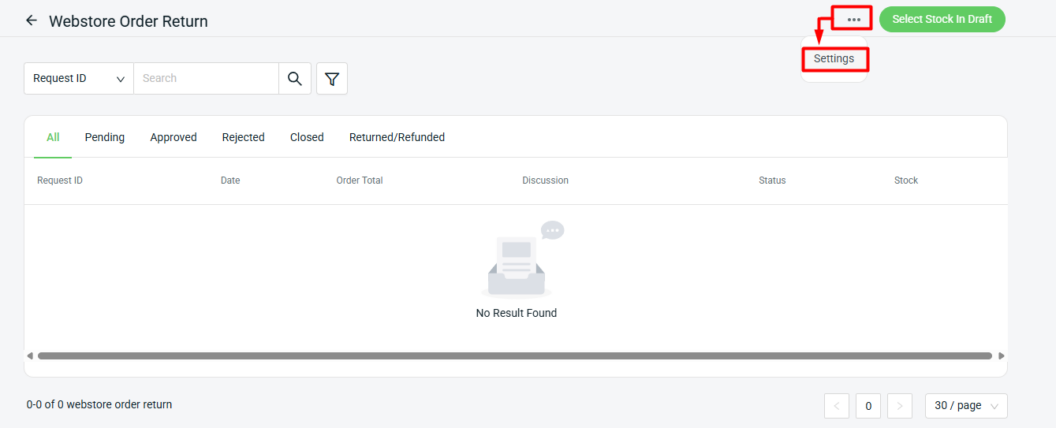
Step 2: Click More(…) > Settings.
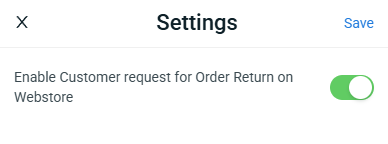
Step 3: By default, the Customer Request status is enabled. If you do not want to use it, click Disable and then Save. When this status is turned off, customers will not be able to request returns through the website. In this case, the customer will need to submit return requests manually, and you can process the return order by following Step 7.
3. Request Return And Refund
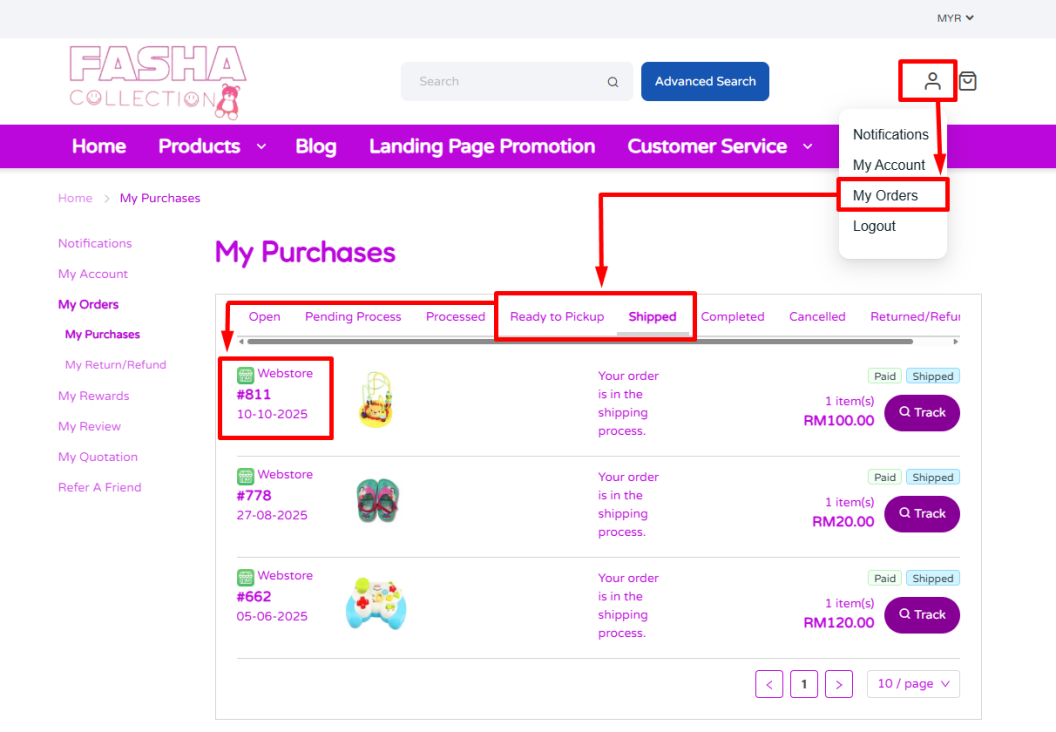
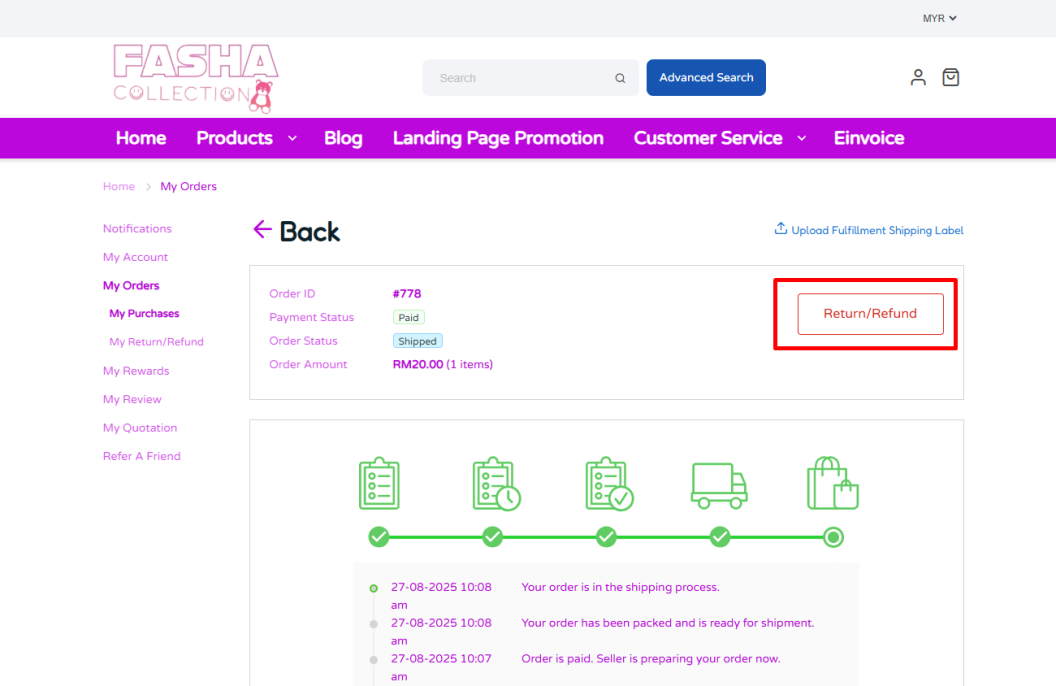
Step 1: Customers Log in to the Webstore > clicks My Orders > Order Status > clicks inside the Order ID.
📌Note: Customers can request a return or refund only when the order status is Ready to Pickup or Shipped.
Step 2: Click Return/Refund.
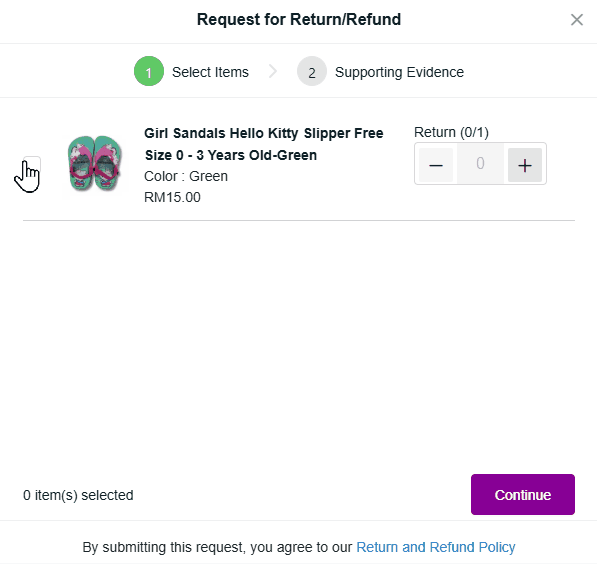
Step 3:Tick the product to return > update the return Quantity > select the Reason > add Notes(optional) > click Continue.
📌Note: If Others is selected as the reason, the Notes section must be filled in before proceeding.
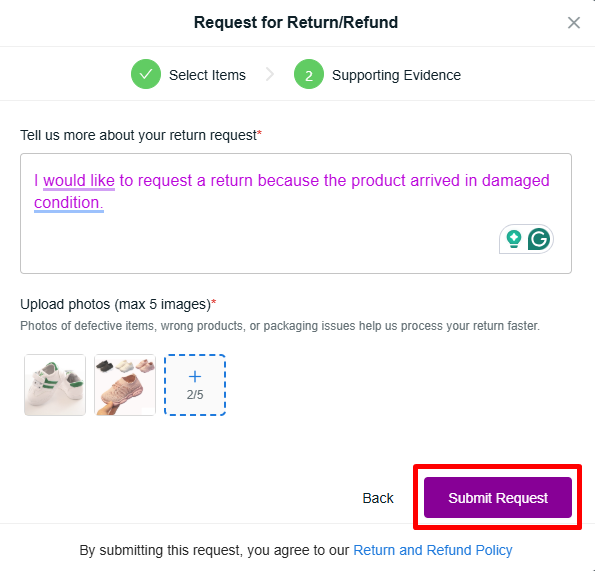
Step 4: Under Supporting Evidence, provide additional details for the return request > upload photos > click Submit Request.
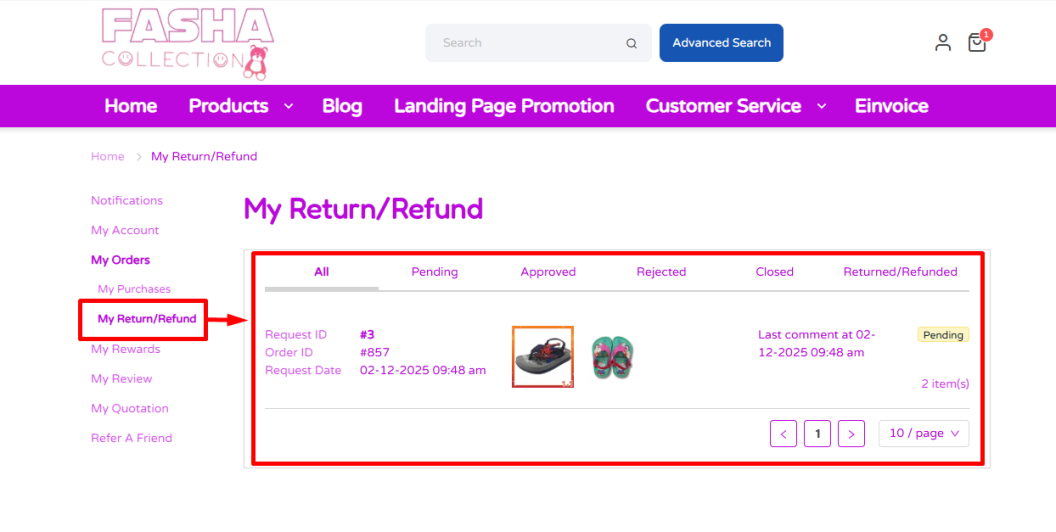
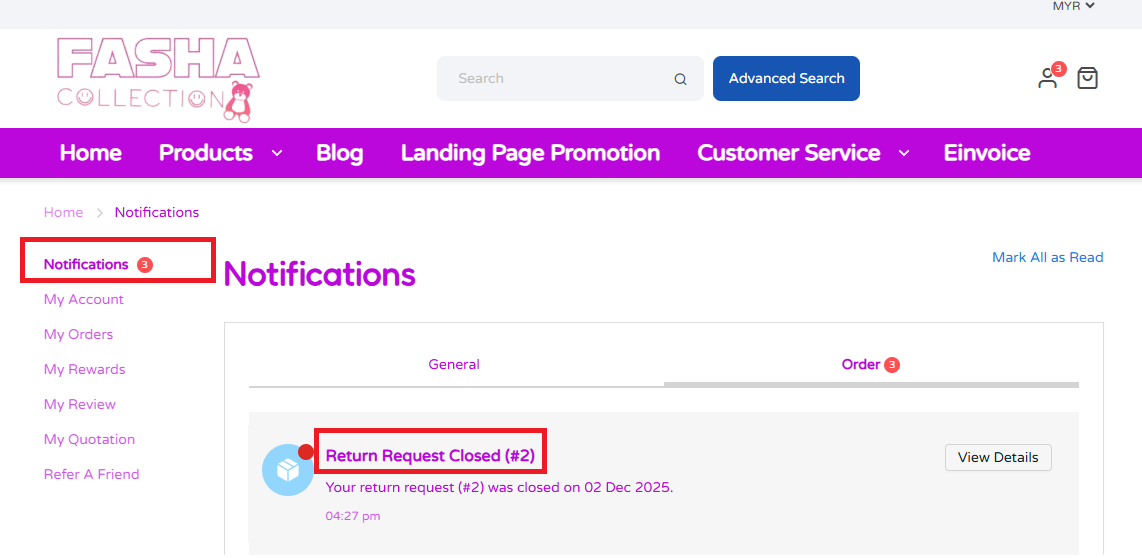
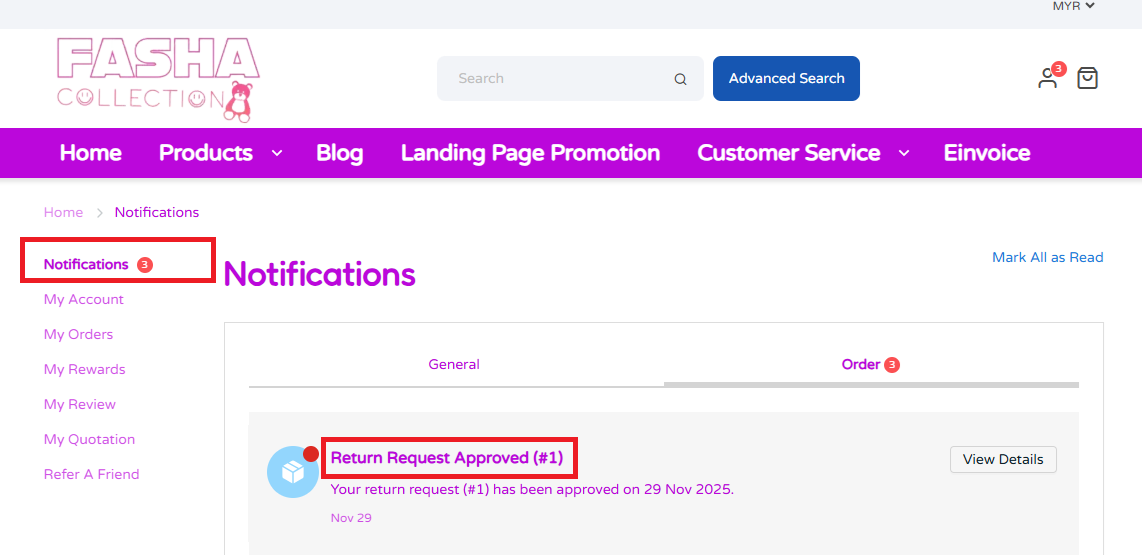
Step 5: The order status can be seen under the My Return/Refund section.
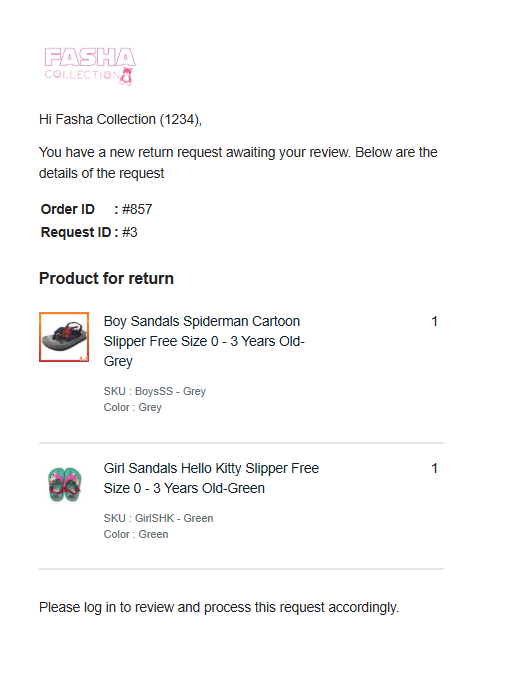
Step 6: Once the customer submits the request, the seller will receive a notification via email.
4. Manage Return And Refund
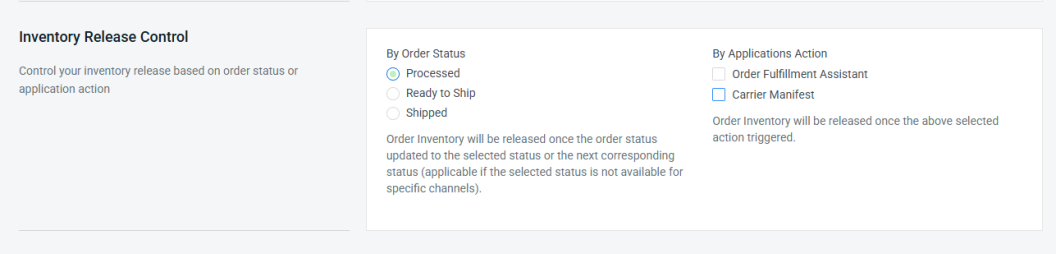
⚠️Important Note: For Ready to Pickup orders, stock is required to be released early and can be set via the Order Status (Processed) or through the Application Action under Settings > General > Inventory Release Control section.
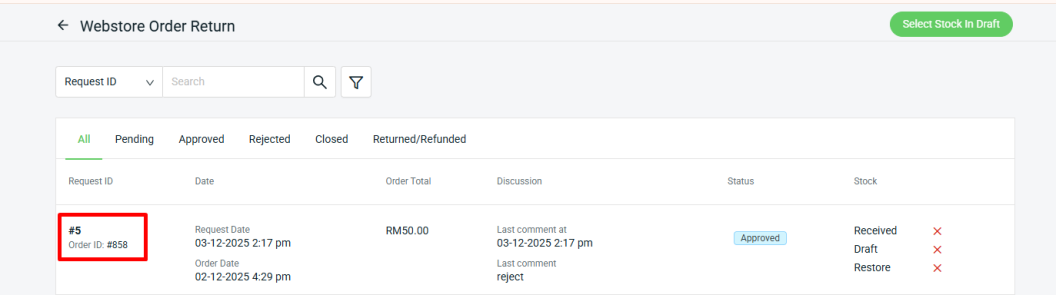
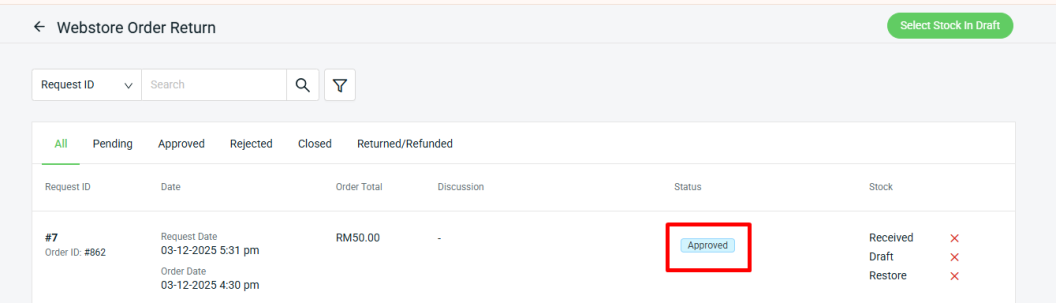
Step 1: Navigate to Orders on the sidebar menu > click Order Return > Manage Webstore.
Step 2: Click inside the Order ID to manage the request.
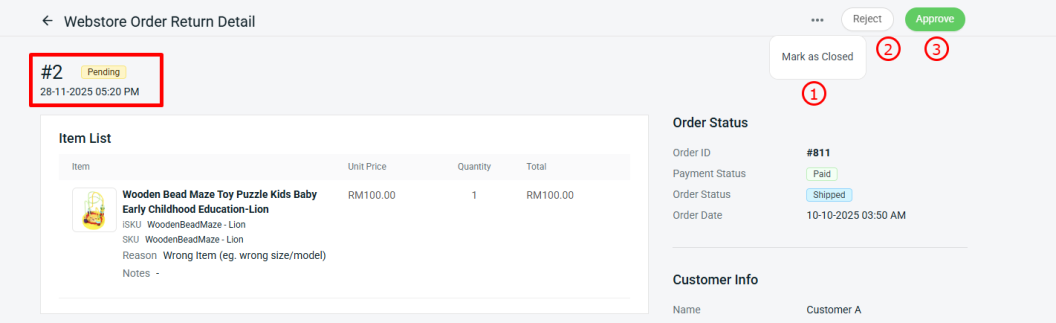
Step 3: The return order status will be under Pending. Select the preferred status to update it for the customer.
1. Mark as Closed: The customer is unable to submit a return or refund request for that order anymore.
Step 1: Click More (...) > Mark as Closed.
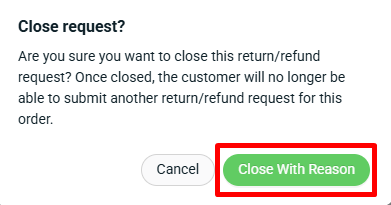
Step 2: Click Close With Reason. Step 3: Enter the Closed Reason > Submit. Step 4: Once the seller marks the status as Closed, the customer will receive a notification in the webstore.
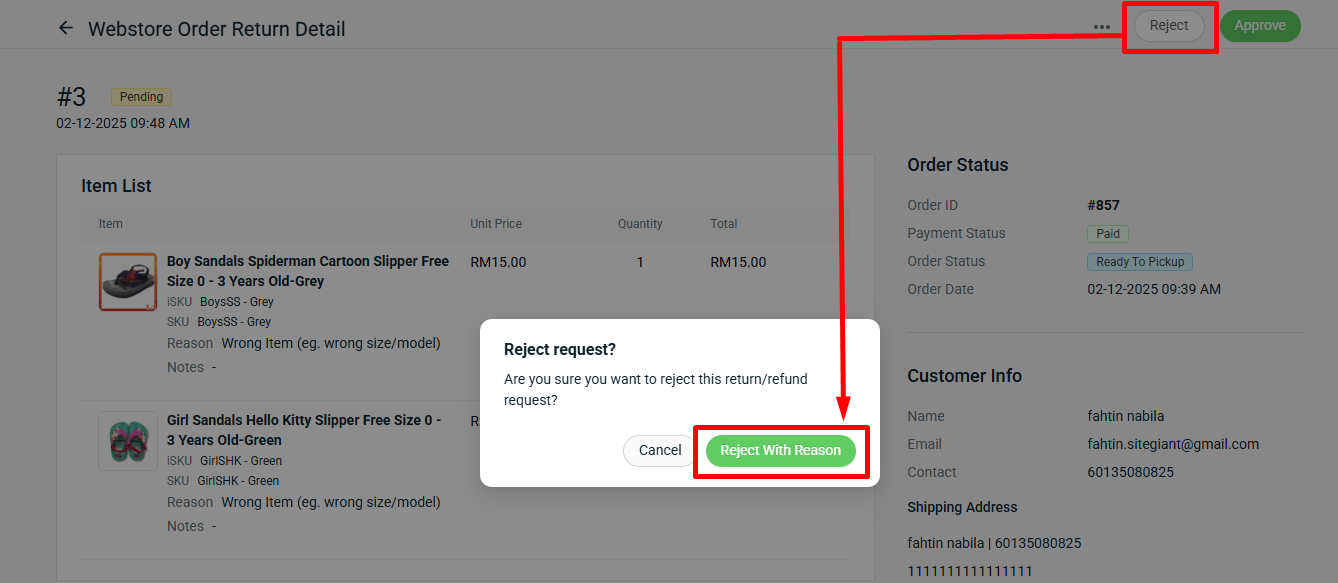
2. Reject: Reject the return or refund request as the item will not be accepted back into stock and no refund will be issued.
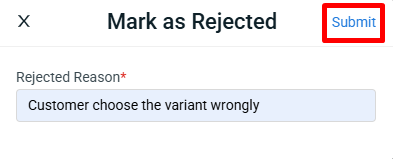
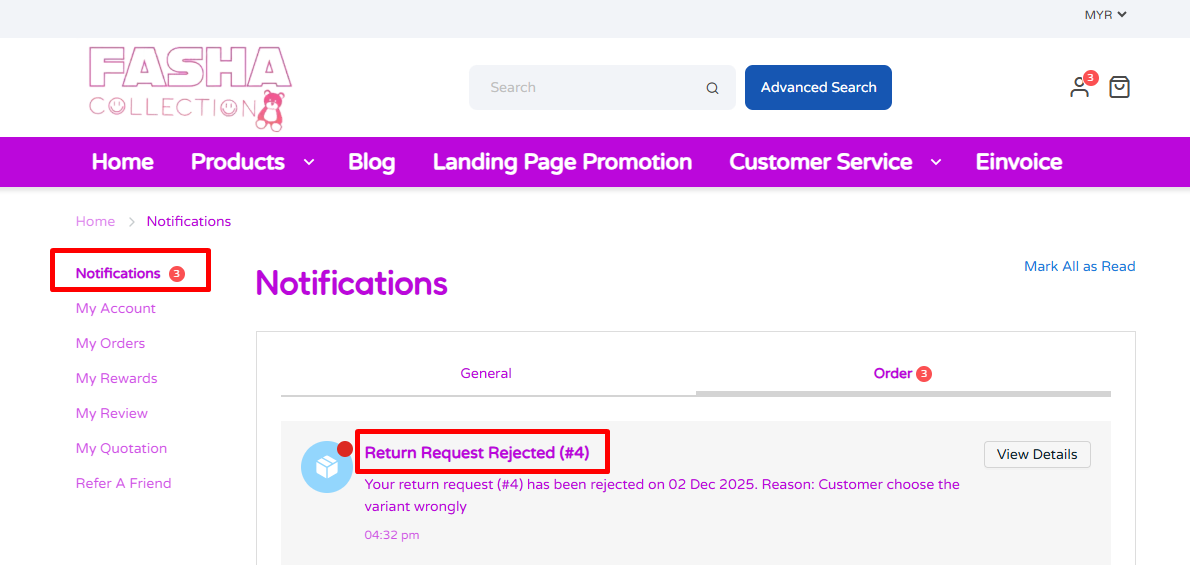
Step 1: Click Reject > Reject With Reason. Step 2: Enter the Rejected Reason > click Submit. Step 3: Once the seller marks the status as Reject, the customer will receive a notification in the webstore. 📌Note: The customer can submit a return and refund request again by going to the My Orders page to resubmit it.
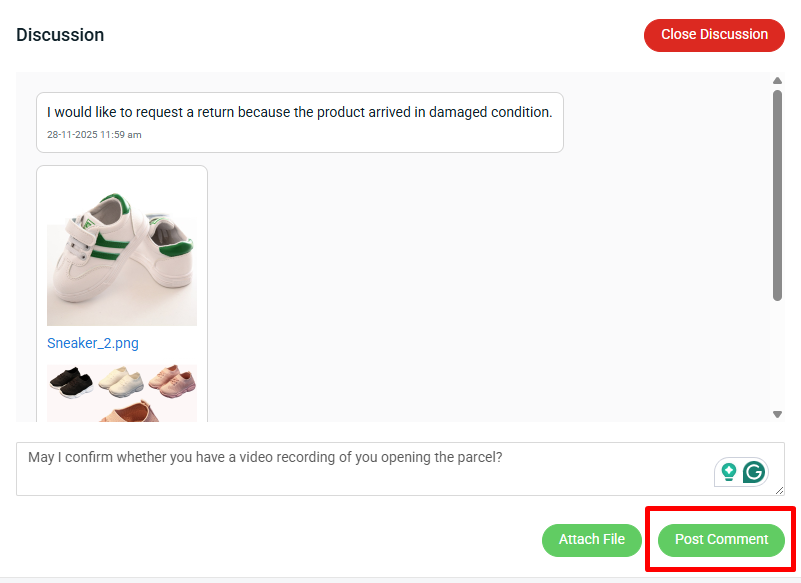
3. Approve: The discussion will be open for customers and merchants to update information related to the return or refund request.
Step 1: Once the seller marks the status as Approved, the customer will receive a notification in the webstore. 📌Note: The merchant can still reject or close the order after the request has been approved.
Step 4: Under the Discussion section, you can reply to the customer’s inquiry > click Post Comment. However, if no further discussion is required, click Close Discussion.
📌Note: If the return/refund status is already marked as Closed, the Discussion section will be closed automatically.
5. Receive And Restore Return Item
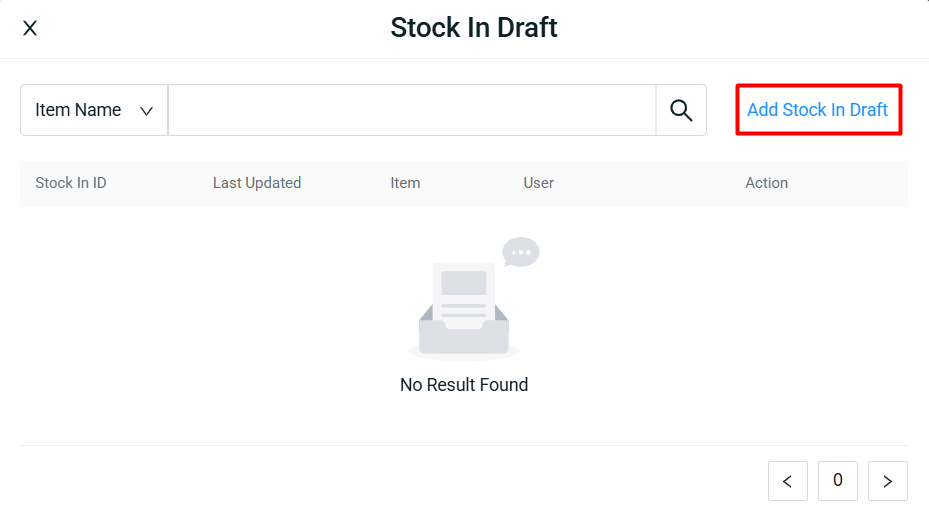
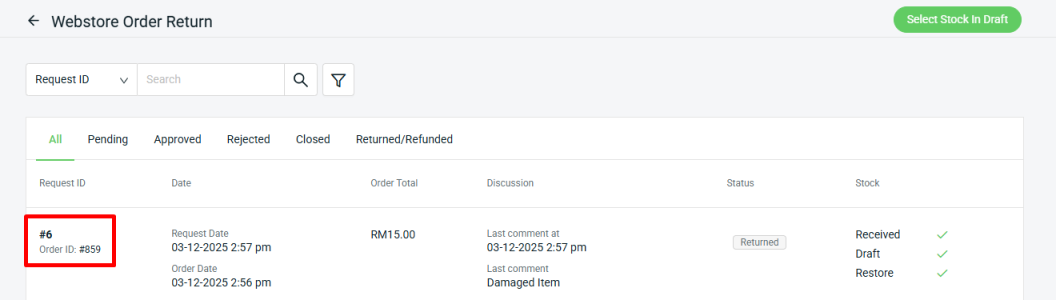
Step 1: Click Select Stock In Draft.
Step 2: Click Add Stock In Draft.
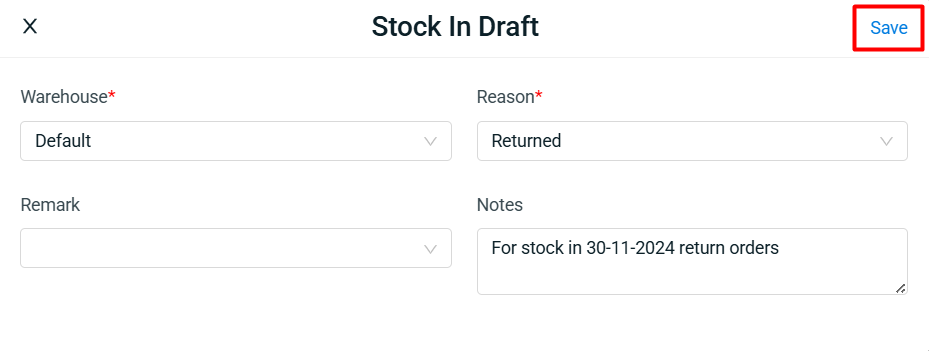
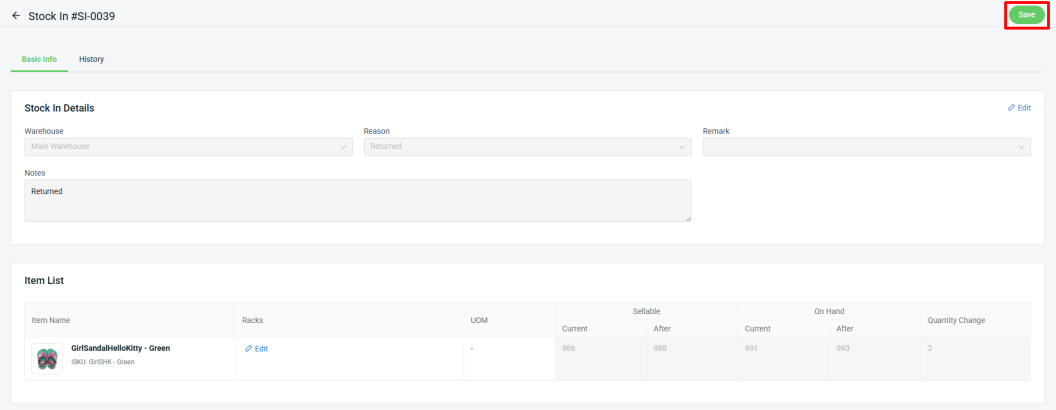
Step 3: Fill in the Stock In details > Save.
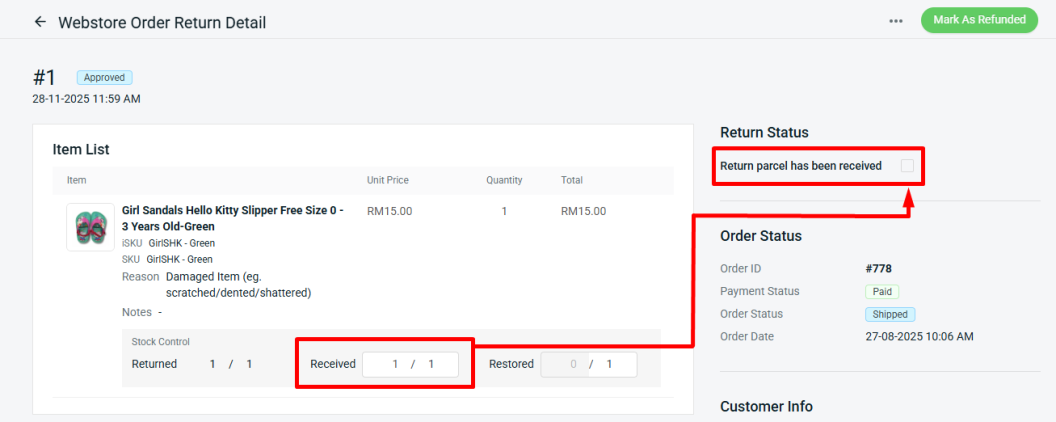
Step 4: Click the Order ID to view the Webstore Order Return Details.
Step 5: Enter the quantity received from the return parcel in the Received column > tick the Return parcel has been received checkbox.
Step 6: Tick Mark As Returned > Receive.
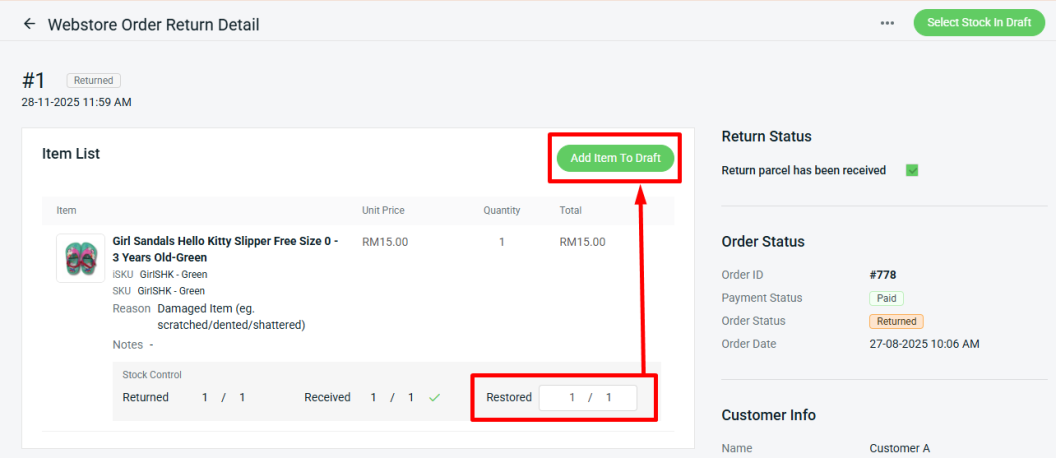
Step 7: Enter the quantity you would like to restore to inventory in the Restored column > Add Item To Draft.
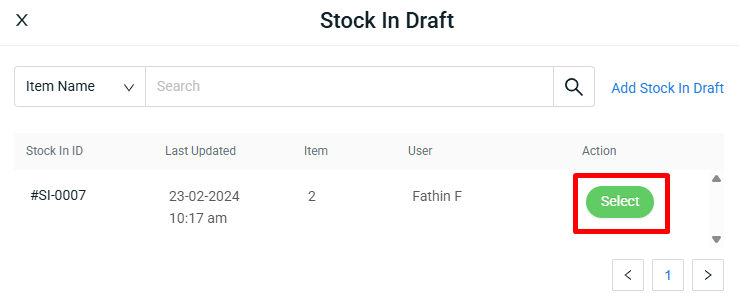
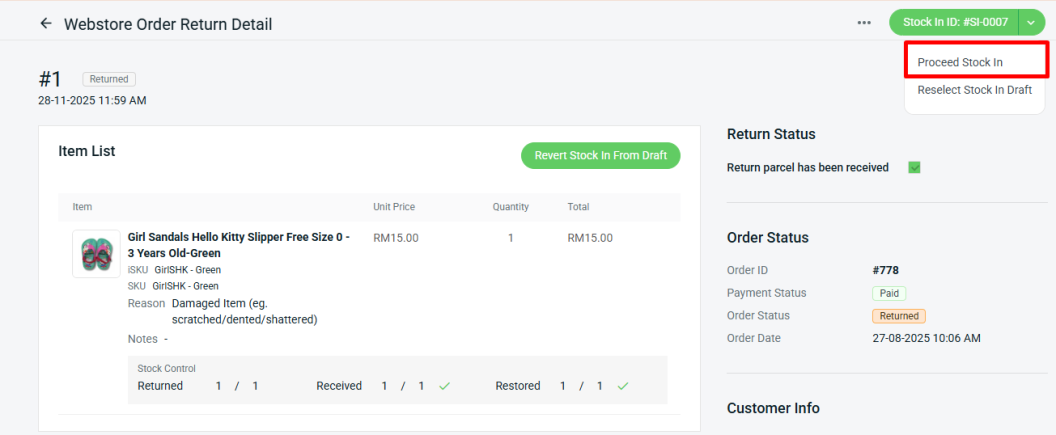
Step 8: Select the Stock In ID that has been created.
Step 9: Repeat Steps 4-8 to add other return orders into Stock In Draft. Once done, click Proceed Stock In.
Step 10: Click Save.
📌Note: You can only edit Remarks and Notes under Stock In Details.
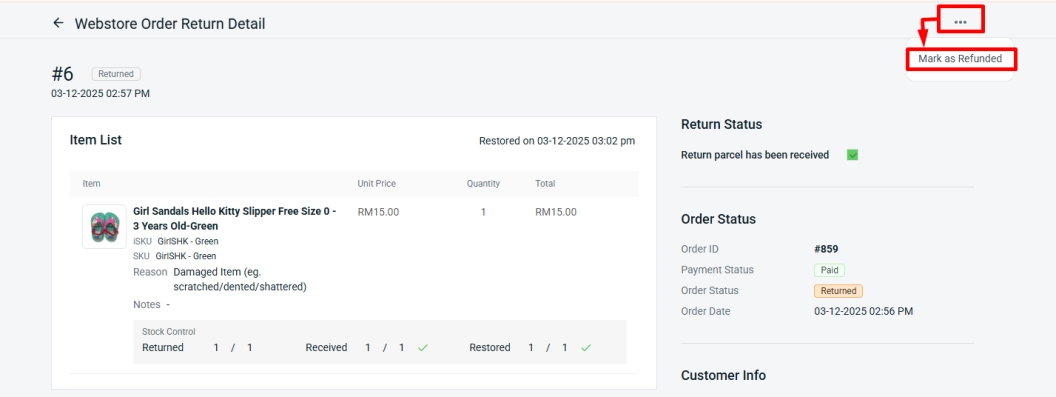
6. Mark As Refunded
Step 1: Click into the Order ID again.
Step 2: Press more(…) > Mark as Refunded.
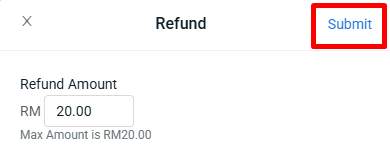
Step 3: Click Refund.
Step 4: Enter the Refund Amount > Submit.
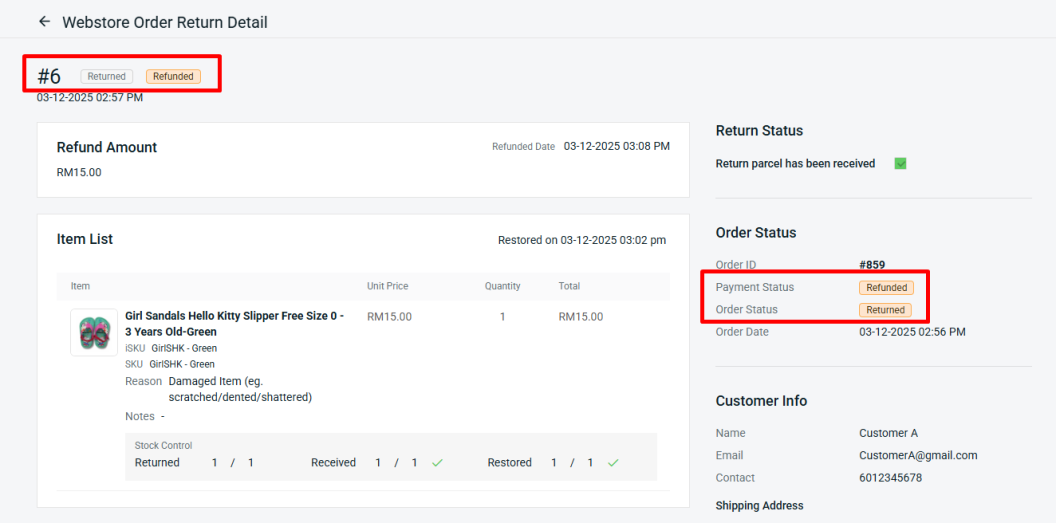
Step 5: Once updated, you can view the Payment and Order status within the order details.
📌Note: If a customer used points or store credit when placing the order, these will not be automatically added back to their account when updating the return and refund. The merchant needs to add it manually.
7. Guest Returns & Refunds (Manual Process)
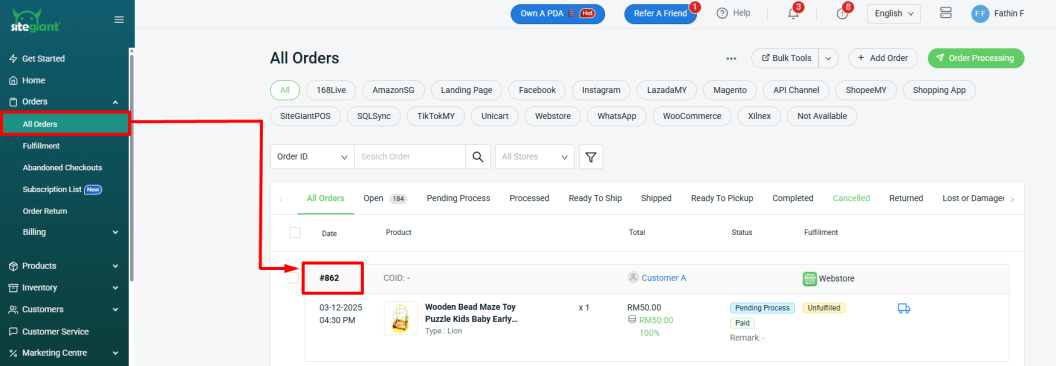
Step 1: The customer will need to contact the merchant to request a return and refund. Once approved, the merchant can navigate to Orders on the sidebar menu > All Orders > click the Order ID.
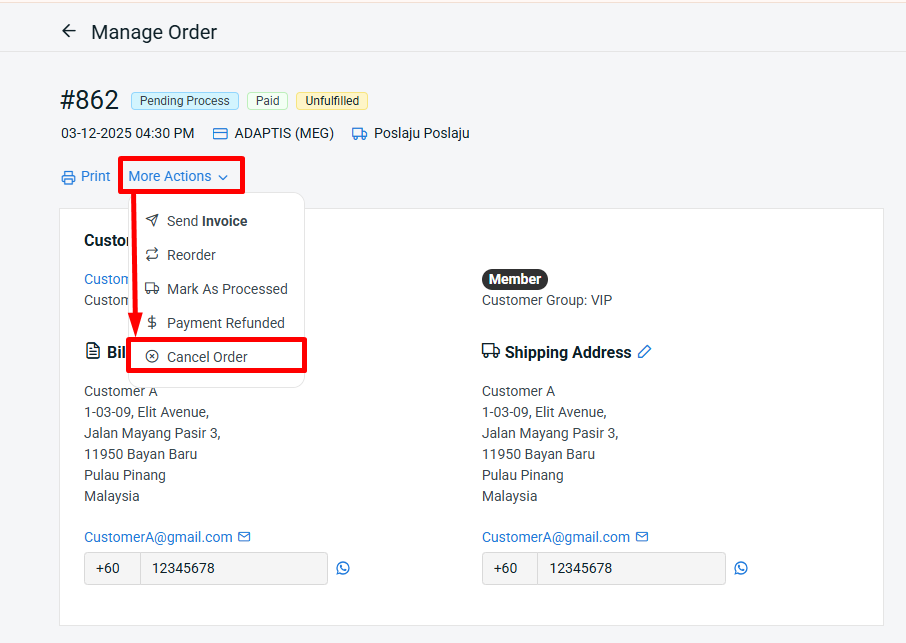
Step 2: Click More Actions > Cancel Order.
Step 3: Untick Add product back to inventory > Cancel Order.
Step 4: Then, go to Orders > Order Return > Manage Webstore.
Step 5: The order return status will automatically change to Approved once the order is marked as canceled. Continue the process by following Step 5 and Step 6.
📝Additional Information
1. Marketplace Order Return Management can also scan and retrieve Webstore orders that do not exist in Webstore Order Return. This allows merchants to use Marketplace Order Return Management when a customer requests a manual return and refund directly from the seller.
2. If an order is already managed under Marketplace Order Return Management, Webstore customers will not be able to submit a return and refund request from the Webstore.
3. When a Webstore order is marked as Cancelled without reverting stock, the system will check whether the order is under Marketplace Order Return. If it is not, a record will be created under Webstore Order Return.