1. Introduction
2. Setting Broadcast Bot (One-Time)
3. Update Notification Template
4. Setting Automated Bot (Recurring)
5. Additional Information
1. Introduction
Marketing Automation is a solution that enables organizations to effectively engage customers through automated marketing communications across multiple channels, including websites, email, and text messages, to generate sales leads. At SiteGiant, you have two options for scheduling your email campaigns: you can either use the Broadcast Bot for one-time emails or set up recurring campaigns with the Automated Bot.
This feature is only available in SiteGiant OMO Essential and above, as well as the SiteGiant ERP Add-On App.
2. Setting Broadcast Bot (One-Time)
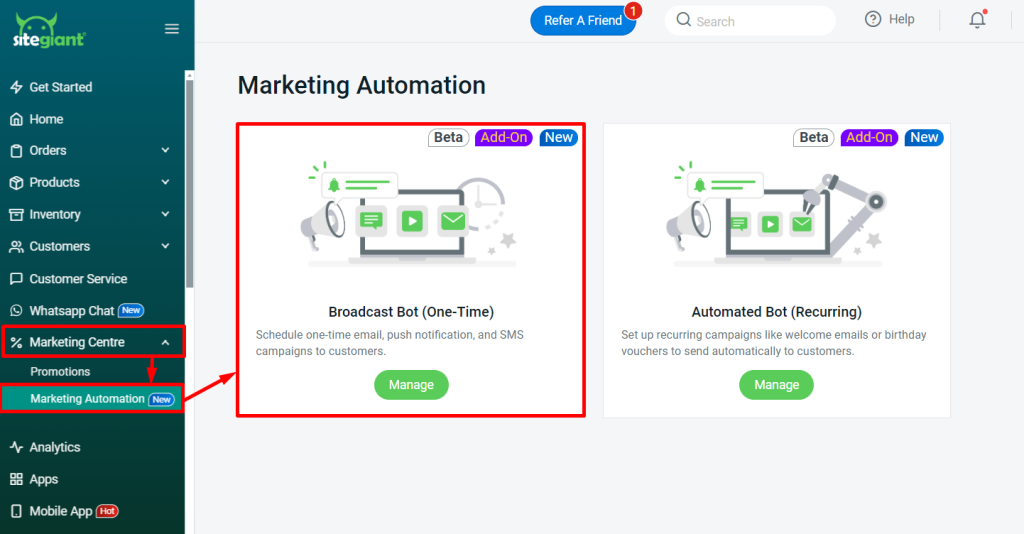
Step 1: Navigate to Marketing Centre on the sidebar menu > Marketing Automation > click Broadcast Bot (One-Time).
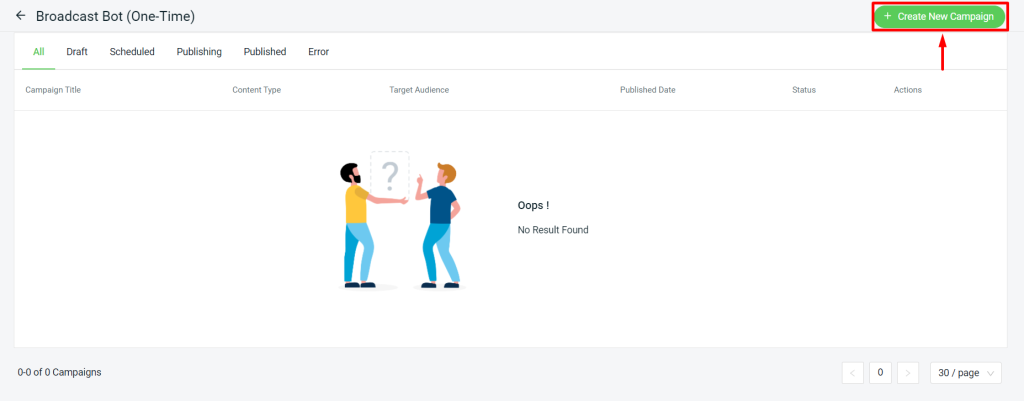
Step 2: Click + Create New Campaign.
Step 3: Enter the Campaign Title > select Content Type Status.

1. Push Notification: Customers will receive a message or notification upon logging into their account on the website or shopping app.

2. Email: The customer will receive a message or notification via the email address they provided during sign up.

3. SMS: Customers will receive a notification message via SMS to the phone number they registered.
Step 4: Select a Target Audience for the broadcast notification.

1. All Customers: A notification will be sent out to all customers listed under the seller.

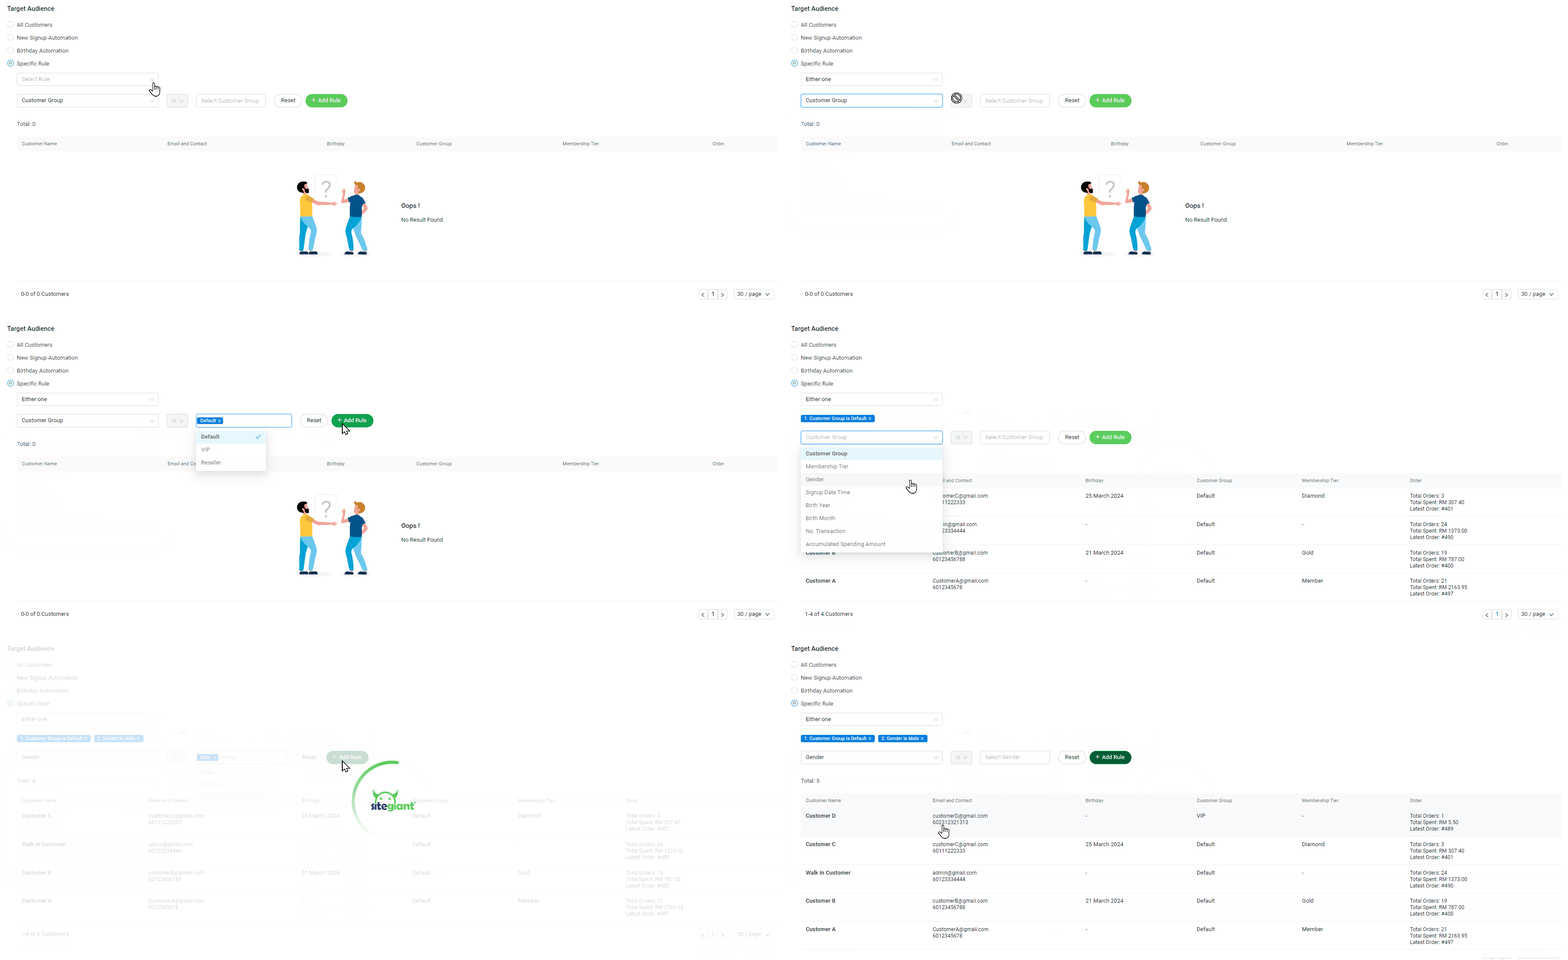
2. Specific Rule: You may select the customer to whom you would like to send the notification based on the specified criteria.
Step 5: Check the estimated token cost under SiteGiant Wallet Token Info.
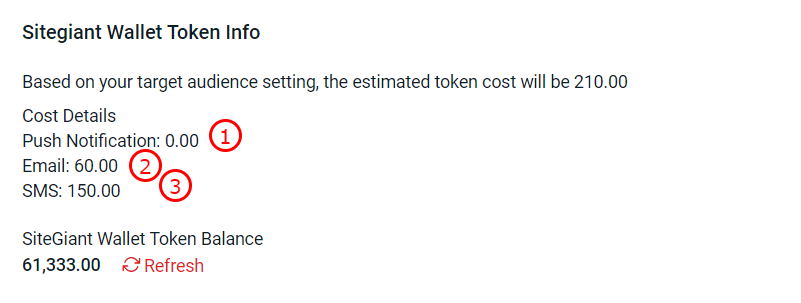
1. Push Notification: It will not deduct any tokens from your SiteGiant Wallet.

2. Email: A deduction of 3 tokens will be applied for each customer from a single notification. If the customer's details do not include an email address, the message will not be sent to the customer, and the token will not deduct for that customer.

Example:  You want to send notification to 20 customer. Then it will calculate as below:

20 Customer x 3 Token
= 60 Token

3. SMS: A charge of 50 tokens will be applied for each customer with a Malaysia phone number, and a charge of 100 tokens will be applied for each customer with a Singapore phone number.

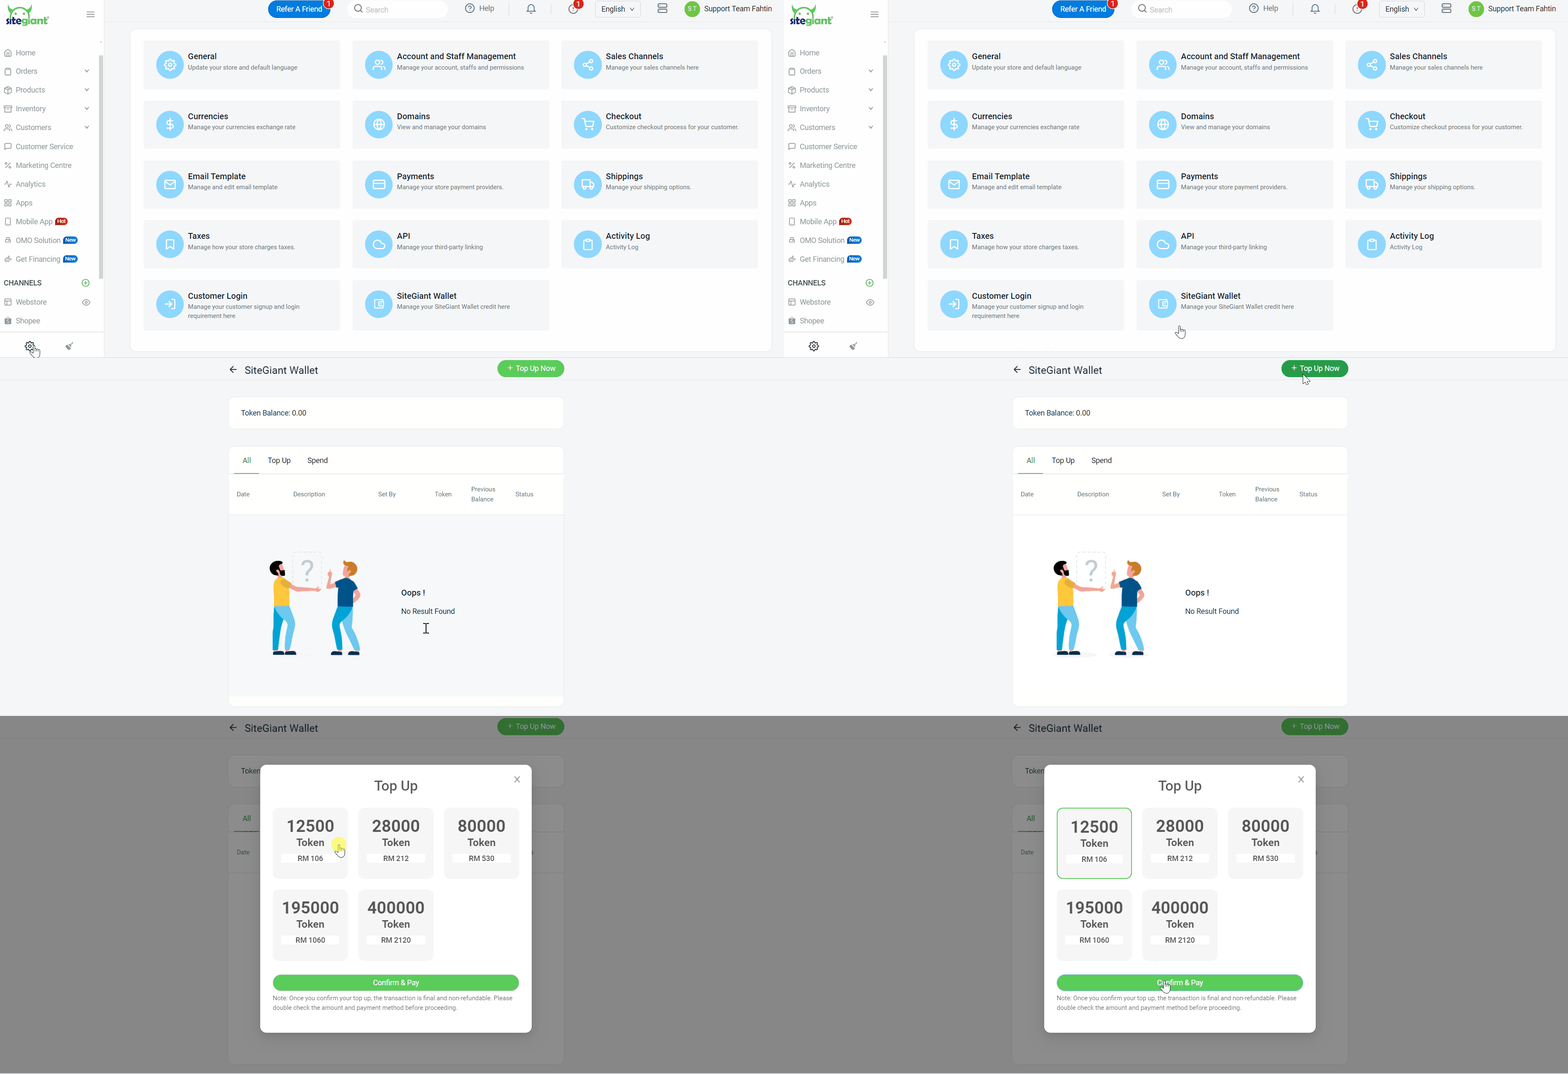
💡Tips: You can top up your SiteGiant Wallet as shown below:
3. Update Notification Template
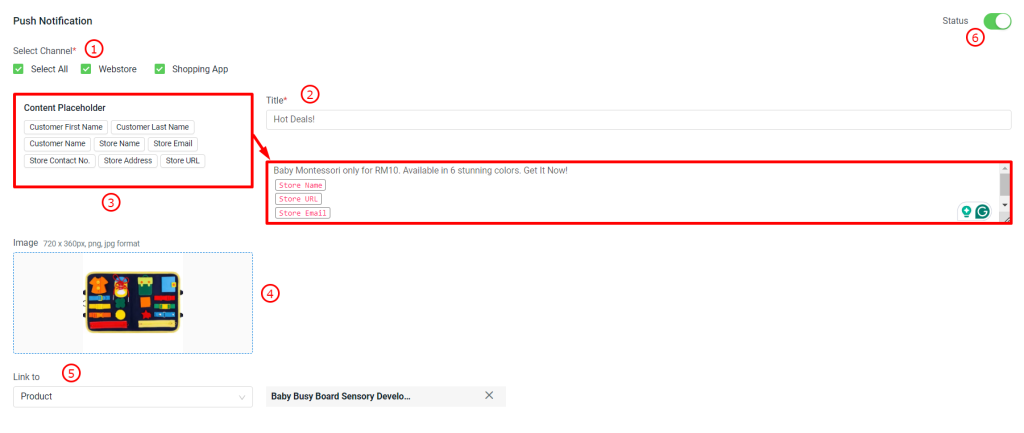
1. Push Notification
Step 1: Select Channel to send the notification > enter the notification Title > edit the notification using the Content Placeholder which will insert the information based on the details > upload Image (Optional) > update Link to > toggle on Status.
2. Email Content
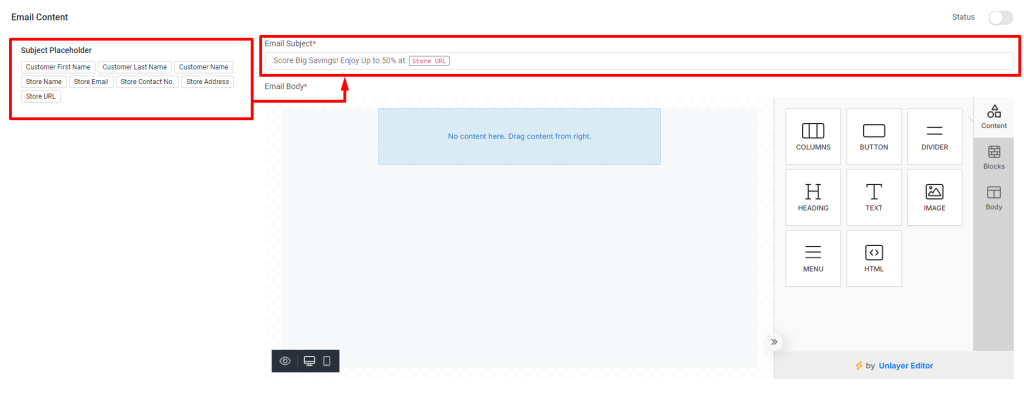
Step 1: Update the Email Subject using the provided Subject Placeholder.
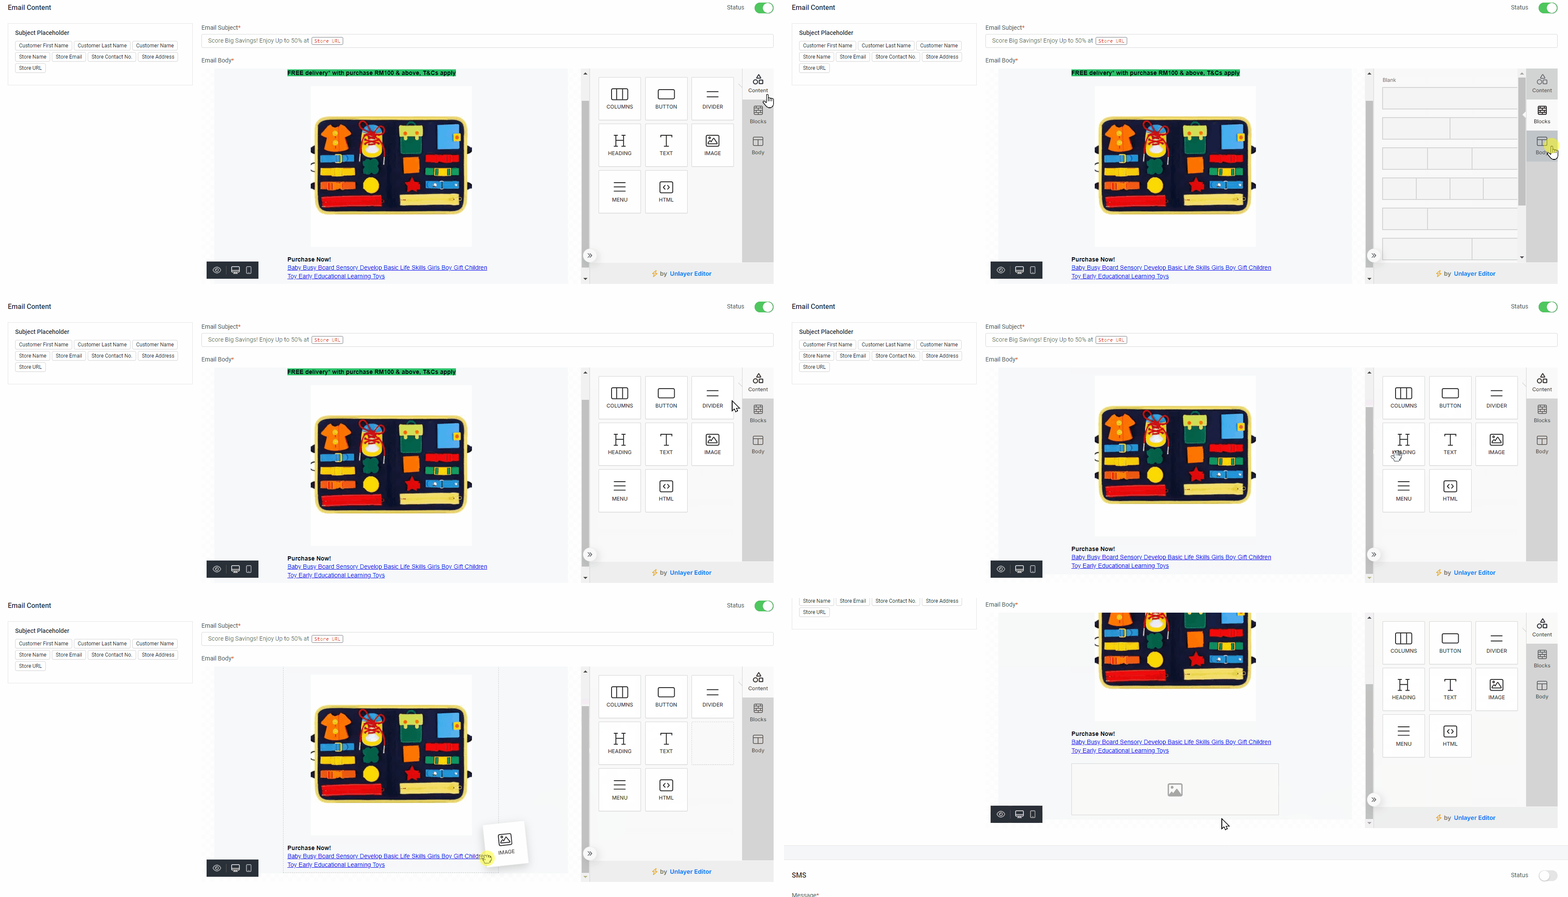
Step 2: Update the Email Body using the provided Content, Blocks, and Body sections. You may drag the relevant block that you wish to use.
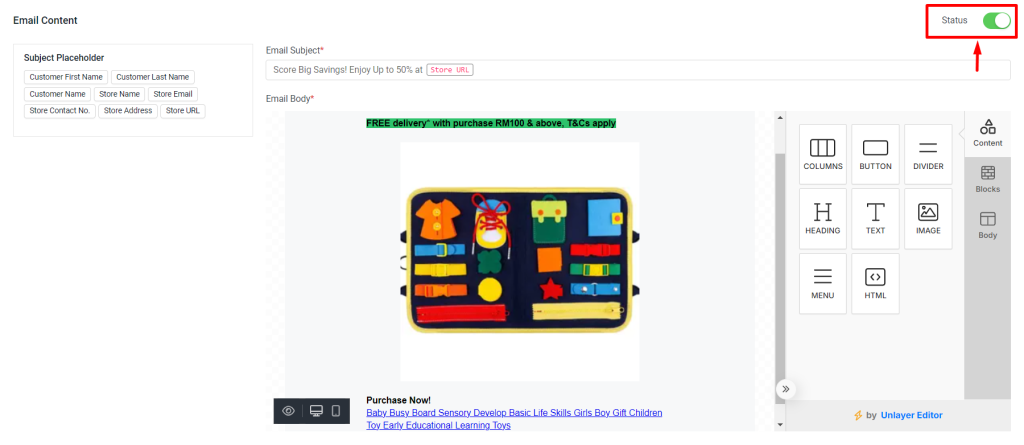
Step 3: Toggle On Status.
3. SMS.
Step 1: Update the Message you wish to send to customer > toggle on Status.

📌Note: Once all the setting is done, you can select Publish Now or Schedule Publish to set the date for the notification to be sent.

4. Setting Automated Bot (Recurring)
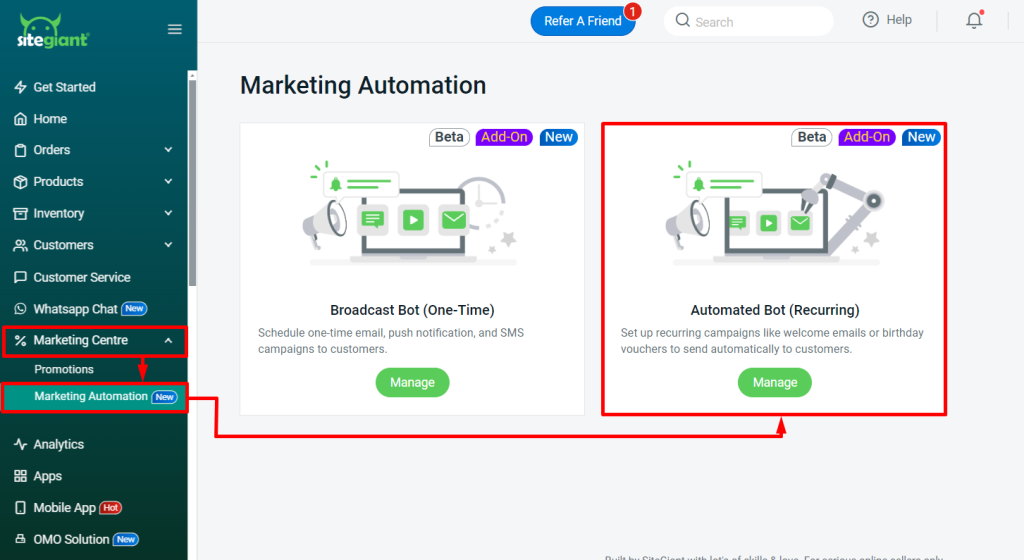
Step 1: Navigate to Marketing Automation on the sidebar menu > Marketing Automation > click Automated Bot (Recurring).
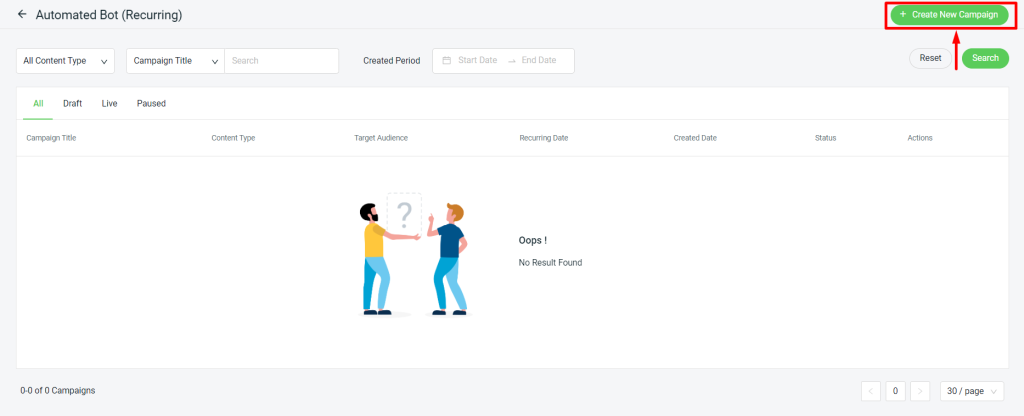
Step 2: Click + Create New Campaign.
Step 3: Enter the Campaign Title > select Content Type Status.

1. Push Notification: Customers will receive a message or notification upon logging into their account on the website or shopping app.

2. Email: The customer will receive a message or notification via the email address they provided during sign up.

3. SMS: Customers will receive a notification message via SMS to the phone number they registered.
Step 4: Select a Target Audience for the notification.
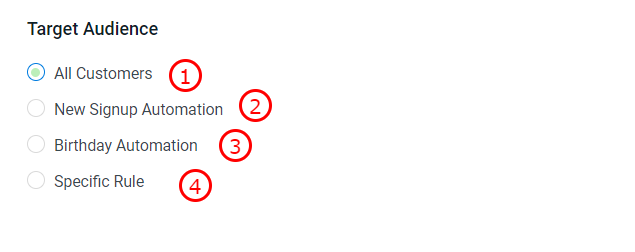
1. All Customers: A notification will be sent out to all customers listed under the seller. 2. New Signup Automation: The notification will be sent to the customer automatically upon successful registration. 3. Birthday Automation: You are able to schedule notifications to be sent to your listed customers according to their birthday dates.4. Specific Rule: You may select the customer to whom you would like to send the notification based on the specified criteria.
Step 5: Select the recurring time to update the customer regarding the notification you created.

Step 6: Check the estimated token cost under SiteGiant Wallet Token Info.

1. Push Notification: It will not deduct any tokens from your SiteGiant Wallet.

2. Email: A deduction of 3 tokens will be applied for each customer from a single notification. If the customer's details do not include an email address, the message will not be sent to the customer, and the token will not deduct for that customer.

Example:  You want to send notification to 20 customer. Then it will calculate as below:

20 Customer x 3 Token
= 60 Token

3. SMS: A charge of 50 tokens will be applied for each customer with a Malaysia phone number, and a charge of 100 tokens will be applied for each customer with a Singapore phone number.

💡Tips: You can top up your SiteGiant Wallet as shown below:
📌Note: Please refer to Step 3: Update Notification Template for the setup of the notification template.
5. Marketing Automation Analytics Report
1. Broadcast Bot (One-Time)
Step 1: Under Broadcast Bot listing, click the Campaign Title that you wish to check.

Step 2: You will be able to see the Broadcast Bot Basic Info (Campaign Title, Content Type, Target Audience, and Published Date)

Step 3: Analytic will be updated based on your selected Content Type Status.
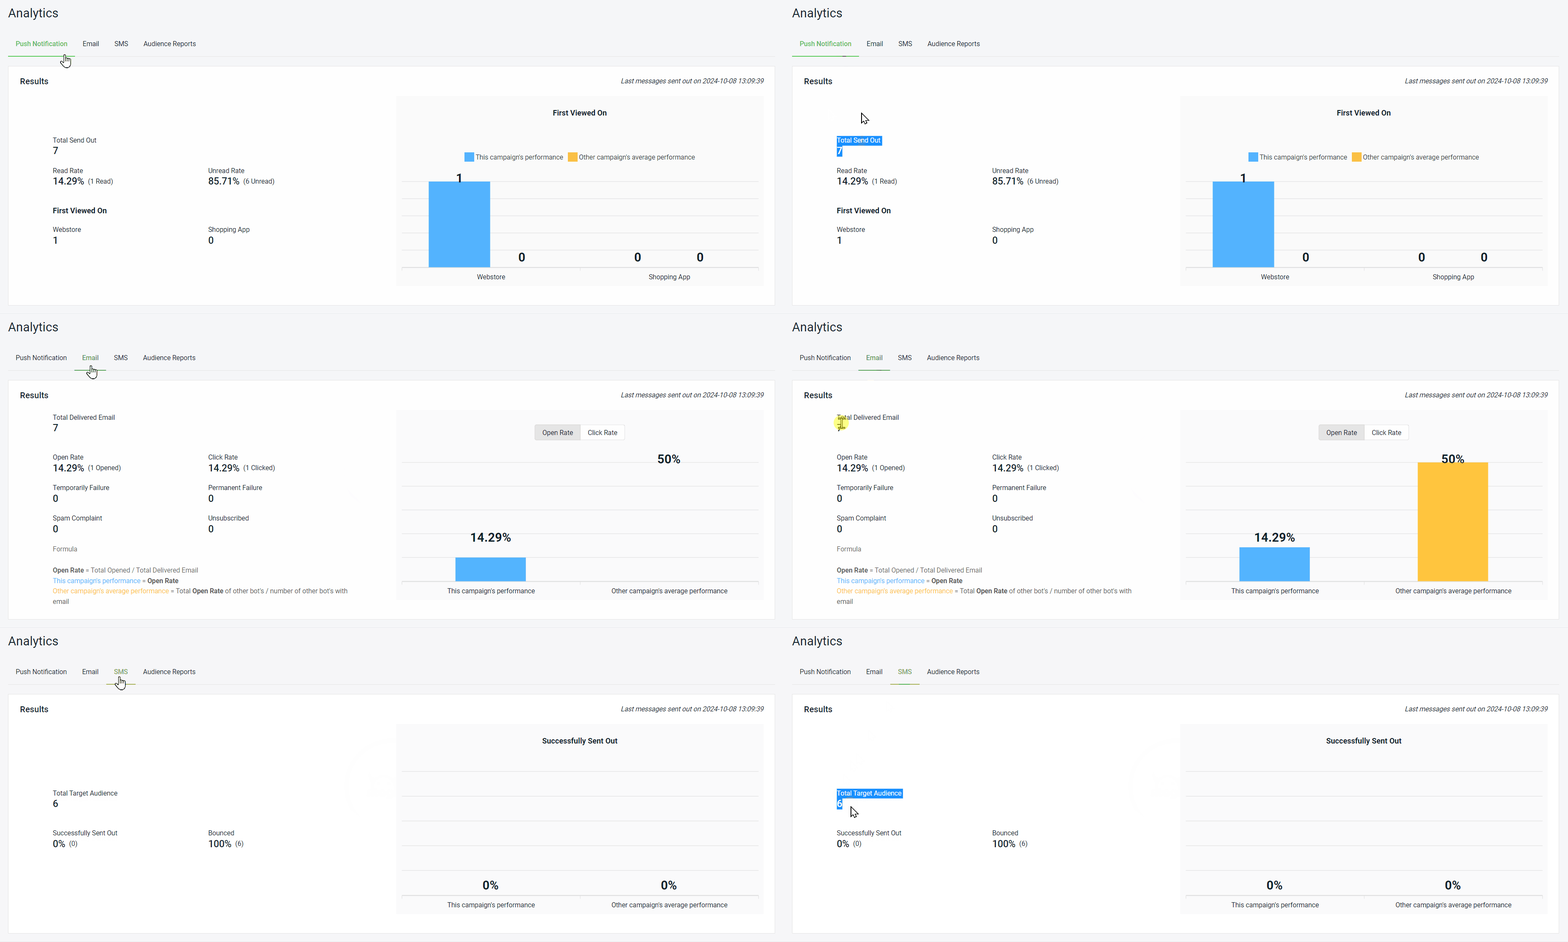
Step 4: Under the Target Audience section, you can view the notification status already sent to the customer.

Step 5: You can check whether the notification was sent successfully to related customers by checking the Audience Reports.

2. Automated Bot (Recurring)
Step 1: Under the Automated Bot (Recurring) listing, click the Campaign Title that you wish to check.

Step 2: You will be able to see the Automated Bot Basic Info (Campaign Title, Content Type, Target Audience, and Recurring Date)

Step 3: Analytic will be updated based on your selected Content Type Status.

Step 4: Under the Target Audience section, you can view the notification status already sent to the customer.

Step 5: You can check whether the notification was sent successfully by filtering the date and time for the relevant customers in the Audience Reports.

📝Additional Information
1. Broadcast Bot (One-Time)
Step 1: Under the Broadcast Bot (One-Time) listing, you can search for campaigns using filters such as Content Type, Campaign Title, and Published Period date.

Step 2: Click View Content to see the notification that has been sent to the consumer.
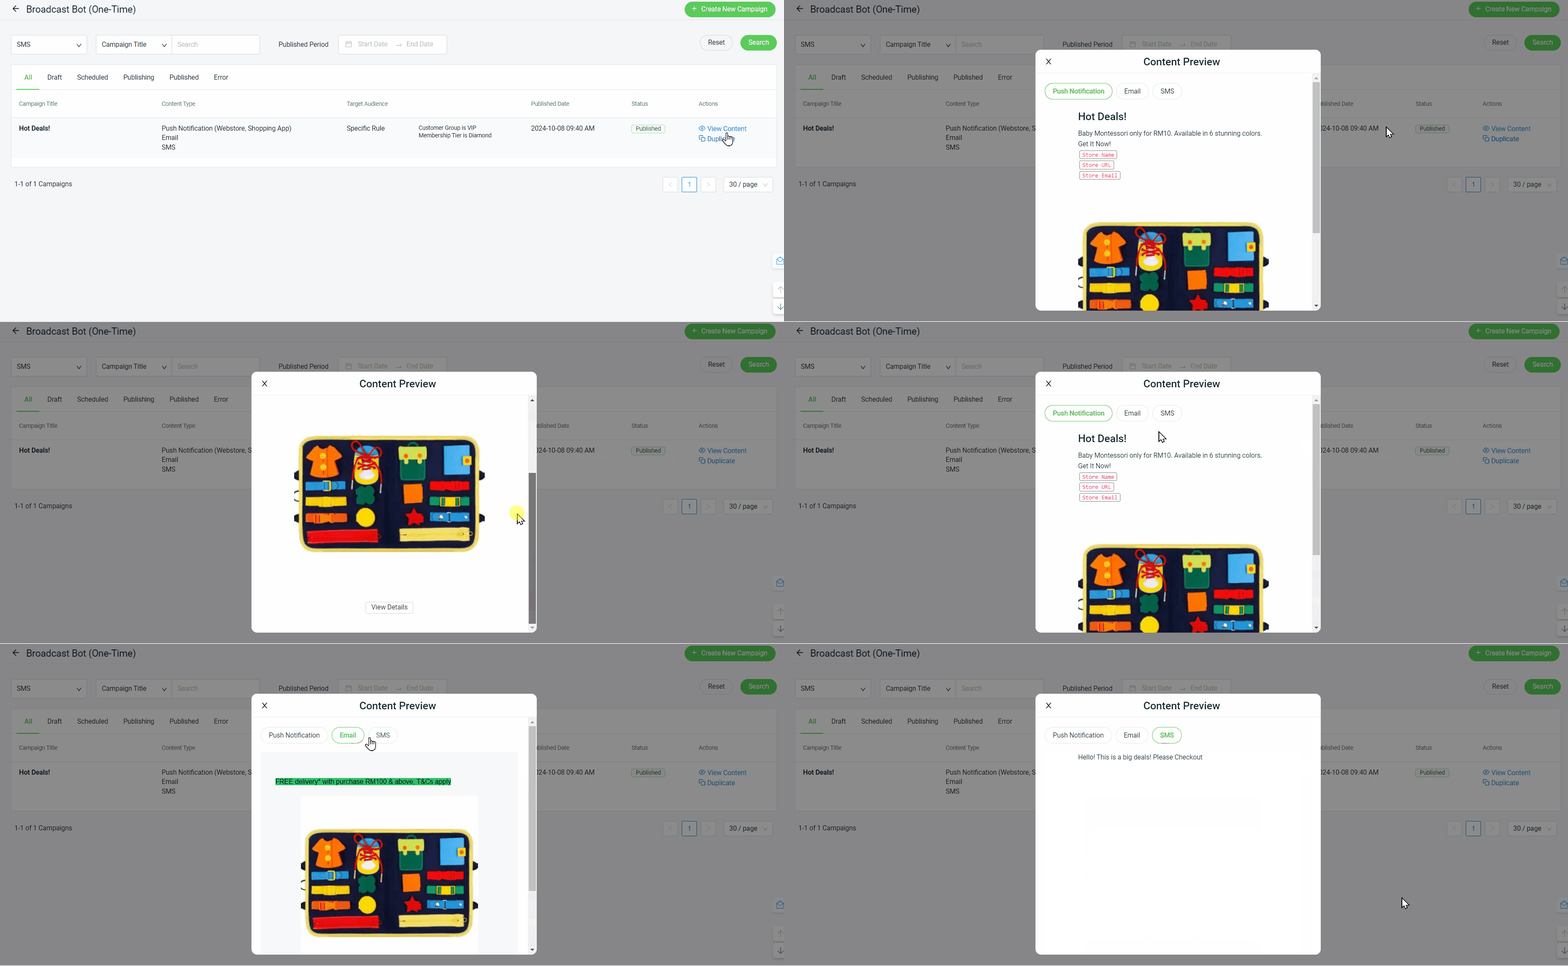
Step 3: You can also duplicate the campaign by clicking the Duplicate button.

2. Automated Bot (Recurring)
Step 1: Under the Automated Bot (Recurring) listing, you can search for campaigns using filters such as Content Type, Campaign Title, and Published Period date.

Step 2: Click View Content to see the notification that has been sent to the consumer.
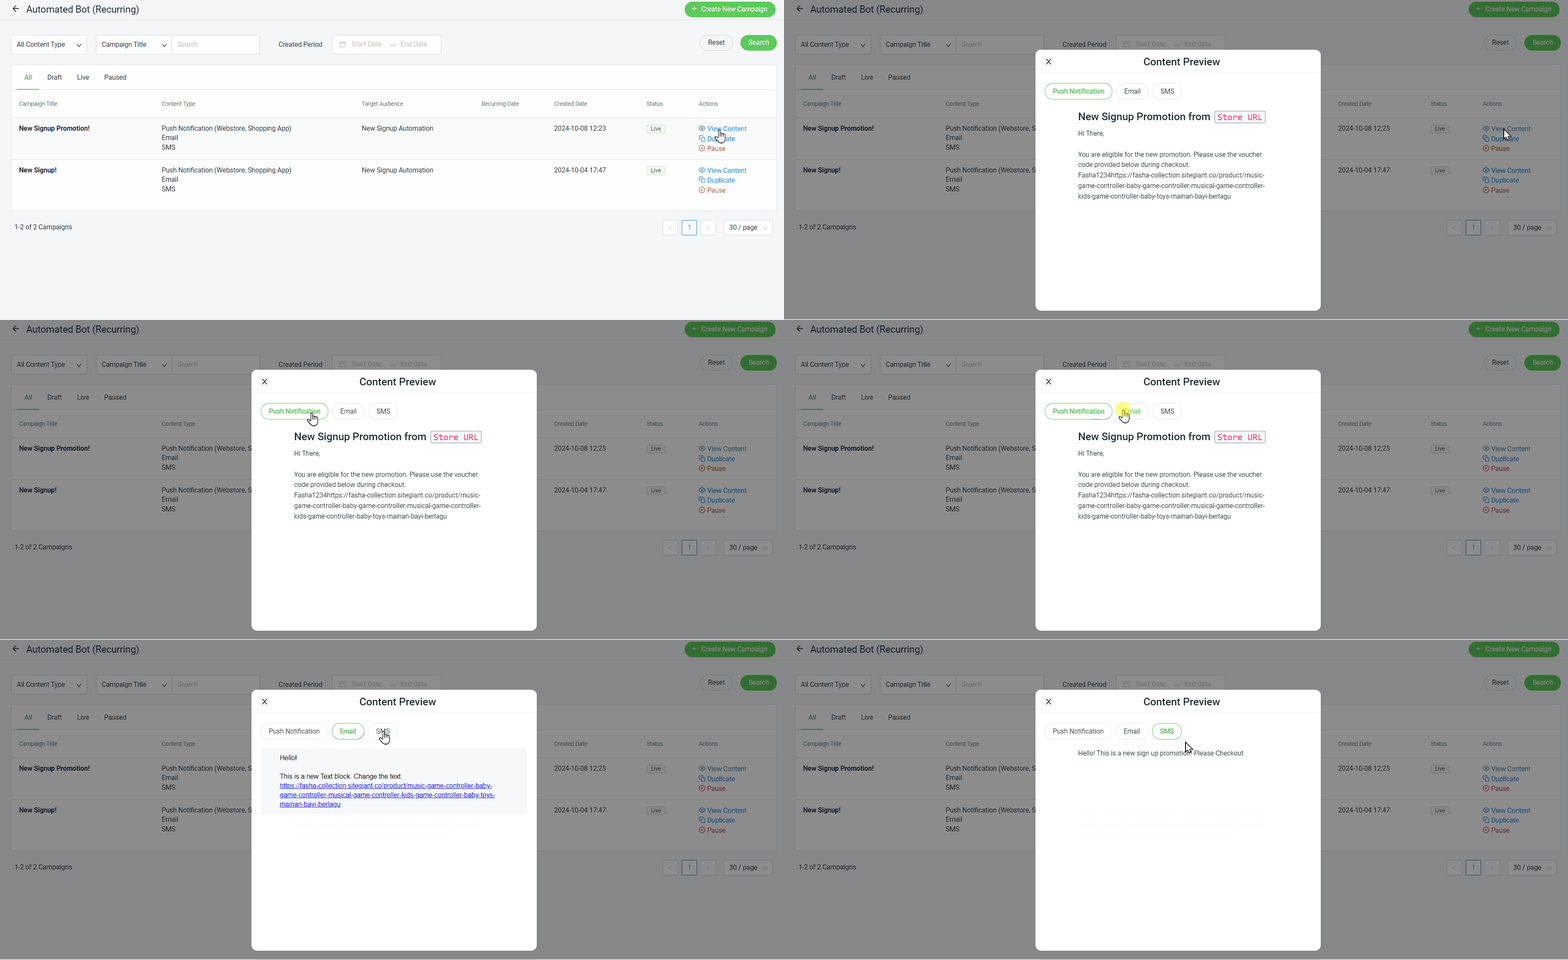
Step 3: You can also duplicate the campaign by clicking the Duplicate button.

Step 4: If you wish to discontinue the campaign, click the Pause button.

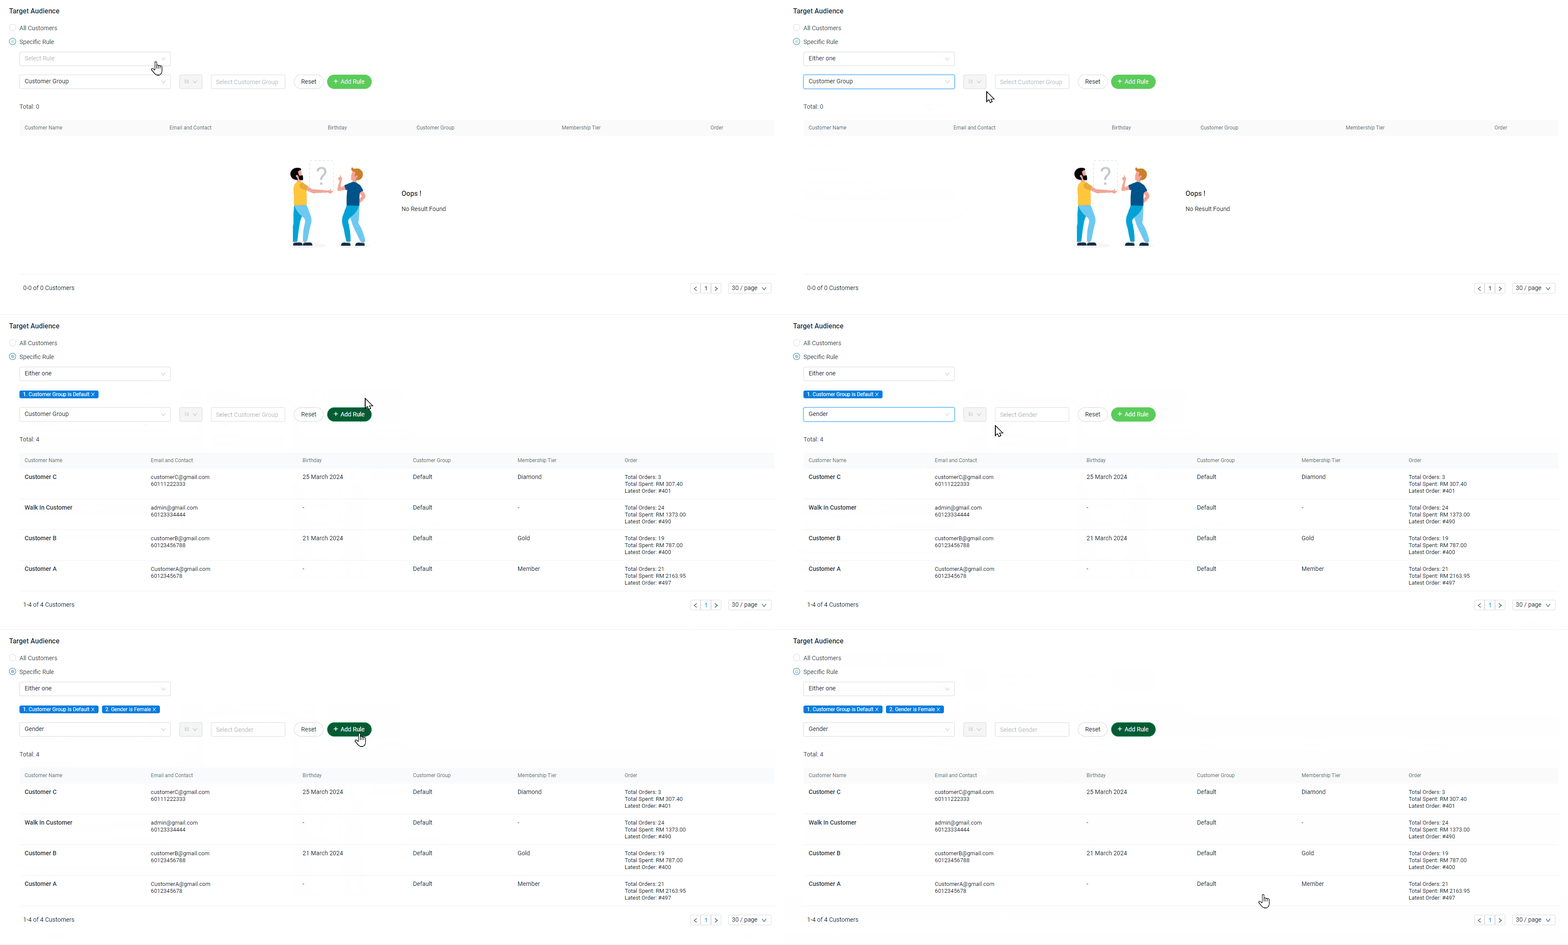
 4. Specific Rule: You may select the customer to whom you would like to send the notification based on the specified criteria.
