1. Introduction
2. Setup Serial Number Tracking
3. Serial Number Addition / Removal
4. Serial Number Consumption
5. View Serial Number Listing
6. Additional Information
1. Introduction
Having a serial number tracking system for your inventory items is essential for maintaining accurate inventory control and accountability. It allows you to track the lifecycle of each item from receiving and stocking to order fulfillment and sale, providing complete visibility of your inventory at every stage.
This is especially important for high-value, high-risk, or regulated products such as electronics, machinery, and warranty-covered items. By tracking each item’s unique serial number, businesses can simplify product recalls, process warranty claims more efficiently, reduce errors, and improve overall inventory accuracy.
This feature is available to the ERP Premium Plan and above.
2. Setup Serial Number Tracking
There are two ways to set up serial numbers: manual creation and batch creation.
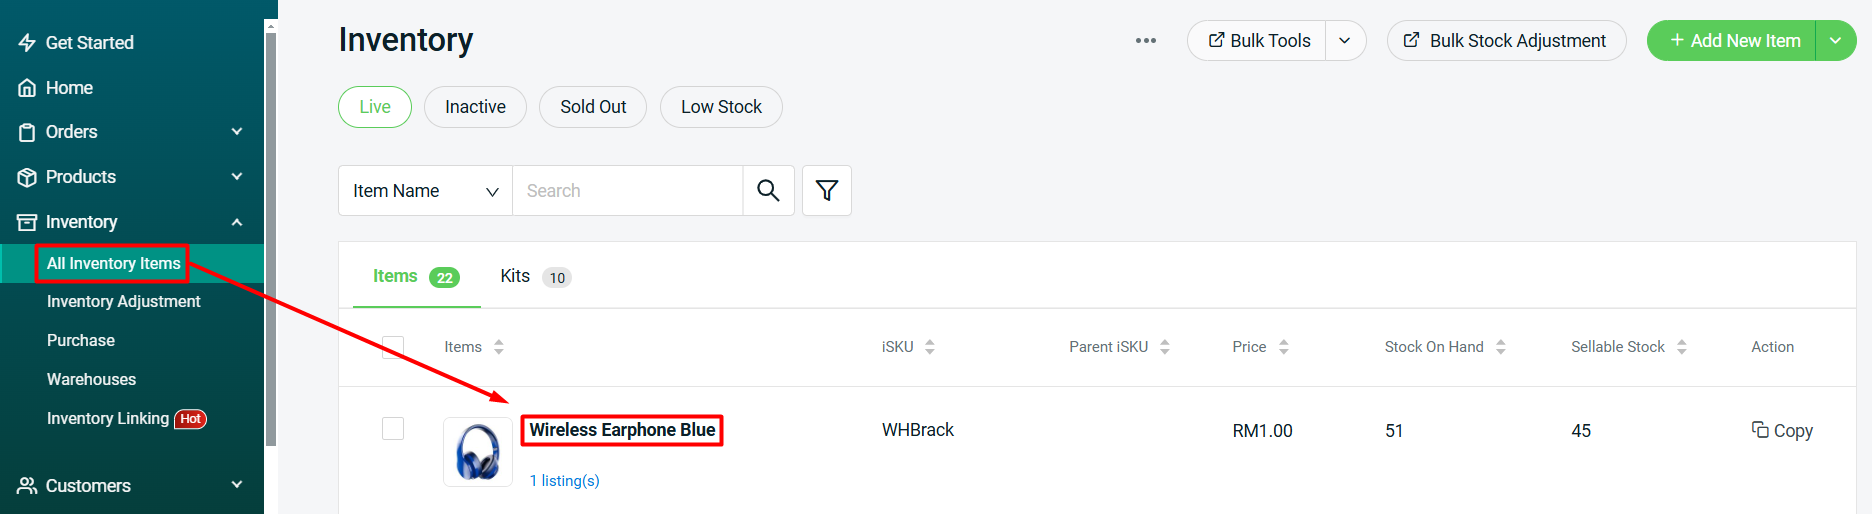
Step 1: Go to Inventory > All Inventory Items > Click into the item name that you wish to setup for serial number tracking.
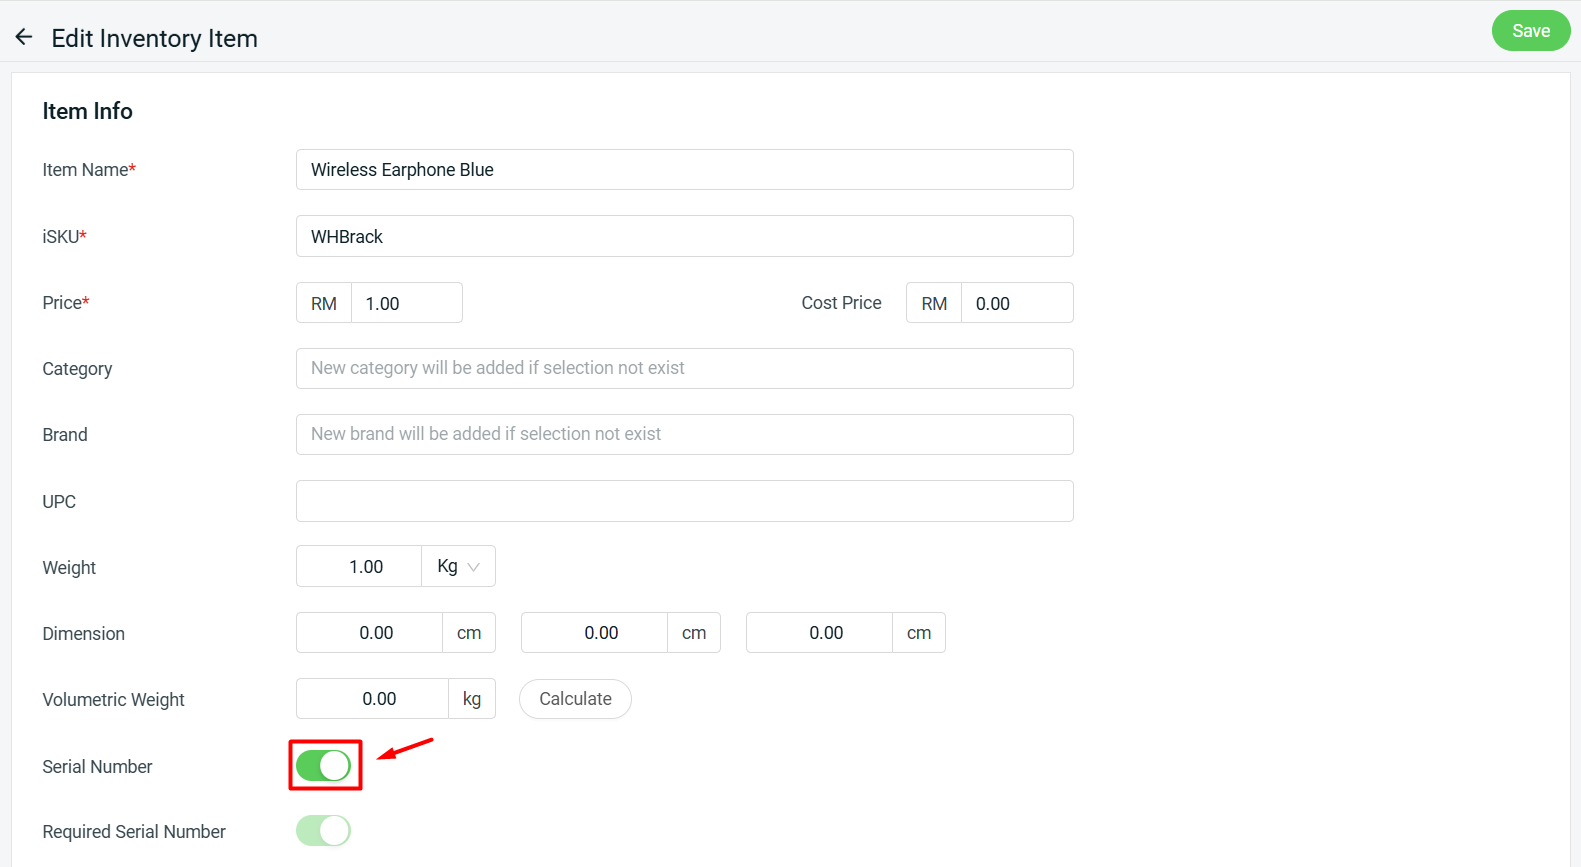
Step 2: Scroll down to the Item Info section > enable Serial Number.
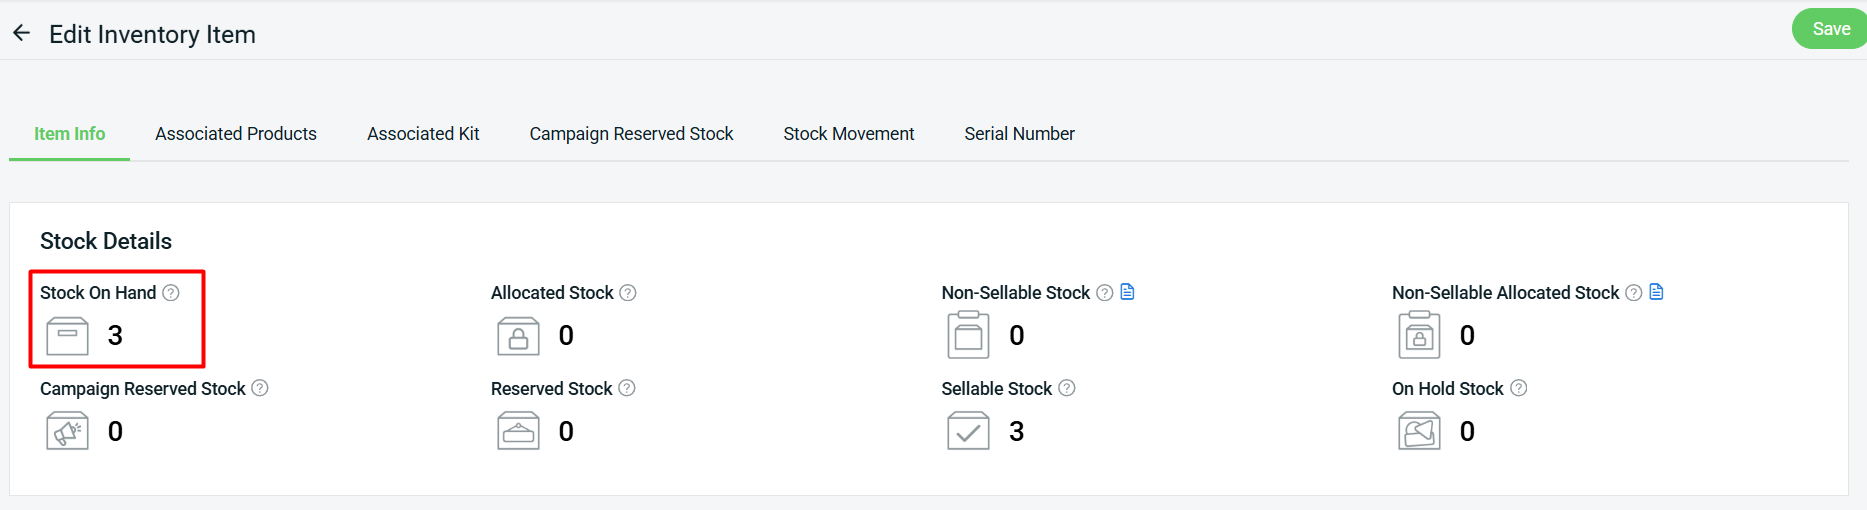
📌Note: Please take note of the stock on hand of the item, as that is the number of serial numbers that need to be added later on.
Step 3: Go to the Serial Number tab > enter the serial number in the Serial Number field > click Add to add it to the Current Action list.
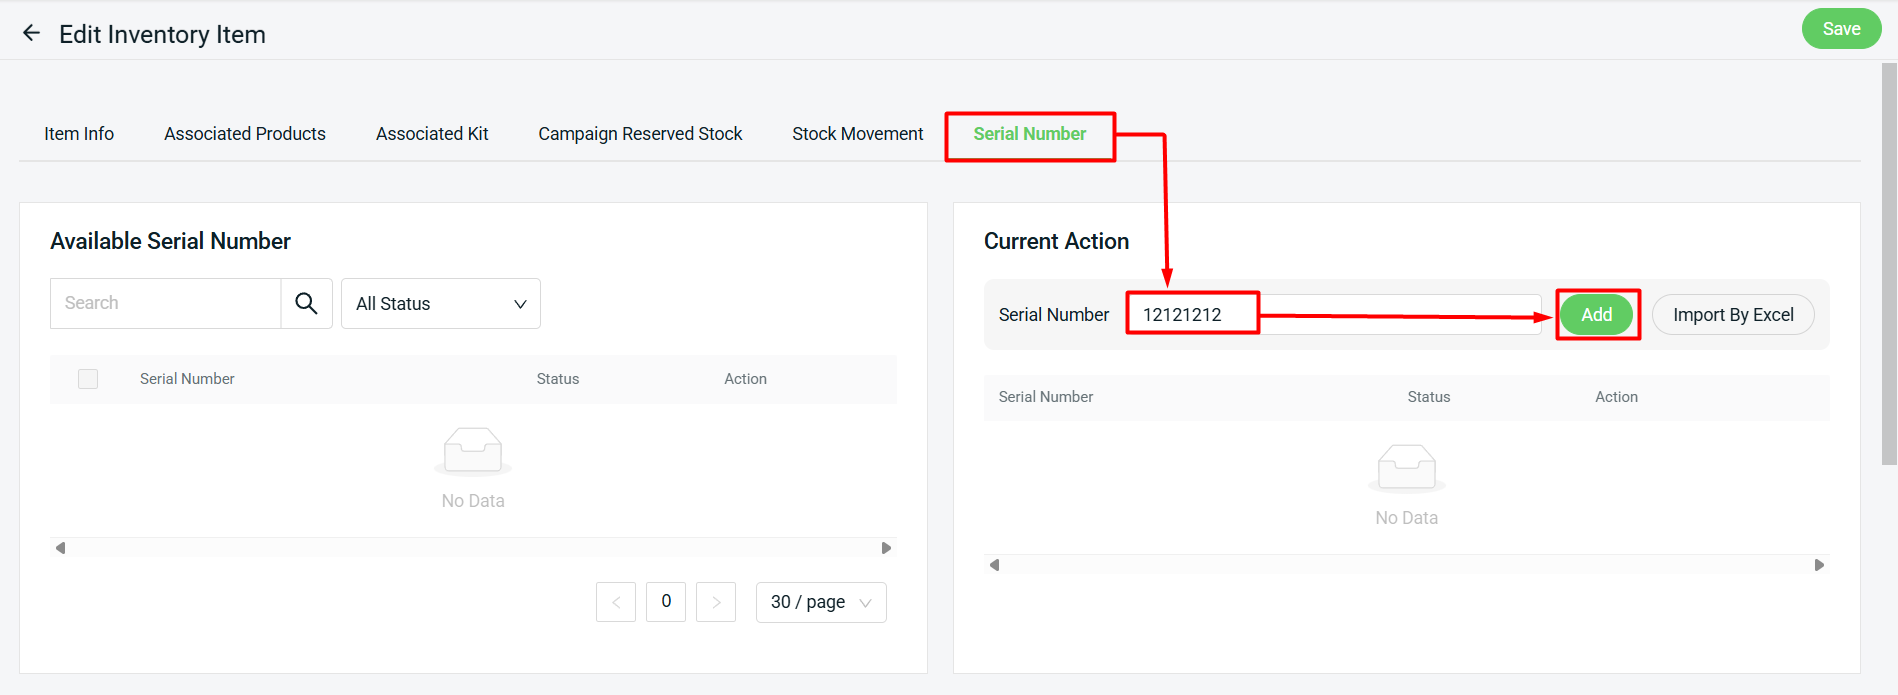
Step 4: Repeat this step for the remaining serial numbers, then click Save when done.
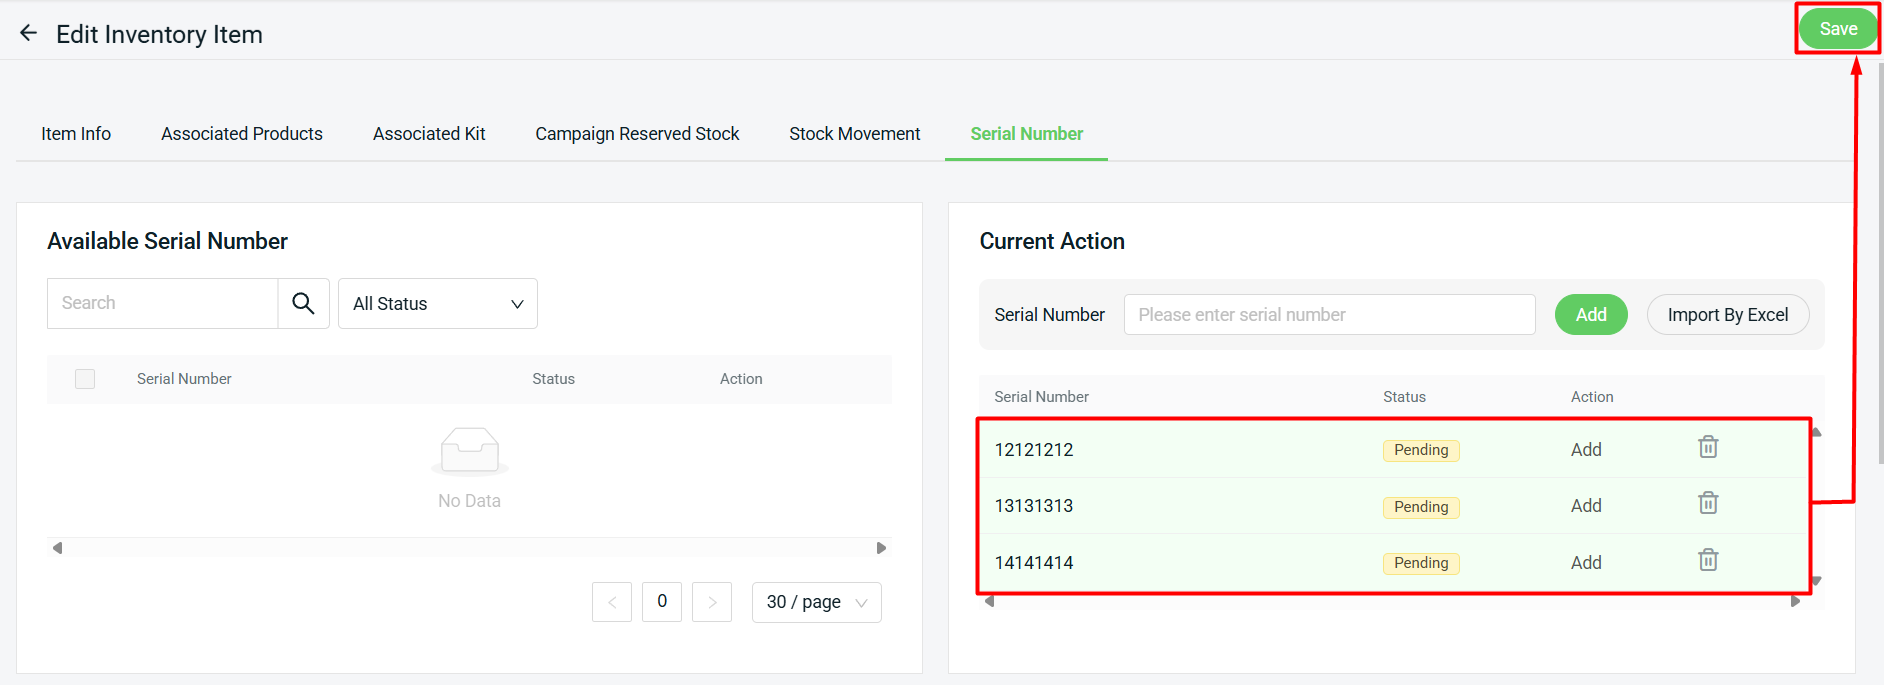
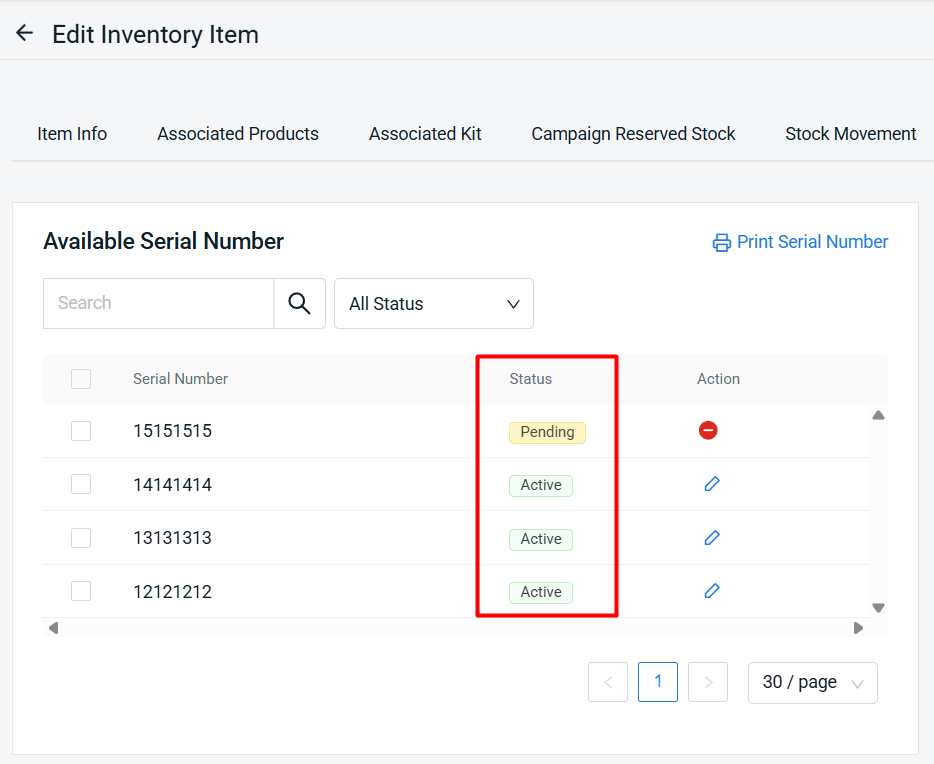
Step 5: The serial number list will be moved to the Available Serial Number section with an Active status. Serial numbers can be created in advance, even more than the current stock, and will remain as Pending status.
Method 2: Batch Creation
Step 1: Click on Import By Excel.
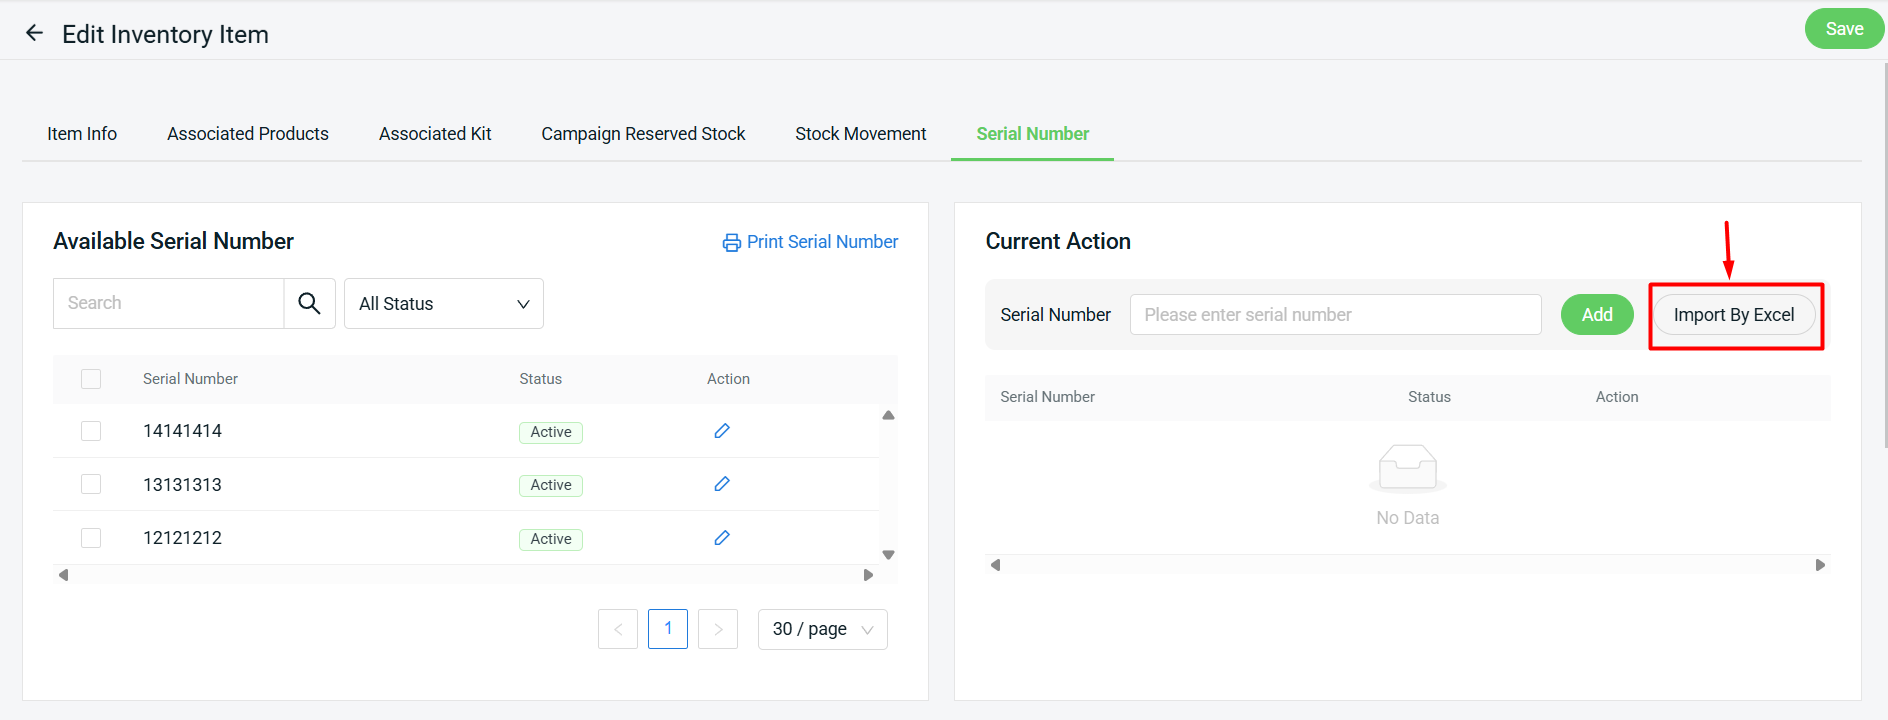
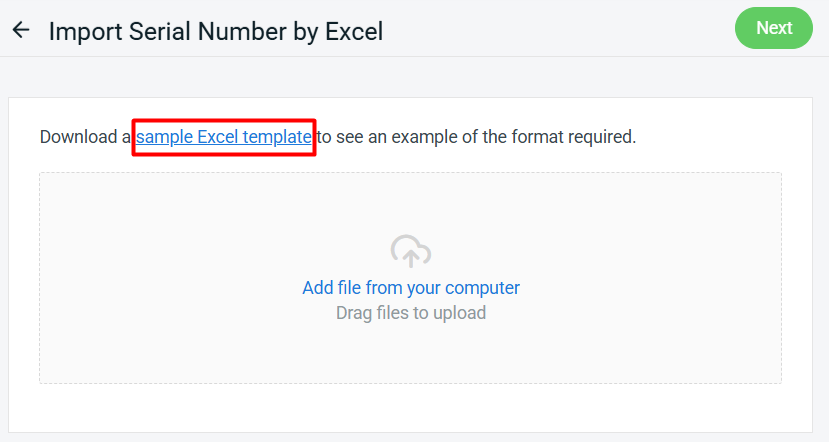
Step 2: Click the sample Excel template button to obtain the Excel file template for updates.
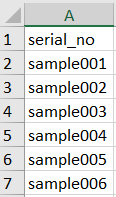
Step 3: Fill in the serial_no listing.
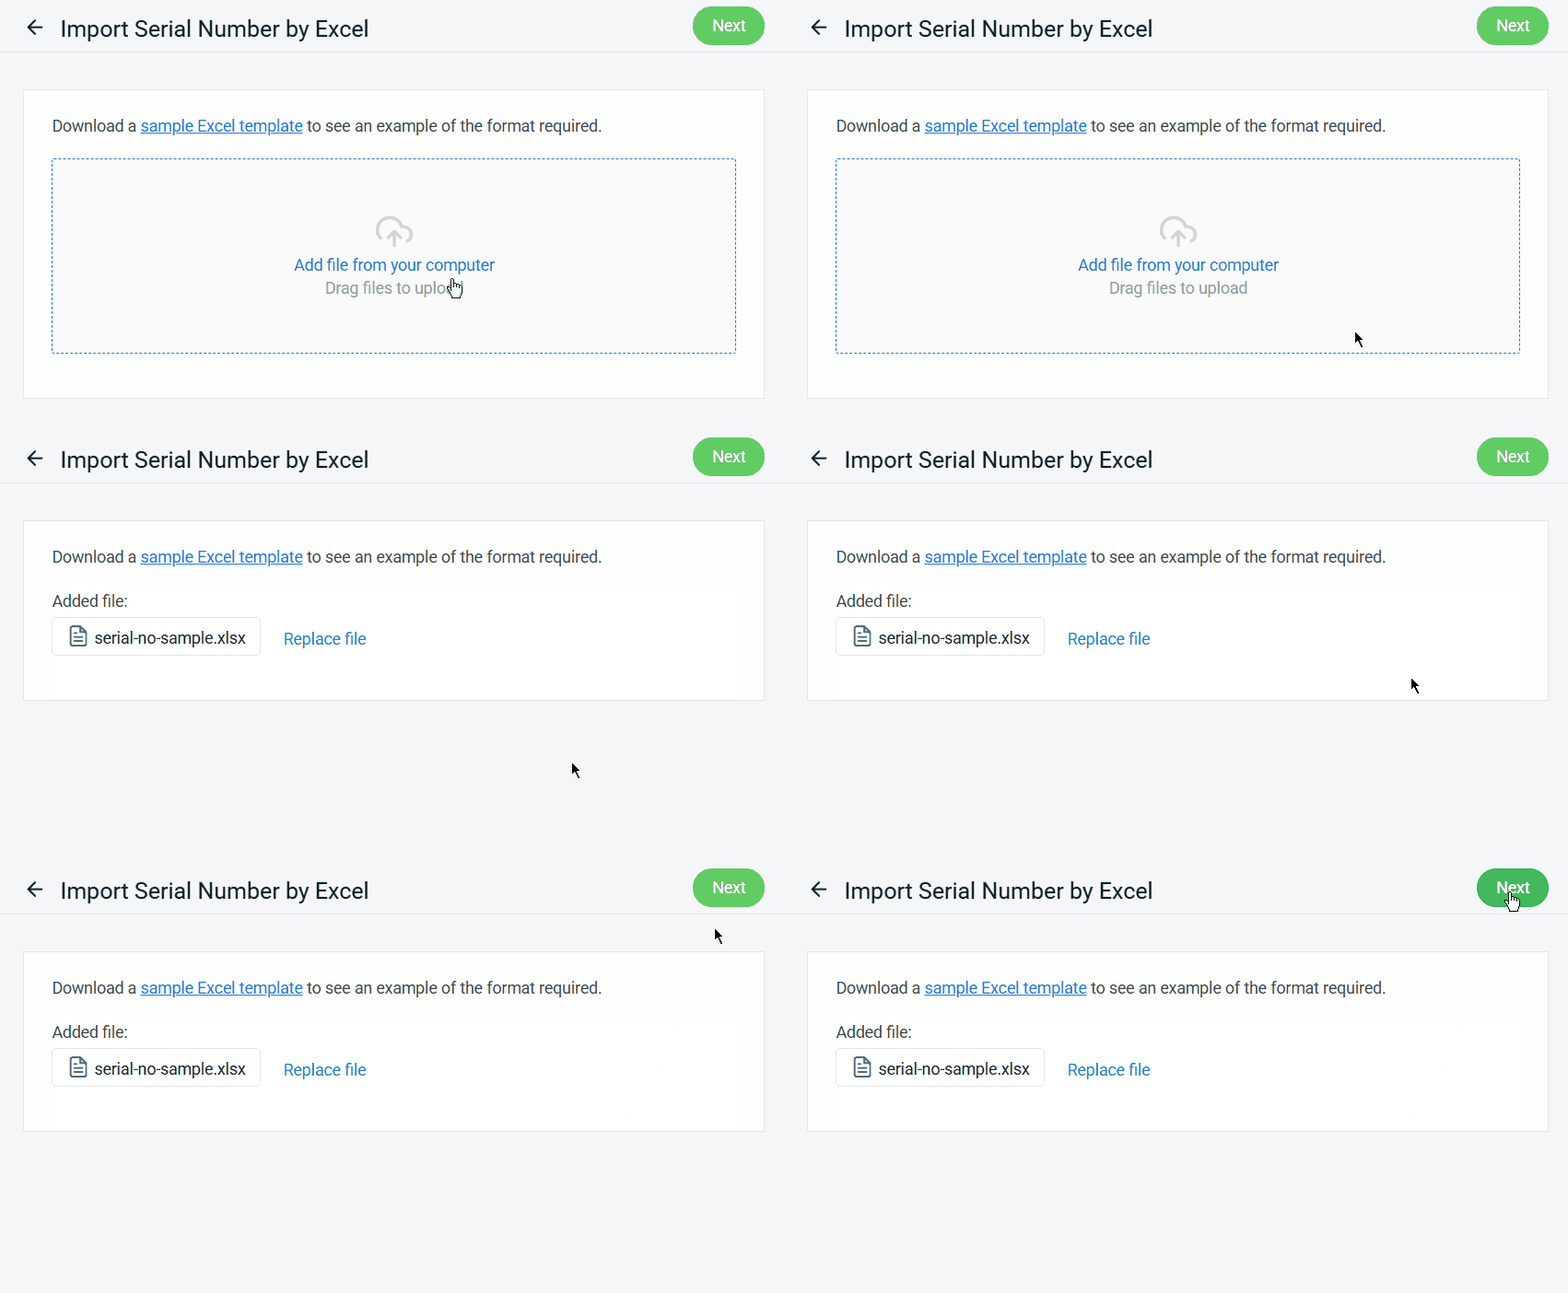
Step 4: Back to Import Serial Number page > Add file from your computer > Next.
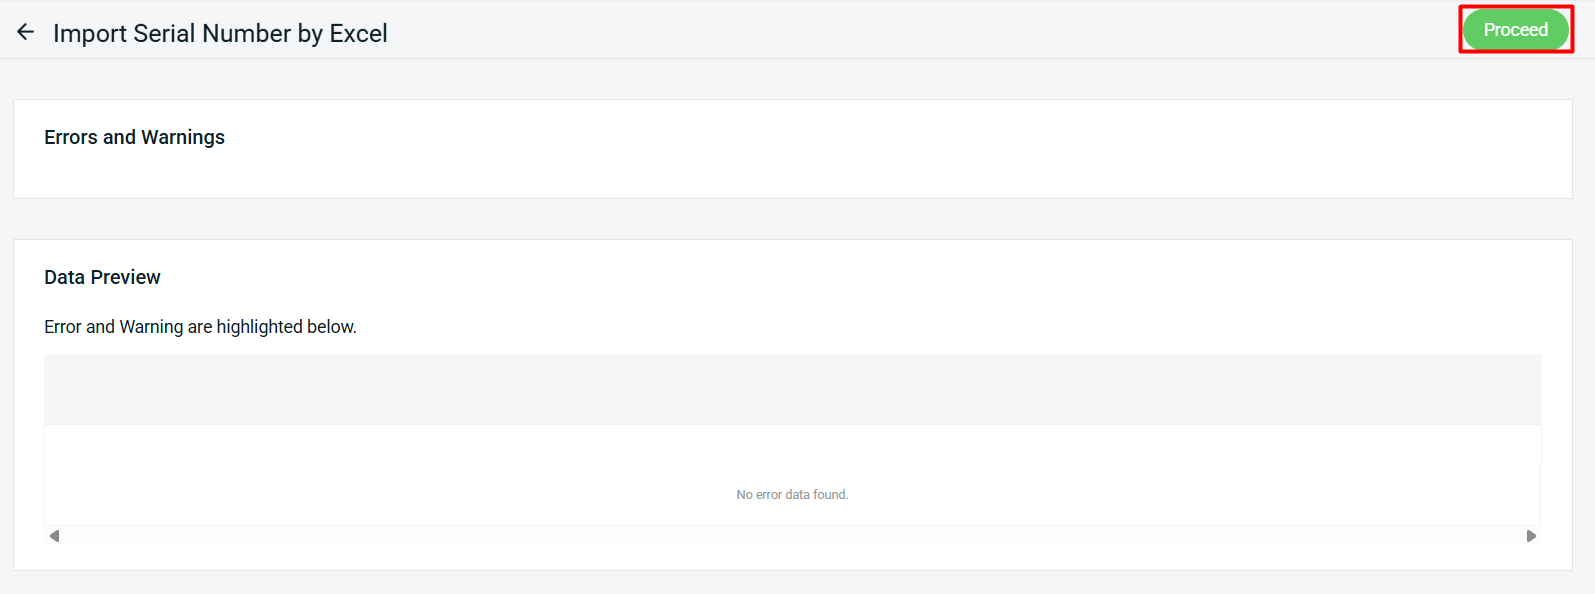
Step 5: If there are any errors in the Excel uploaded, you will see the error message in Errors and Warnings, and it will show the error column in the Data Preview. Amend the error column and reupload the file. Click Proceed if the uploaded file has no errors.
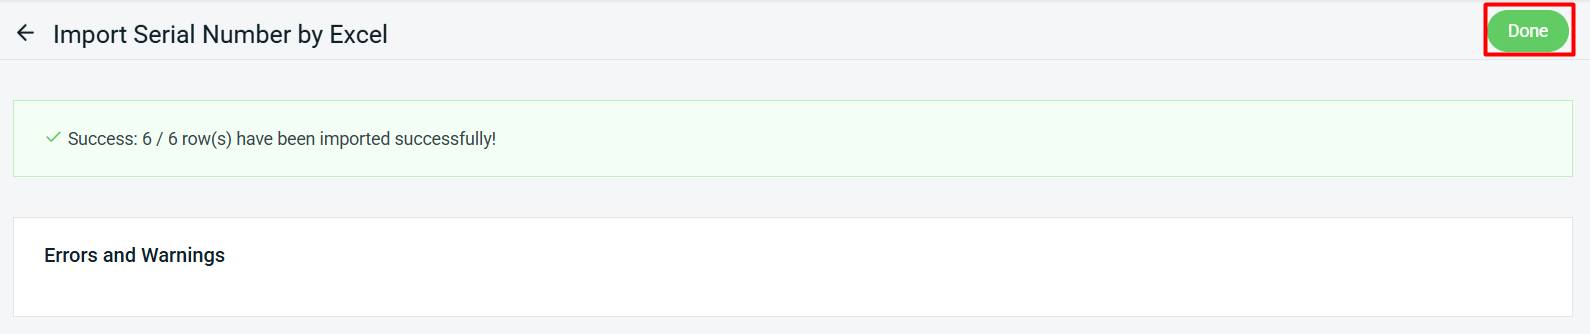
Step 6: After the serial numbers are successfully imported, click Done.
3. Serial Number Addition / Removal
When stock is added or received, serial numbers must be assigned accordingly. Existing serial numbers may also be removed when necessary. These actions can be performed in the following modules:
i) Stock In
ii) Stock Out
iii) Stock Adjustment
iv) External Stock Transfer
v) Marketplace Order Return Management
vi) Purchase Order
vii) Advanced Shipping Notice
The process of adding, receiving, or removing serial numbers is consistent across all the modules listed above. Below is an example flow for performing Stock Adjustment and Purchase Order for items with serial number tracking enabled:
Module 1: Stock Adjusment
💡Tips: Learn more about How To Do Stock Adjustment
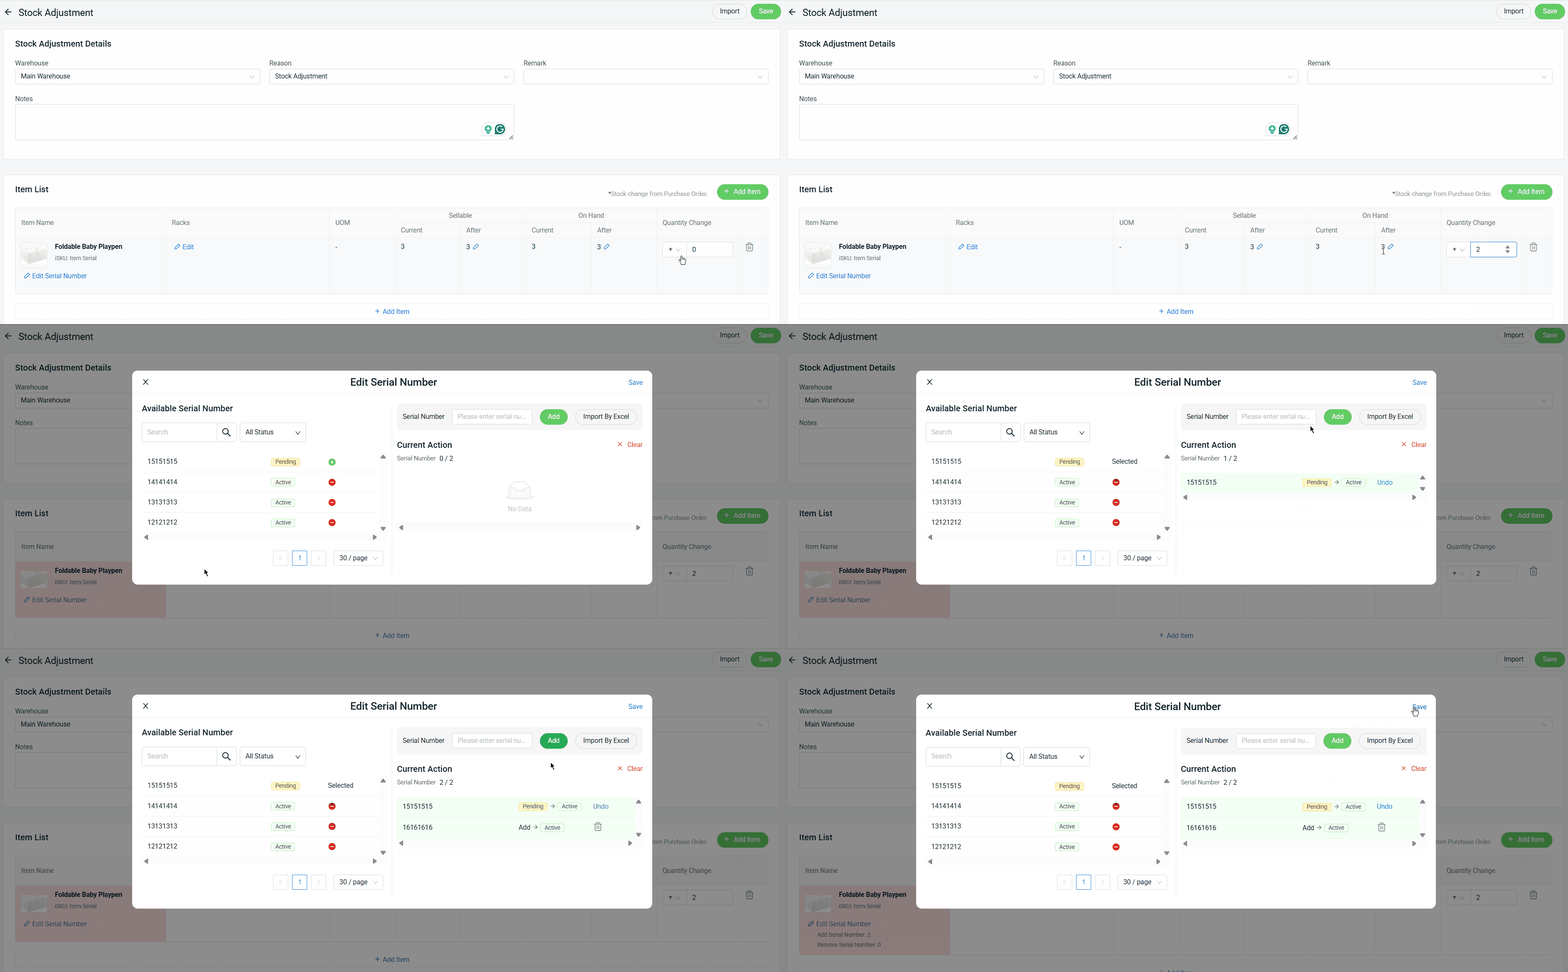
Step 1: For stock additions, enter the Quantity Change > click Edit Serial Number > select the existing Pending serial numbers or click Add the serial number > Save.
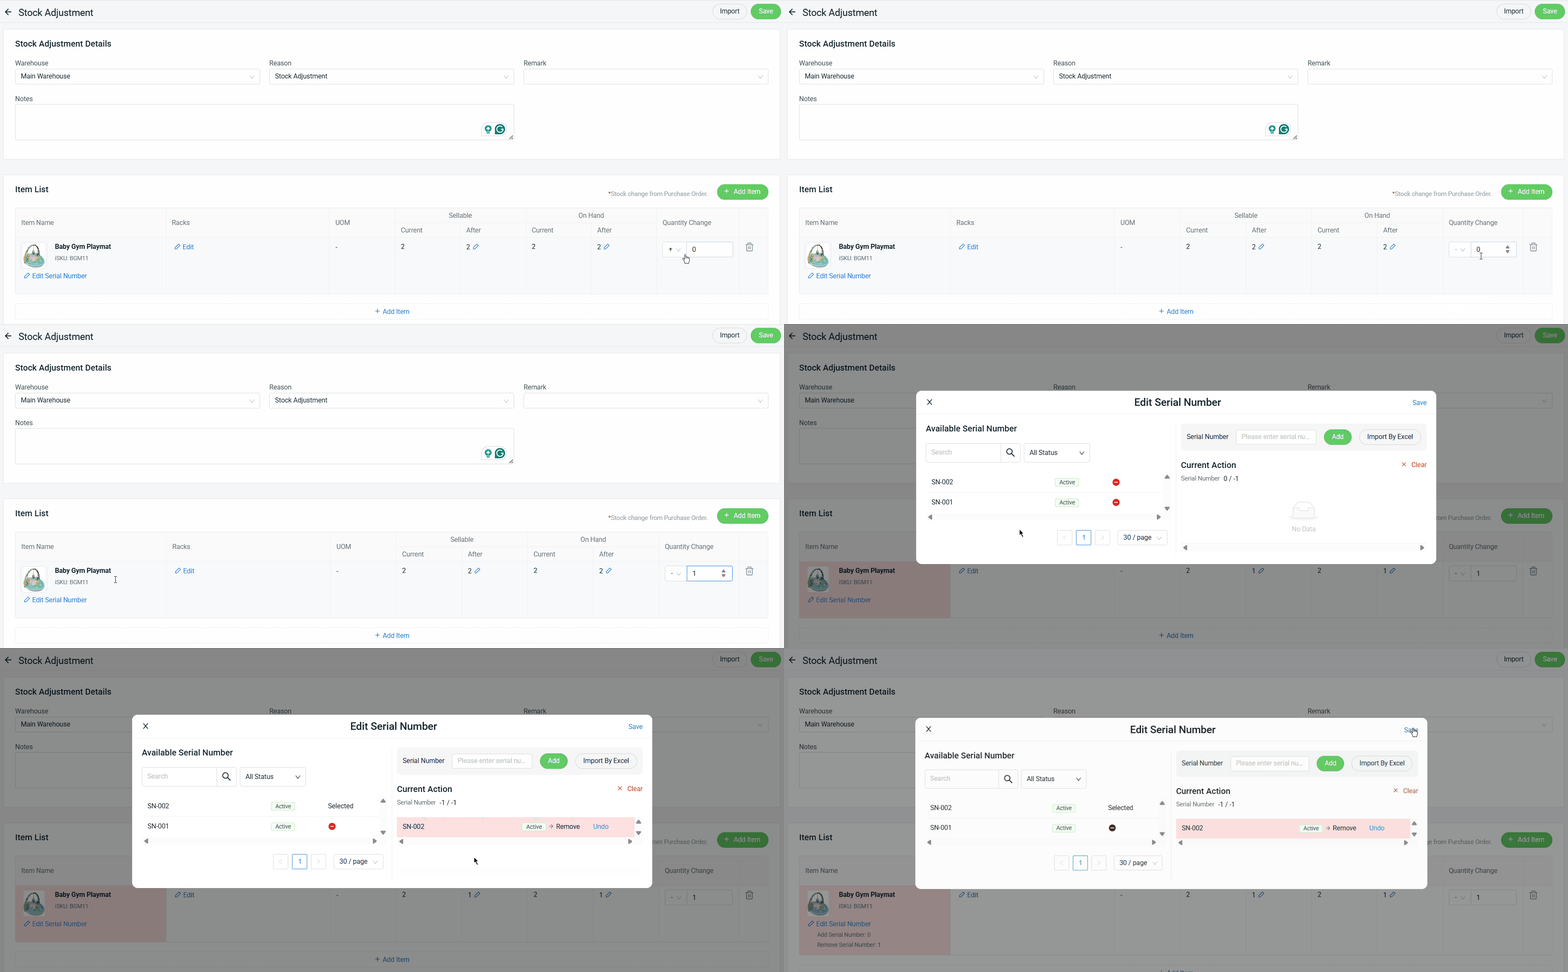
Step 2: For items with stock deduction, set the symbol to ‘–‘ and fill in the Quantity Change > click Edit Serial Number > Remove the number of serial number which corresponds to the Quantity Change > Save.
Step 3: Once all the steps are done, click Save.

Module 2: Purchase Order
💡Tips: Learn more about How To Create Purchase Order
Step 1: Once the Purchase Order is Received > click Edit Serial Number > select the existing Pending serial numbers or click Add the serial number > Save.
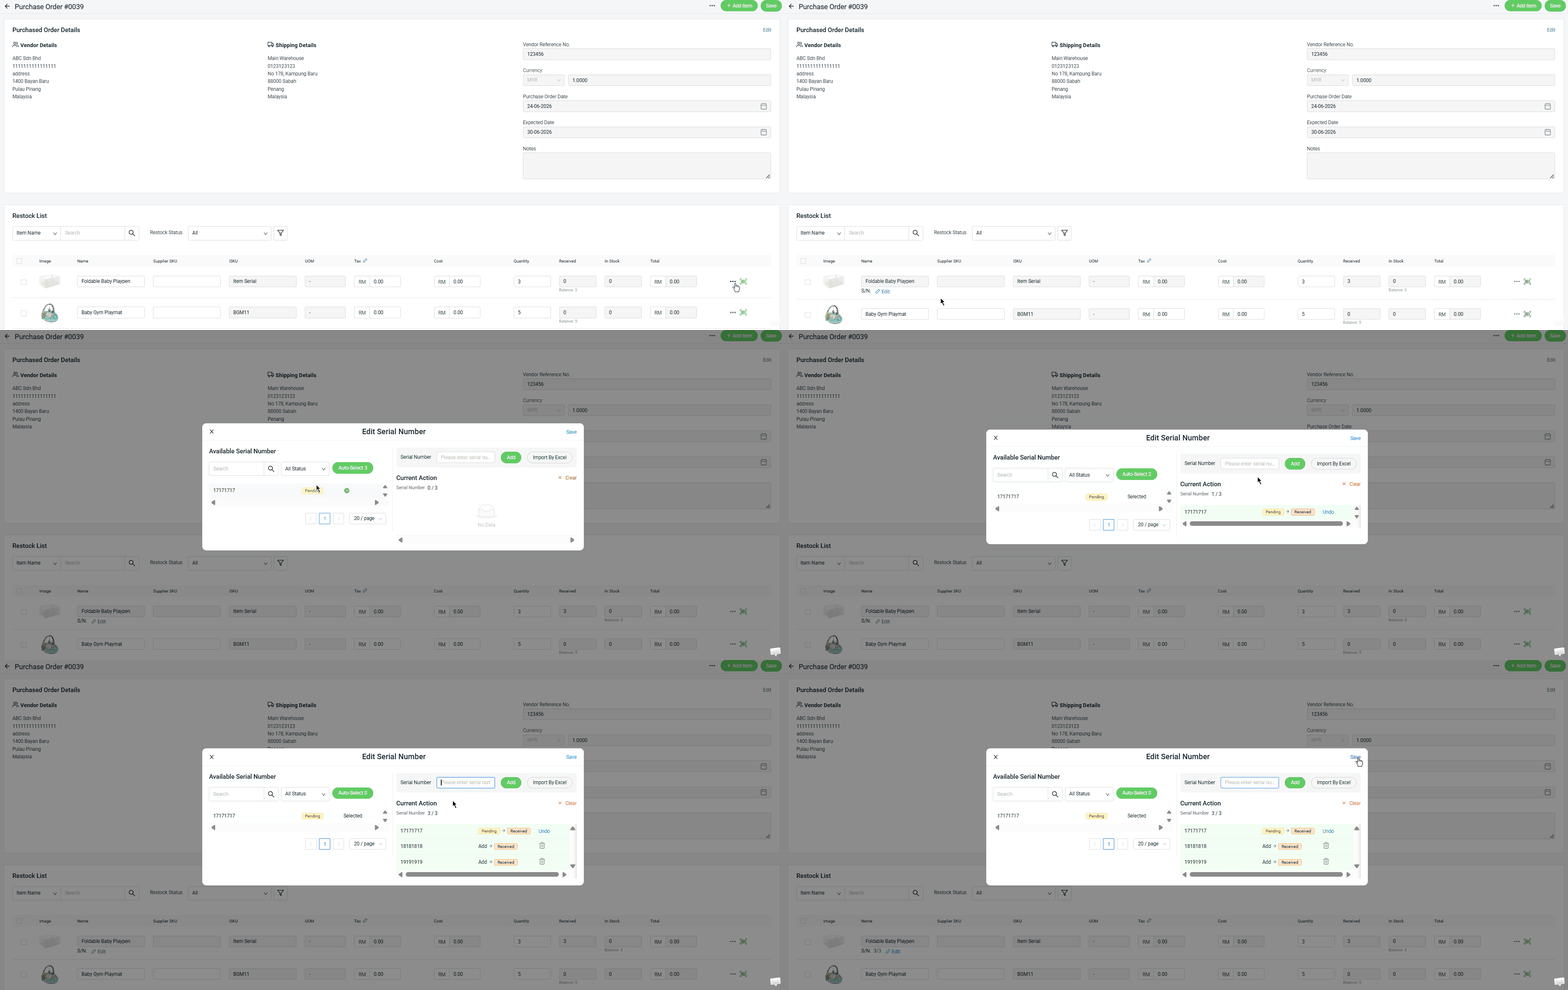
Step 2: Once the settings are done, click Save.

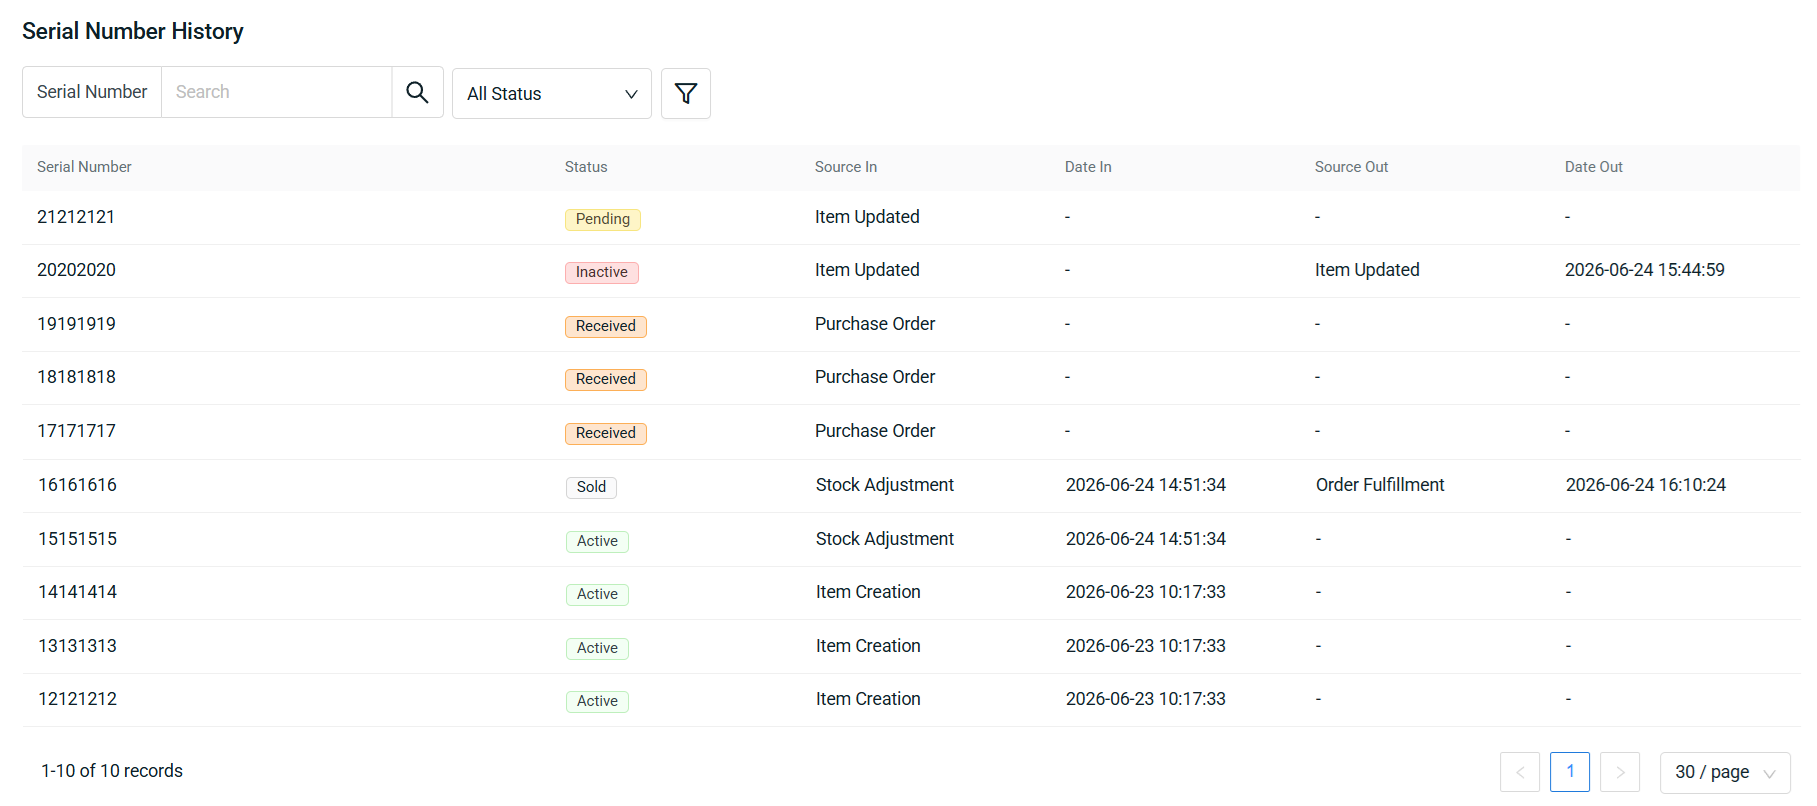
📌Note: After the action is completed in every of the module, you can view the serial number status in the Serial Number History section.


1. Pending: Merchants can create serial numbers with Pending status in advance, allowing them to be preset in the related modules as mentioned and be updated during the receiving process. Pending serial numbers are not tied to stock on hand, so there is no limit to the quantity that can be created.

2. Inactive: Serial numbers removed from the system will have this status, except those removed through Order Fulfillment, where the serial number status will change back to Active since the serial number still exists in listing.

3. Received: Serial numbers that have been preset in a Purchase Order or Advanced Shipping Notice will have this status once received.

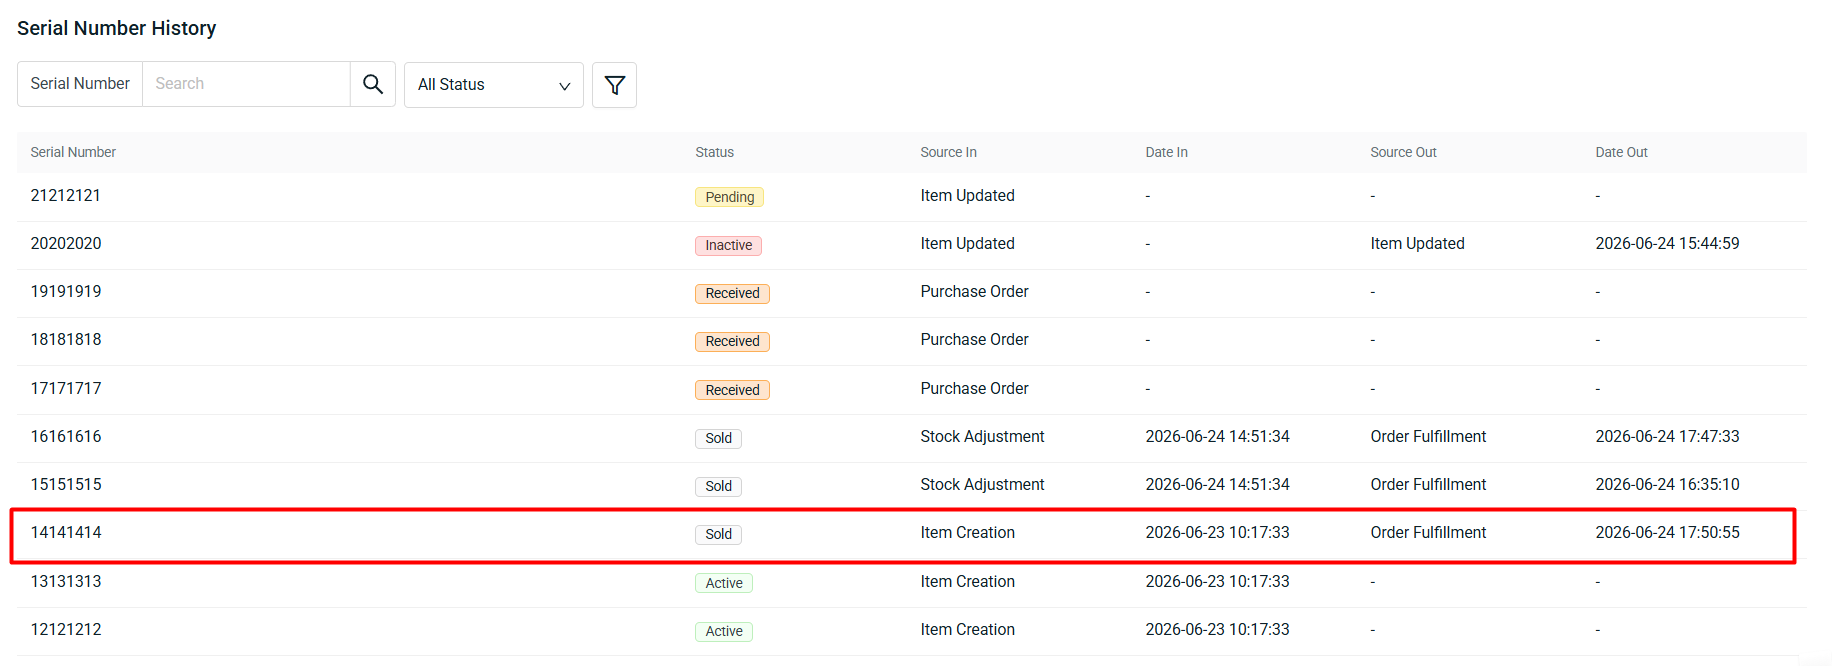
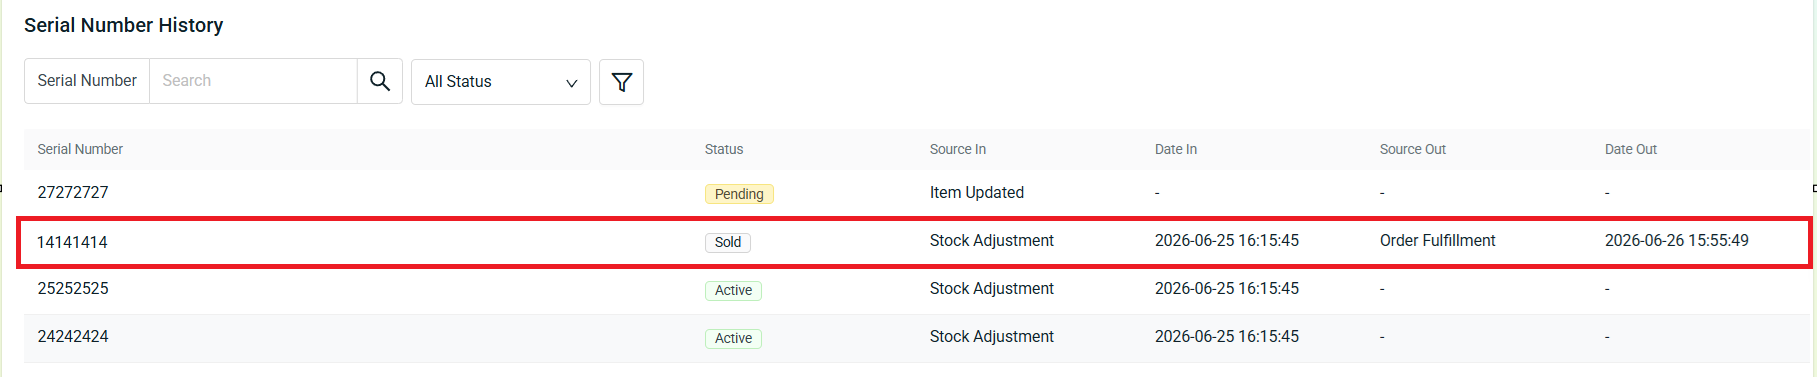
4. Sold: Serial numbers linked to an order will be marked as Sold when the stock is released. The system will record Order Fulfillment as the source, along with the Date Out.

5. Active: Serial numbers that are tied to stock on hand will have this status and include a Date In record.
4. Serial Number Consumption
The available serial number of an item can be consumed through the functions below:
Module 1: Order Fulfillment Assistant
💡Tips: Learn more about How To Add Serial Number In Order Fulfillment And Print Invoice With Serial Number
Step 1: Go to Order Fulfillment Assistant Settings > select the Insert Serial Number option > update Enforce Item Serial Number Matching.
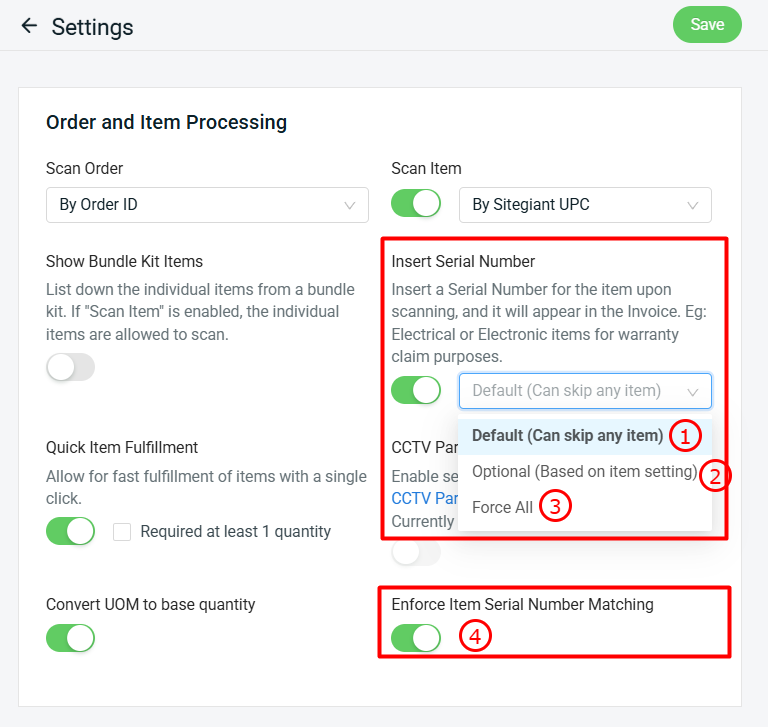
1. Default (Can skip any item): Serial number entry is not required when scanning the order.

2. Optional (Based on item setting): Serial number entry is required only for items with serial number tracking enabled in the item settings.

3. Force All: Serial number entry is required for every item when scanning the order.

4. Enforce Item Serial Number Matching:
Enable: Only serial numbers with Pending or Active status can be saved. All others (do not exist, Received, Sold, Inactive) cannot be saved.
Disabled: Non-existing serial numbers can still be saved, except those with Received status. However, the system will not show any alert or warning message.
Step 2: Once a serial number is assigned to an item, its status will be updated to Sold in the serial number list.
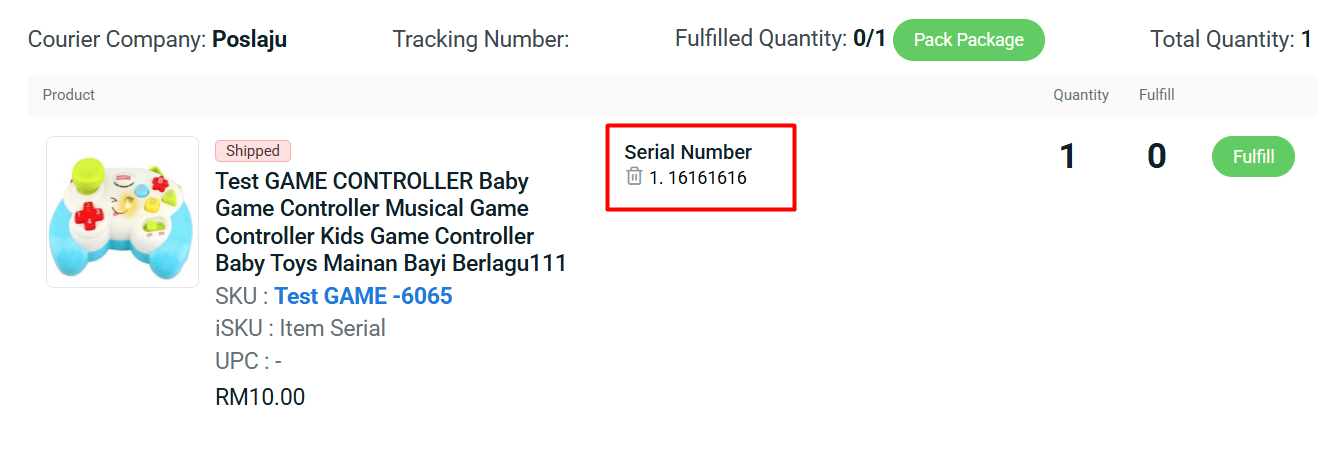
Step 3: The status of the used serial number can be viewed in the Serial Number History section.
Module 2: Order Details
Step 1: On the Order Details page, items with serial number tracking enabled will have the Edit Serial Number buttons available.
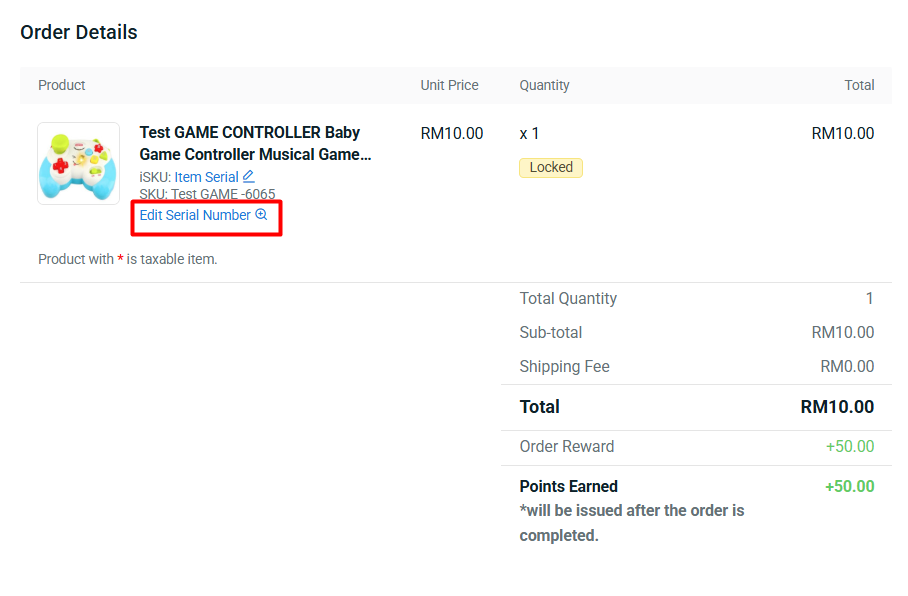
Step 2: Click the Edit Serial Number button to add or remove the item’s serial number in the order.
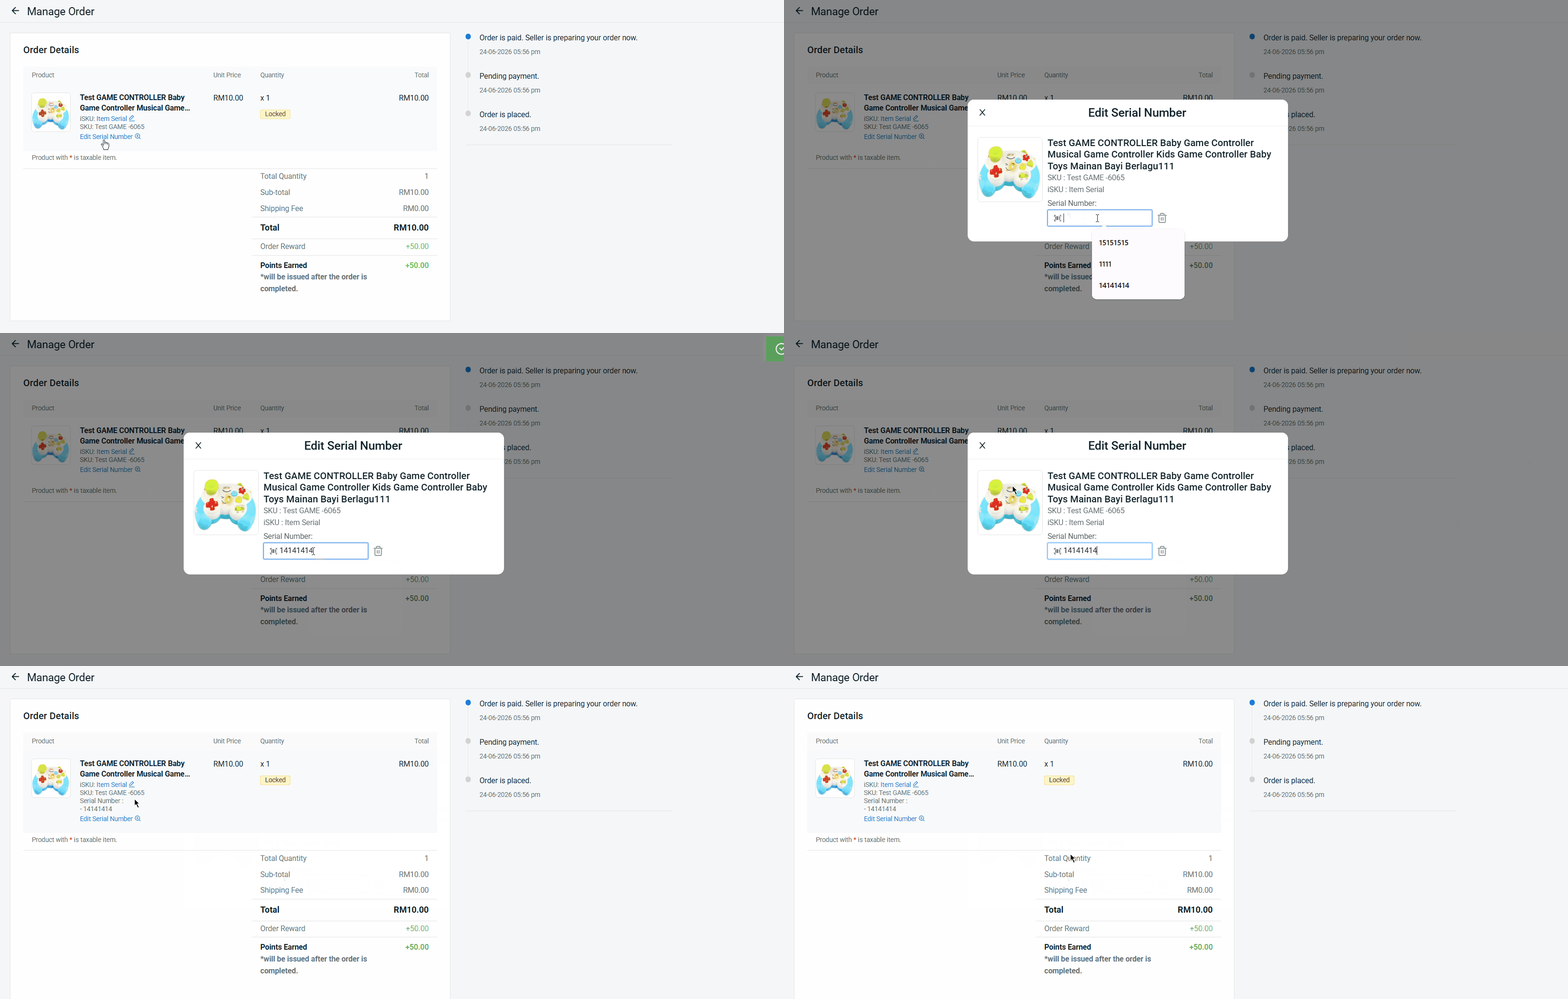
Step 3: Adding the serial number on the Order Details page will also update its status in the Serial Number History section.
Module 3: ScanNPrint
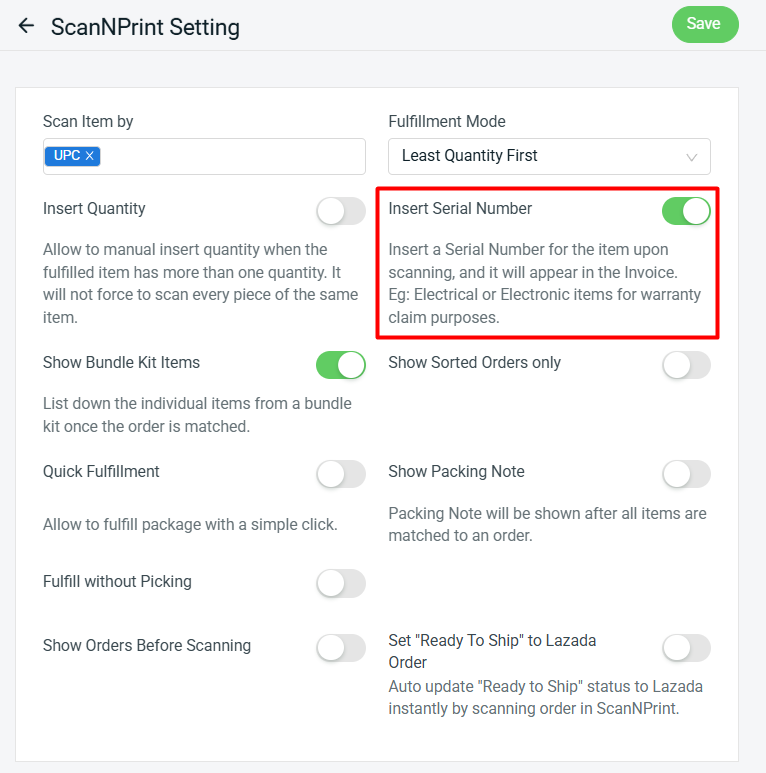
Step 1: Ensure that the Insert Serial Number option is enabled first in the ScanNPrint Setting.
Step 2: Similar to the Order Fulfillment Assistant, you can add the serial number in ScanNPrint after the order has been matched.
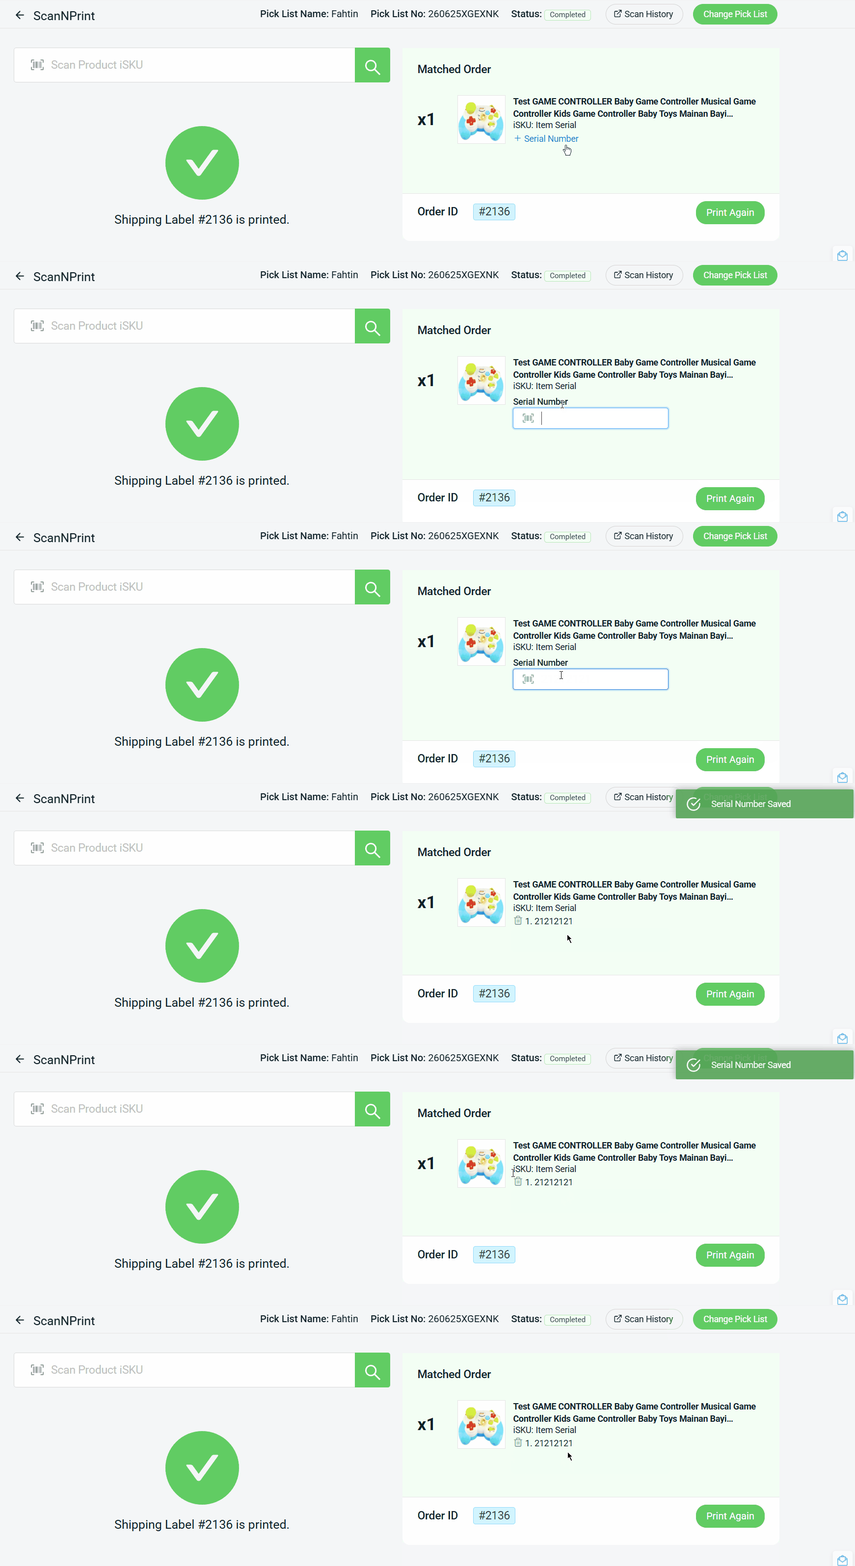
Step 3: Updating the serial number in the ScanNPrint page will also update its status in the Serial Number History section.
5. View Serial Number Listing
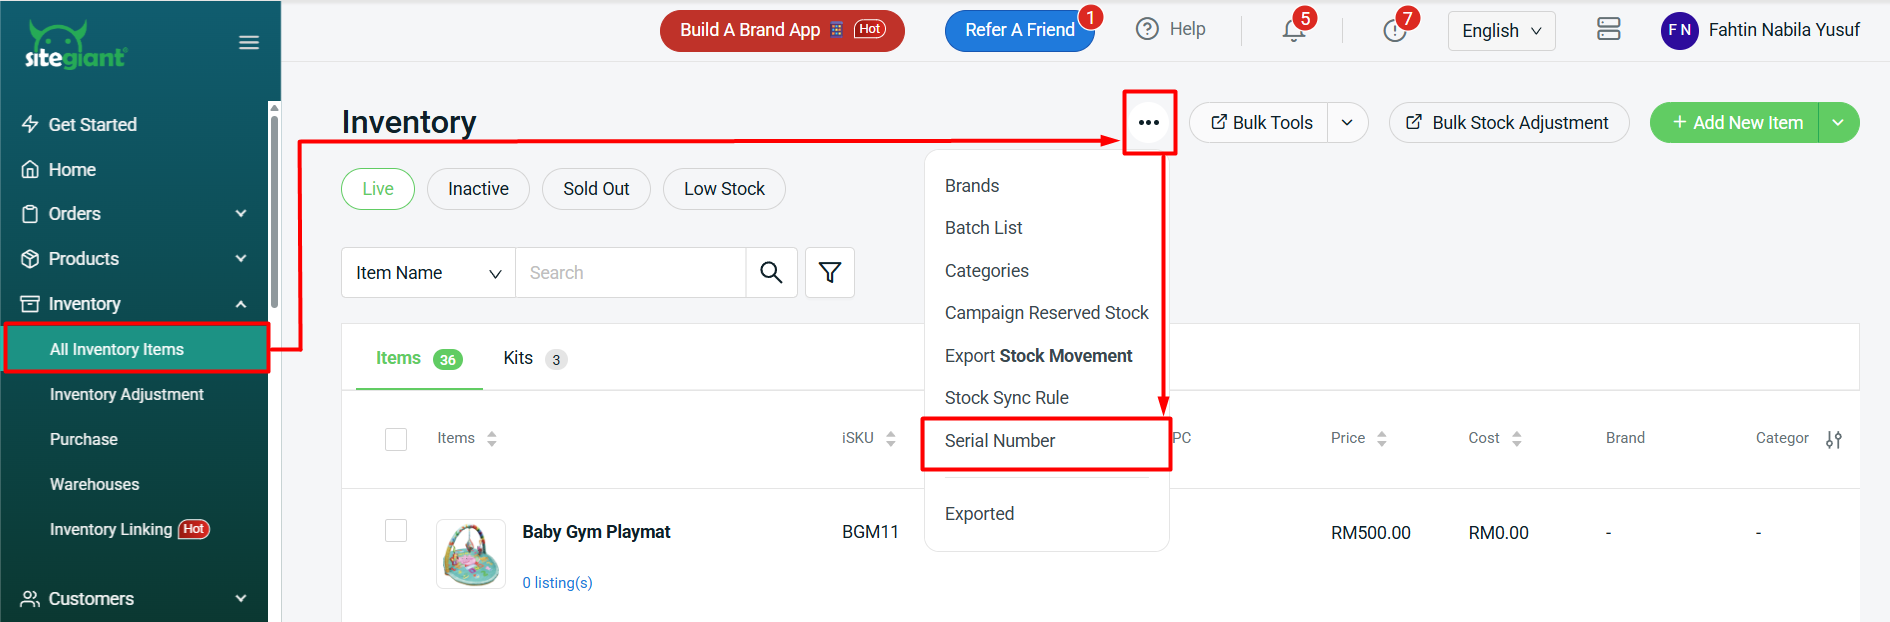
Step 1: Navigate to All Inventory Items on the sidebar menu > click More (…) > select Serial Number.
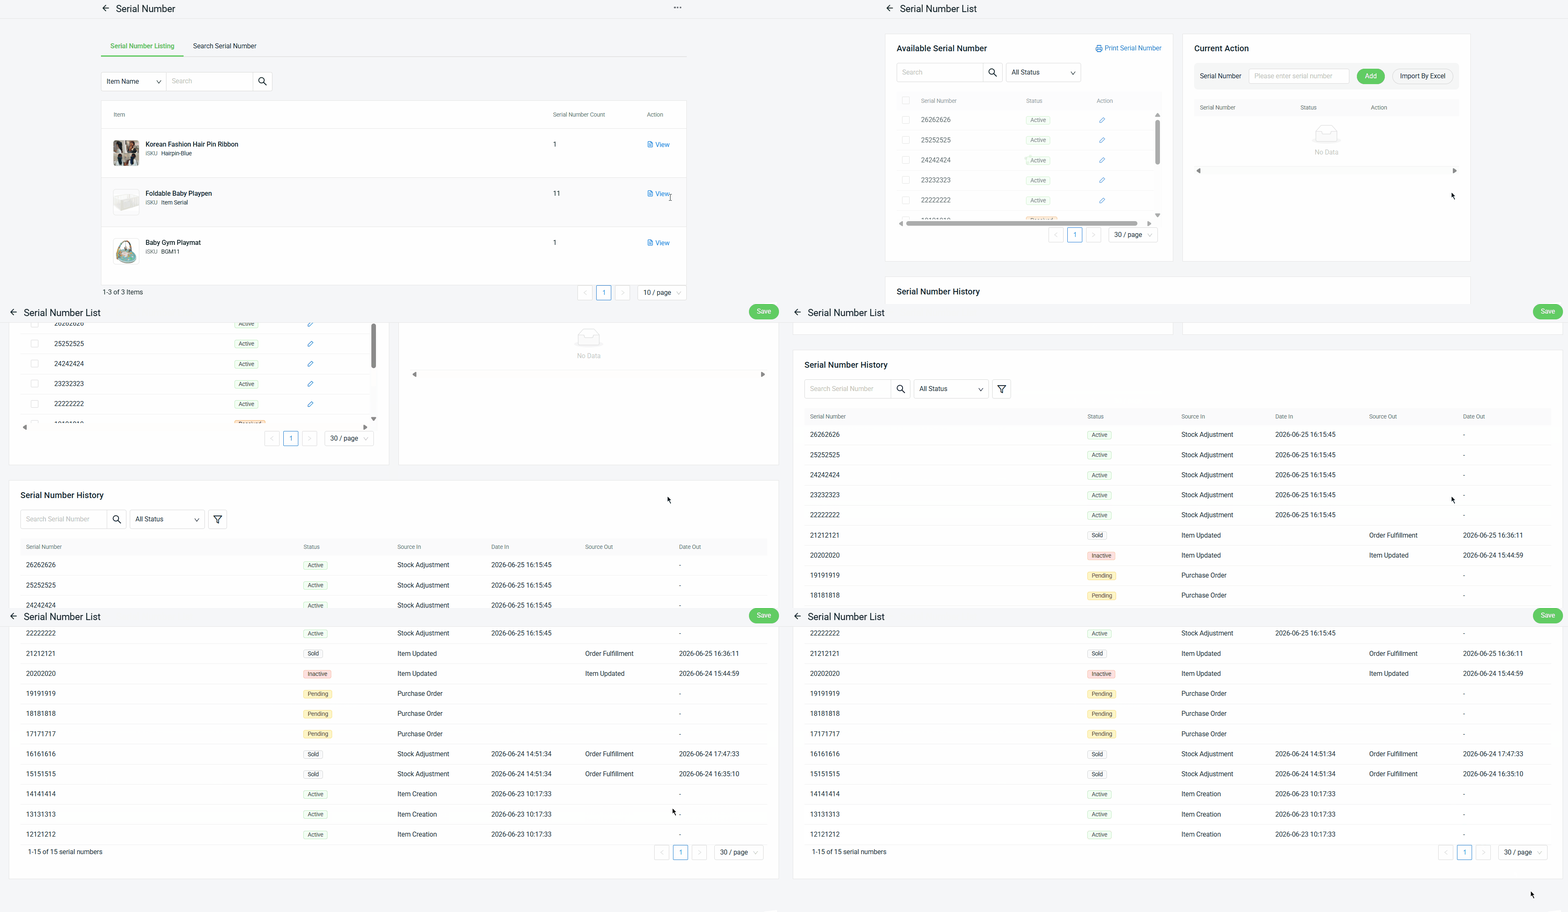
Step 2: Click View to check the item’s serial number list and status.
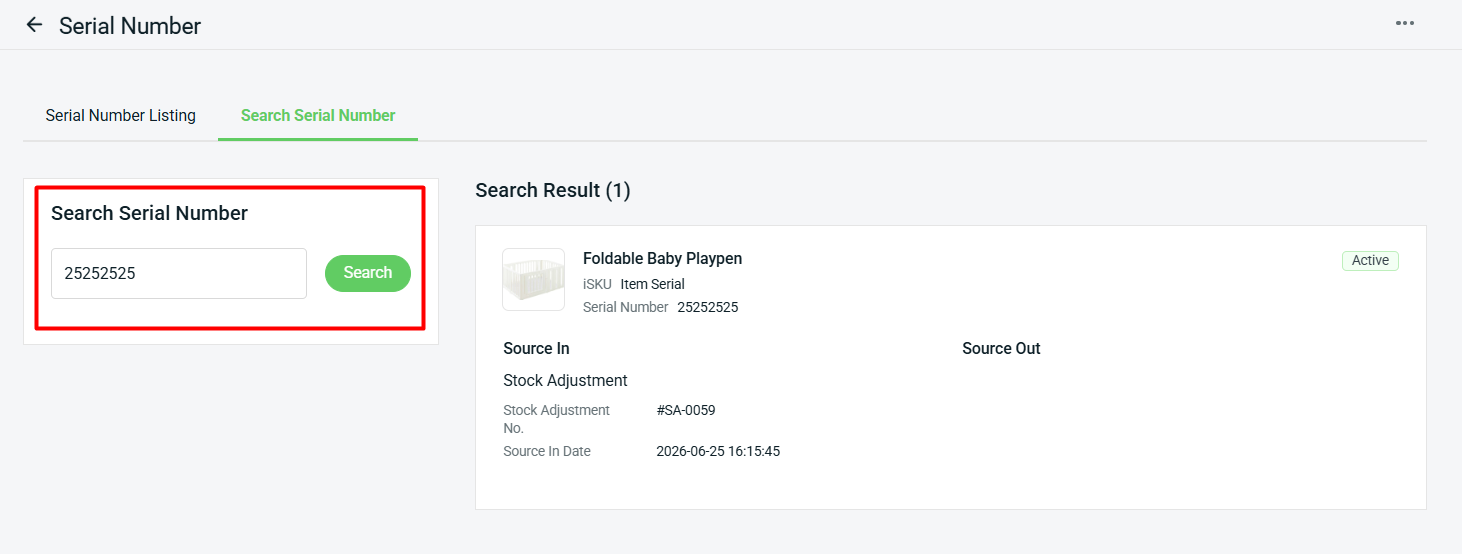
Step 3: If you want to check specific serial number details, go to the Search Serial Number section > enter the Serial Number > Search.
📝Additional Information
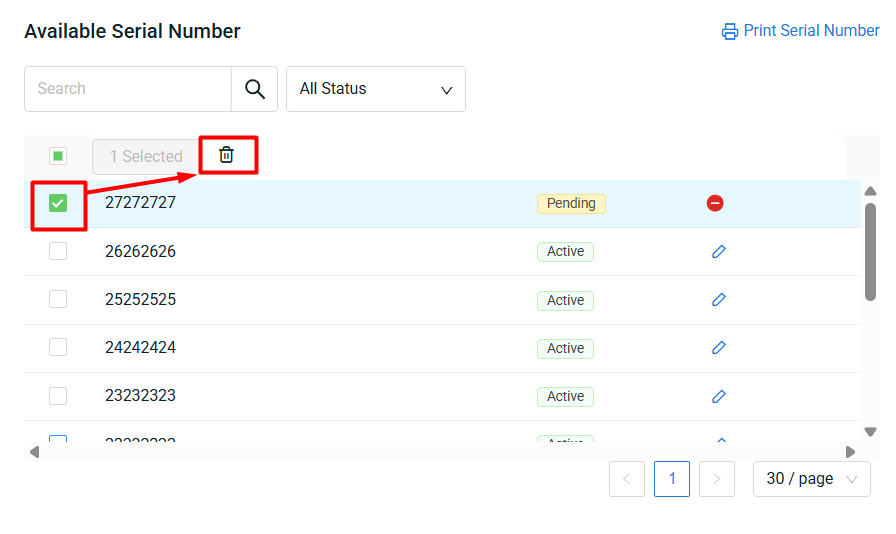
1. Delete Pending Serial Number. The serial number listing can only be deleted if the status is Pending.
Step 1: Tick the Serial Number > click the Delete button.
2. Print Serial Number
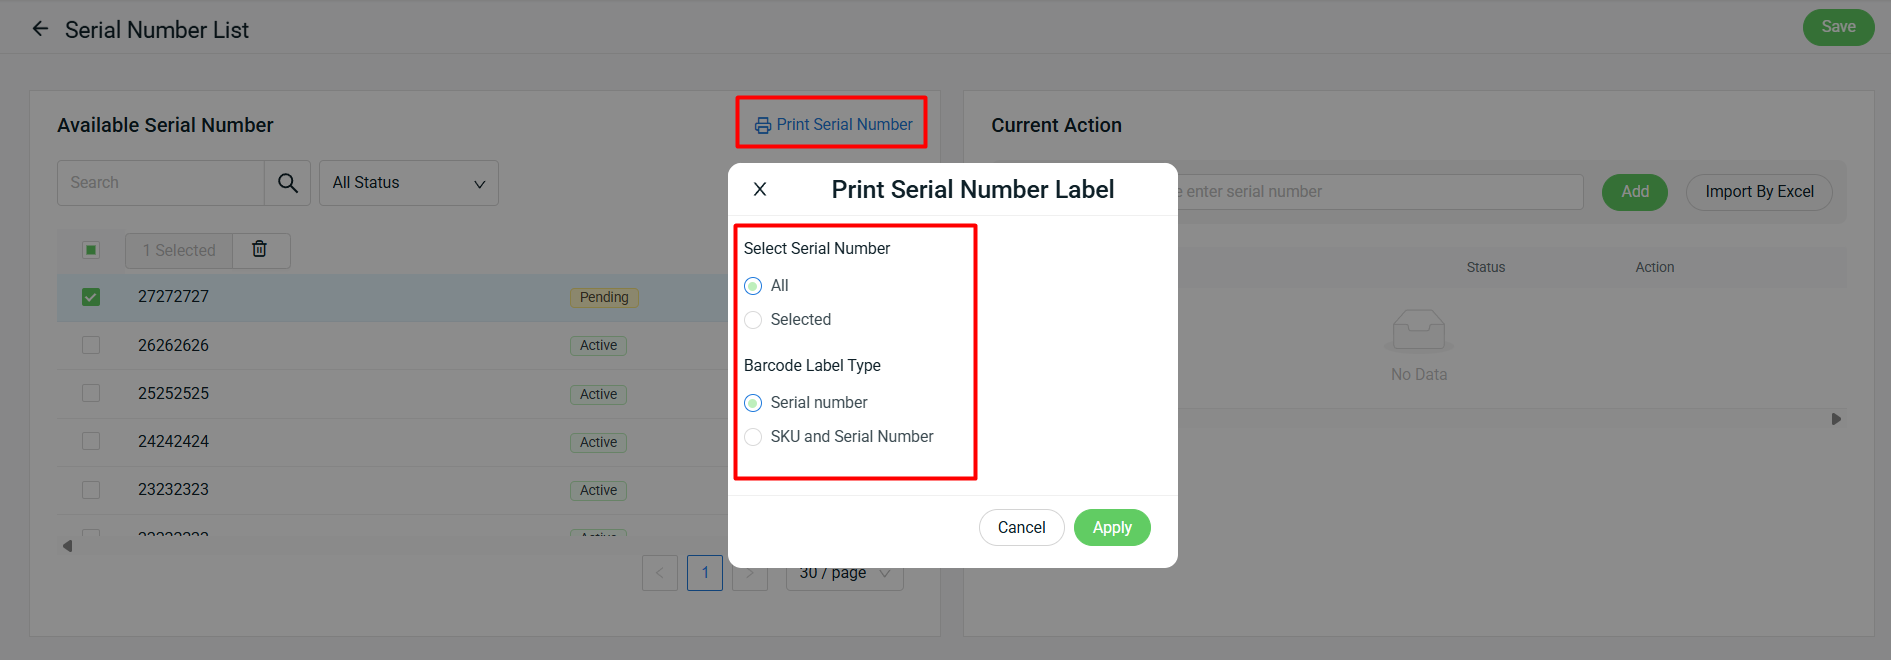
Step 1: Click Print Serial Number > Select Serial Number, either All or Selected > select the Barcode Label Type > Apply.
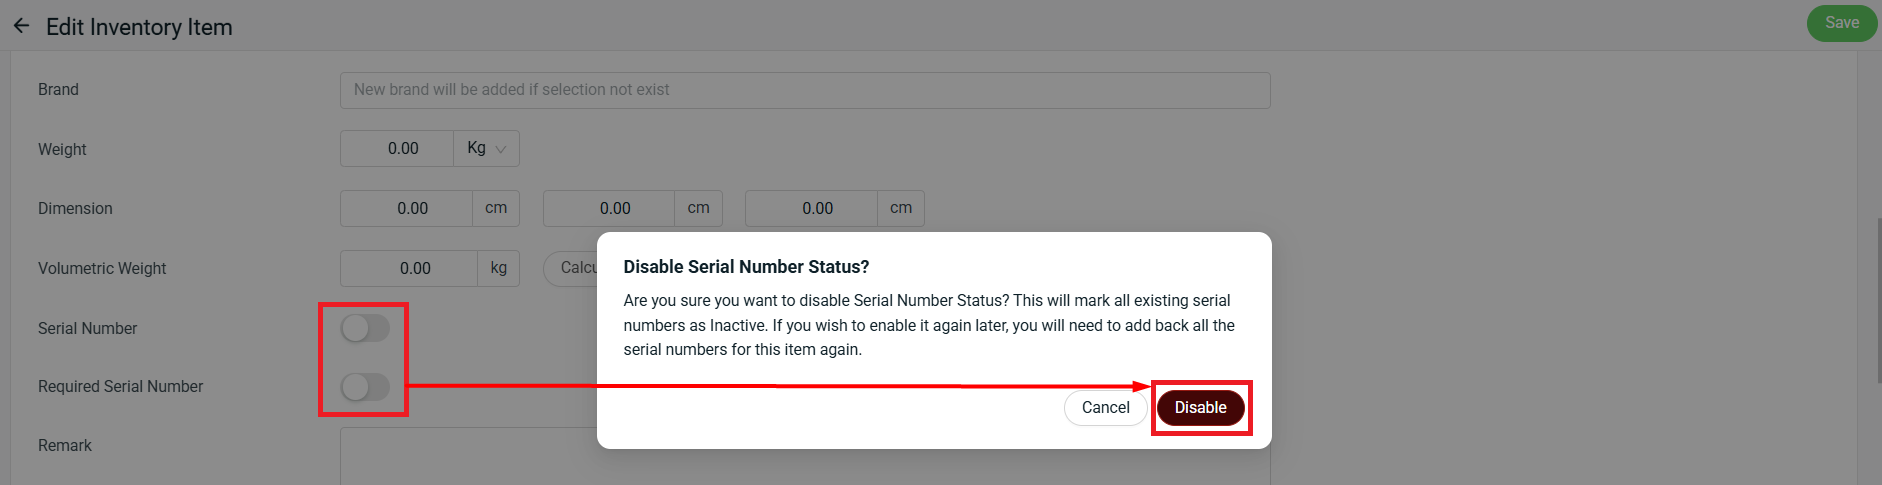
3. Disable Serial Number: Disabling the serial number setting will change all existing serial numbers to Inactive status.